The BME280 sensor with ESP32 is a powerful and widely used combination for building accurate and reliable Environmental Monitoring Systems. The BME280 sensor can measure temperature, humidity, and atmospheric pressure, making it ideal for weather stations, smart homes, and industrial monitoring applications.
In this detailed guide, you will learn how to use the BME280 sensor with ESP32, understand the working principle, circuit diagram connections, and explore real-world applications. This project is highly suitable for ESP32 Projects focused on IoT and smart automation.

Introduction to BME280 Sensor
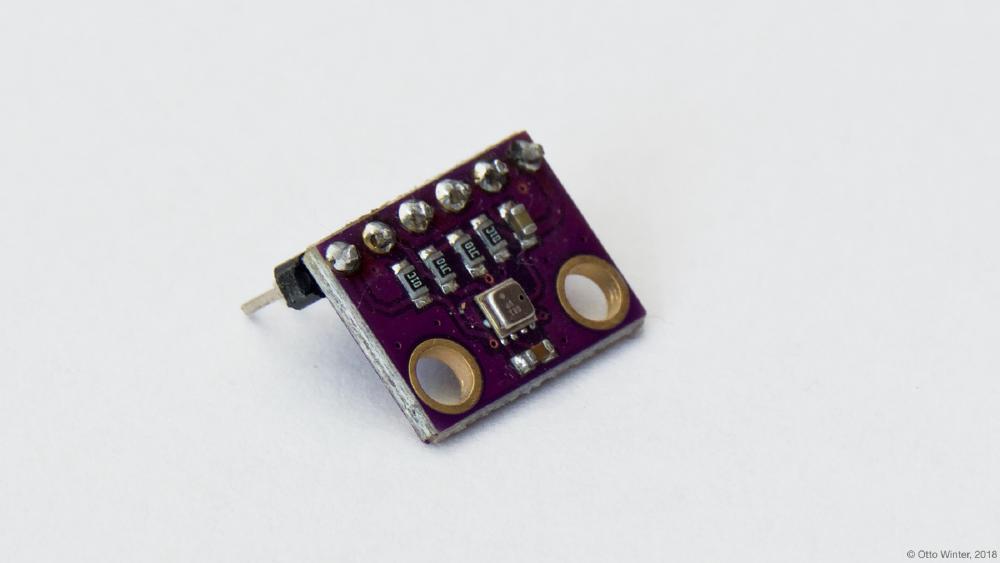
The BME280 is a digital environmental sensor developed by Bosch. It integrates three sensing elements into a single compact module:
- Temperature sensor
- Humidity sensor
- Barometric pressure sensor
Unlike basic temperature sensors, the BME280 provides high accuracy and long-term stability, making it ideal for professional Environmental Monitoring Systems and advanced Smart System designs.
The sensor communicates using I2C or SPI, both of which are fully supported by the ESP32 microcontroller.
Why Use BME280 Sensor?
Using the ESP32 with BME280 sensor offers several advantages:
- ESP32 has built-in Wi-Fi and Bluetooth for IoT connectivity
- Low power consumption suitable for continuous monitoring
- High processing speed and multiple GPIOs
- Perfect for cloud-connected ESP32 Projects
This combination is widely used in smart agriculture, weather stations, indoor air quality monitoring, and industrial automation.
You can also integrate this setup with IoT platforms like Blynk, ThingSpeak, or custom dashboards, similar to projects covered in our
ESP32 Smart Home Automation Project.
Working Principle of BME280 Sensor
The BME280 sensor works by using:
- A band-gap temperature sensor for temperature measurement
- A capacitive humidity sensor for relative humidity
- A piezoresistive pressure sensor for atmospheric pressure
All sensor data is processed internally and sent digitally to the ESP32, eliminating analog noise issues. This makes the BME280 ideal for long-term Environmental Monitoring Systems where accuracy is critical.
Circuit Diagram of BME 280 Sensor With ESP32
Below is a clear explanation of the connections, assuming I2C communication, which is the most commonly used method.
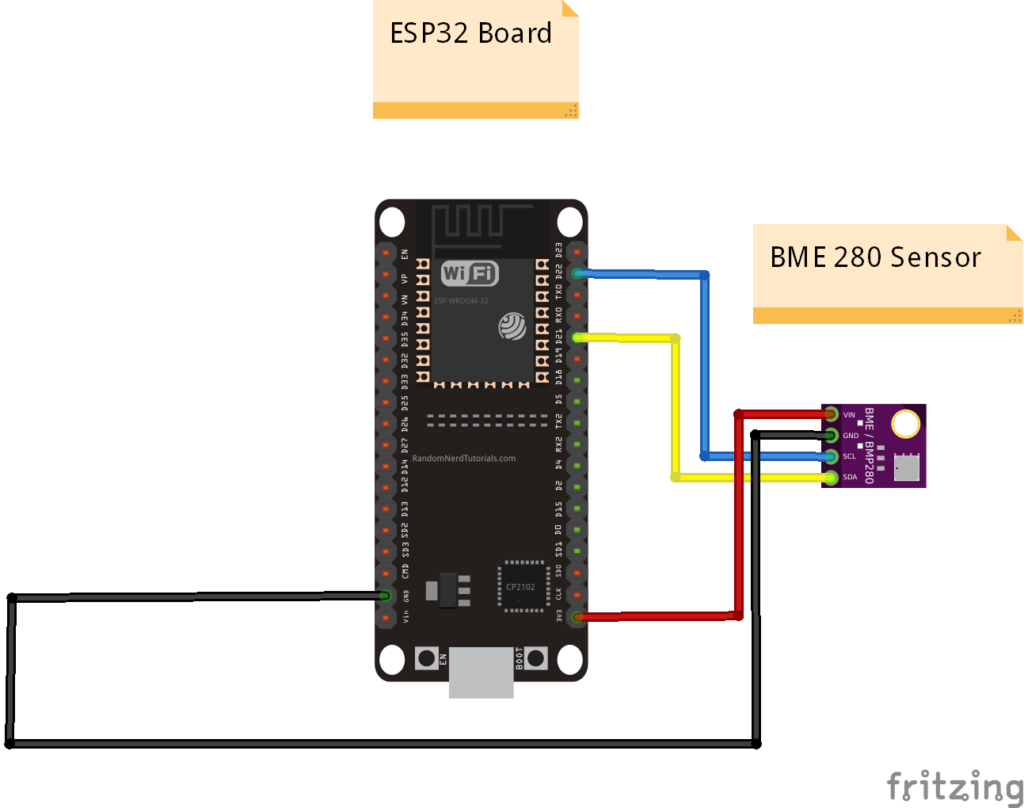
BME280 to ESP32 I2C Connections
- VCC → 3.3V (ESP32)
The BME280 operates safely at 3.3V, which matches the ESP32 logic level. - GND → GND (ESP32)
Common ground connection for stable communication. - SCL → GPIO 22 (ESP32)
This pin acts as the I2C clock line. - SDA → GPIO 21 (ESP32)
This pin is used for I2C data transmission.
Note: GPIO 21 and GPIO 22 are default I2C pins for most ESP32 boards, but they can be changed in software if required.
If your BME280 module includes CS and SDO pins, they can be left unconnected for I2C mode or tied according to the module documentation.
This wiring approach is commonly used across many ESP32 Projects, including weather stations and smart dashboards already published on ArduinoExpert.com.
ESP32 Code for BME 280 Sensor
Since you already have the code, here’s what typically happens in the program:
- ESP32 initializes I2C communication
- BME280 sensor is detected using its I2C address
- Temperature, humidity, and pressure values are read periodically
- Data is displayed on Serial Monitor, LCD, OLED, or sent to IoT platforms
If you are already familiar with ESP32 basics, you may also want to explore Our ESP32 Projects.
#include <Wire.h>
#include <Adafruit_Sensor.h>
#include <Adafruit_BME280.h>

#define SEALEVELPRESSURE_HPA (1013.25)
Adafruit_BME280 bme; // I2C

void setup() {
  Serial.begin(9600);
  Serial.println(F("BME280 Sensor"));

  bool status;

  status = bme.begin(0x76);
  if (!status) {
    Serial.println("Could not find a valid sensor, Please check wiring!");
    while (1);
  }
  Serial.println("-- Test --");
  Serial.println();
}

void loop() {
  printValues();
  delay(2000);
}

void printValues() {
  Serial.print("Temperature = ");
  Serial.print(bme.readTemperature());
  Serial.println(" *C");
  Serial.print("Pressure = ");
  Serial.print(bme.readPressure() / 100.0F);
  Serial.println(" hPa");
  Serial.print("Altitude = ");
  Serial.print(bme.readAltitude(SEALEVELPRESSURE_HPA));
  Serial.println(" m");
  Serial.print("Humidity = ");
  Serial.print(bme.readHumidity());
  Serial.println(" %");
  Serial.println();
}
Applications of BME280 Sensor with ESP32
The BME280 + ESP32 combination is widely used in real-world Smart System designs:
1. Environmental Monitoring Systems
Used to monitor temperature, humidity, and pressure in homes, offices, labs, and industries.
2. Smart Weather Stations
Ideal for DIY and professional weather stations with cloud data logging.
3. Smart Home Automation
Integrates with ESP32-based automation systems to control HVAC, ventilation, or humidifiers.
4. Smart Agriculture and Greenhouses
Helps monitor environmental conditions for crops, improving yield and energy efficiency.
Check Out our Irrigation Scheduling and Water Pumps Control Project
5. Industrial Monitoring Systems
Used in warehouses, cold storage, and factories to ensure optimal environmental conditions.
6. IoT Data Logging Systems
Sensor data can be uploaded to platforms like ThingSpeak, Firebase, or custom web servers using ESP32 Wi-Fi.
Advantages of Using BME280 in ESP32 Projects
- High accuracy and reliability
- Compact and low power consumption
- Supports both I2C and SPI
- Ideal for long-term Environmental Monitoring Systems
- Perfect sensor for professional ESP32 Projects
Conclusion
Using the BME280 sensor with ESP32 is one of the best ways to build accurate, reliable, and scalable Environmental Monitoring Systems. Whether you are designing a smart weather station, home automation setup, or industrial monitoring solution, this sensor provides excellent performance with minimal complexity.
Thanks to the ESP32’s built-in Wi-Fi capabilities, this project easily scales into a complete Smart System with cloud connectivity and remote monitoring. It is an essential project for anyone serious about IoT and advanced ESP32 Projects.
Need Assistance in Setup of BME280 Sensor with ESP32?
If you need any Help or Assistance for Setup BME280, with Modifications or Customization then you can contact us through WhatsApp. We can deliver you this Project in the Following Ways.
Leann More about Services we Offer.