Desktop pet robots have become an exciting project idea for makers, students, electronics learners, and hobbyists who want to combine coding, hardware, 3D design, and creativity into one small device. A desktop pet is not a large moving robot. It is a compact interactive companion that sits on a desk and uses expressions, simple reactions, touch input, animations, or small games to feel alive.
In this project guide, we will explain how to make a cute ESP32 desktop pet robot using an OLED display, TTP223 touch sensor, LiPo rechargeable battery, USB Type-C charging module, and a 3D printed casing. The idea is to build a small robot-style desk buddy that can show animated eyes, respond to touch, run a focus/timer mode, and even include a mini game such as Snake on the OLED screen.
This type of project is useful because it covers multiple practical skills in one build. You learn how to connect an OLED screen with ESP32 C3 Super Mini, how to read input from a touch sensor, how to create simple animations, how to manage different program modes, how to power a compact device with a rechargeable battery, and how to design a custom 3D printed enclosure that fits real electronic components.
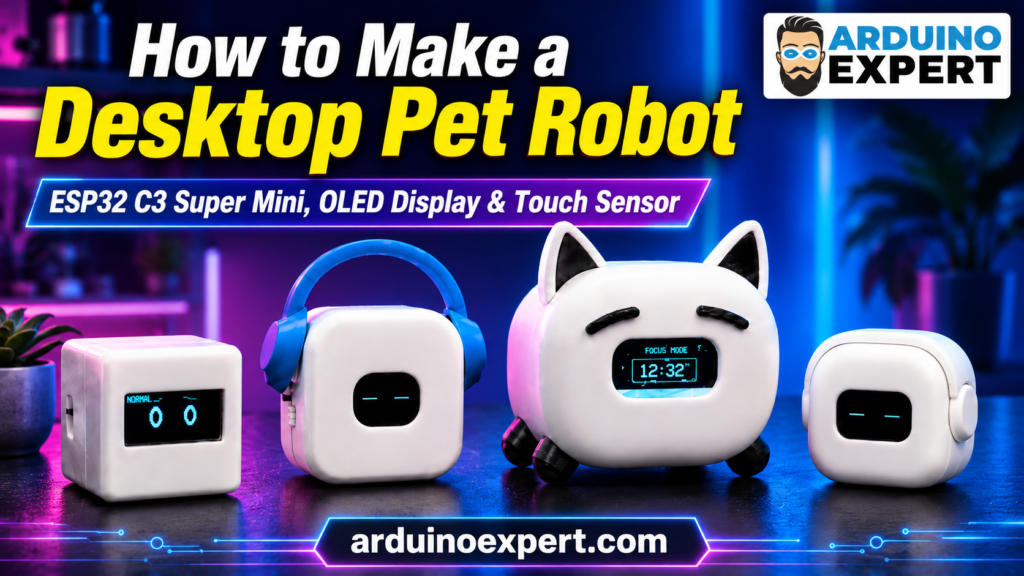
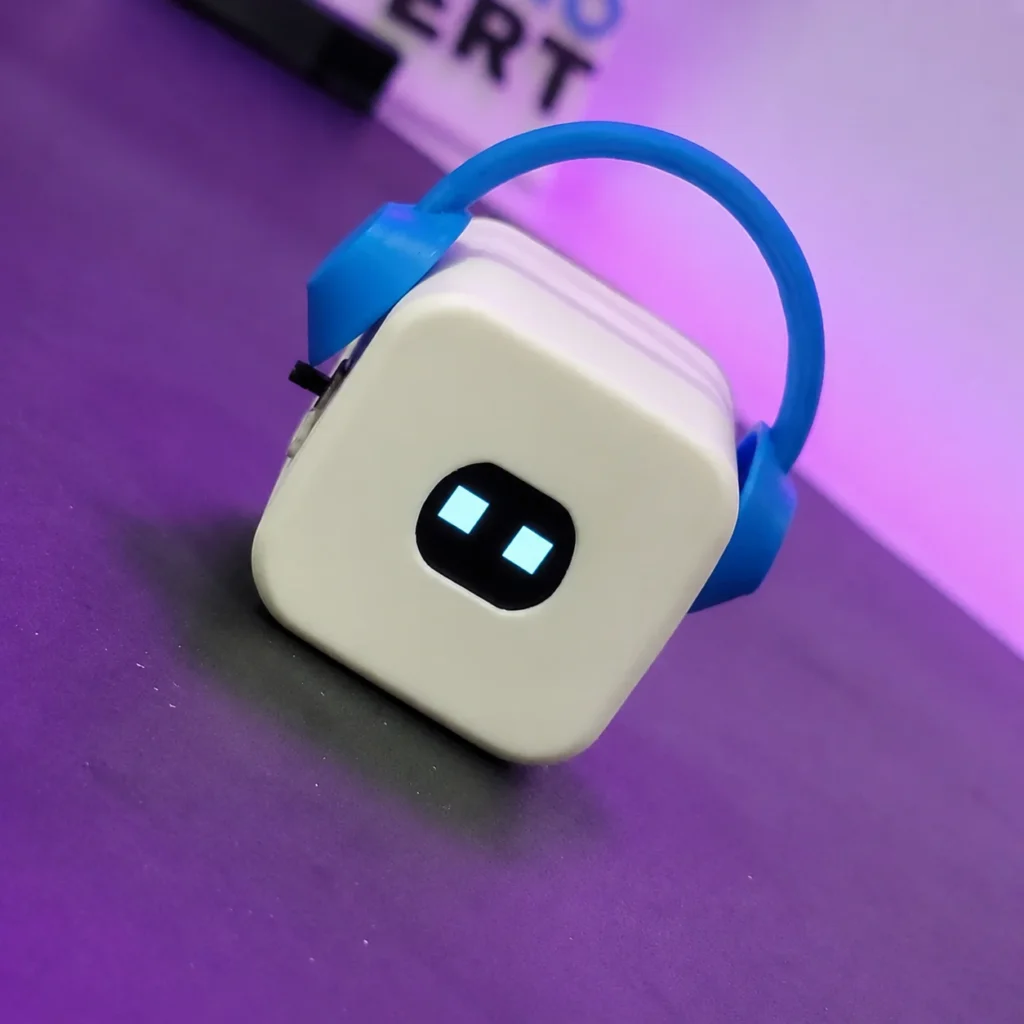
The best part of this project is that the same electronic concept can be used to create many different body styles. You can make a simple cube robot, a cat-style desktop pet, a headphone-style robot, a rounded pod shape, or any custom character casing. The personality of the robot comes from both the OLED animations and the physical design of the enclosure.
This article is written as an educational project guide. It will help you understand the complete concept behind a DIY desktop pet robot, including the components, circuit idea, firmware logic, 3D casing design, 3D printing considerations, assembly process, testing, and customization possibilities.
What Is a Desktop Pet Robot?
A desktop pet robot or desktop pet buddy is a small electronic companion designed to sit on a desk, table, shelf, workstation, study area, or gaming setup. Unlike traditional robots that focus on walking, moving arms, or complex mechanical functions, a desktop pet robot focuses mainly on personality, interaction, expression, and compact design.
The most important part of a desktop pet is how it feels to the user. Even with simple hardware, a small robot can feel cute and interactive if it has expressive eyes, blinking animation, touch response, a few behavior modes, and a friendly body shape. This is why many desktop pet projects use an OLED display as the robot’s face. The display allows the robot to show eyes, emotions, text, menus, timers, or mini game graphics without needing moving mechanical parts.
A desktop pet robot can be used in different ways. For students, it can be a fun STEM learning project. For makers, it can be a compact ESP32 or Arduino project. For office users, it can be a cute desk buddy. For programmers, it can be a small focus companion. For gift buyers, it can be a unique tech gadget. For schools or labs, it can be used to introduce basic electronics, coding, 3D printing, and embedded systems.
A typical desk buddy may include features such as:
- Animated OLED eyes
- Cute expressions and mood changes
- Touch-based interaction
- Simple menu or mode switching
- Focus/timer mode for study or work
- Mini games such as Snake
- Rechargeable battery
- USB charging
- 3D printed body
- Custom colors and shapes
Desktop Pet Project Overview
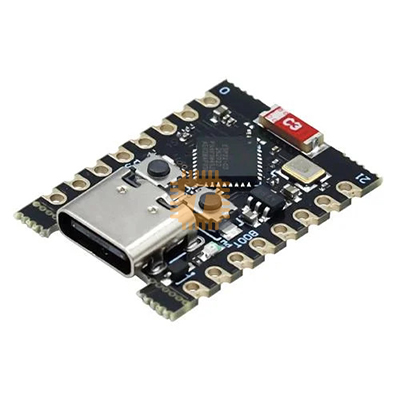
In this project, the ESP32 C3 Super Mini works as the brain of the desktop pet robot. It controls the OLED display, reads the touch sensor, manages different modes, and runs the logic for animations, focus timer, and mini game functions.
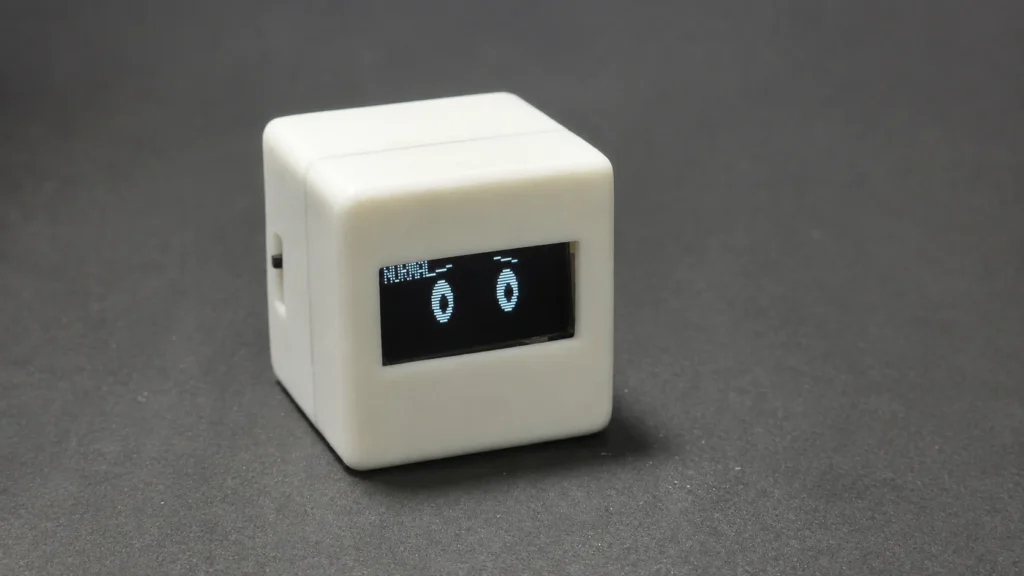
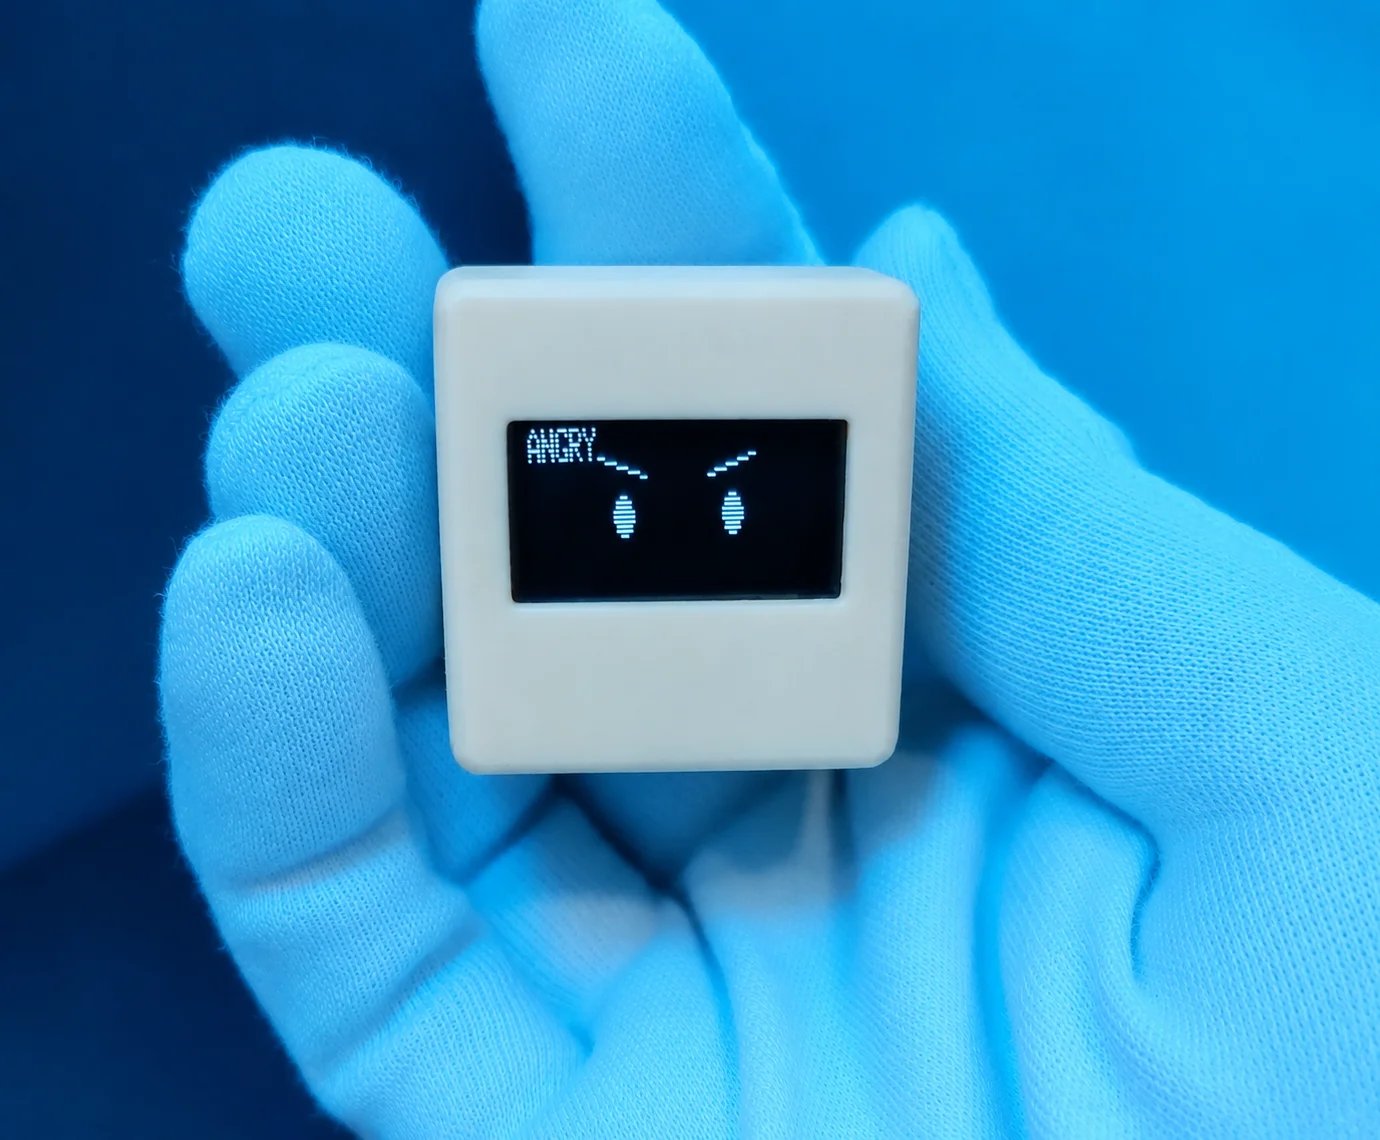
The OLED display works as the face of the pet. Instead of using physical eyes, the display draws digital eyes and expressions. By changing the shape, size, position, or movement of the eyes, the robot can appear happy, sleepy, angry, surprised, normal, or playful. Small changes in animation can make the device feel more alive.
The TTP223 touch sensor works as the user input. Because it is touch-based, the final design can stay clean without large mechanical buttons. The touch sensor can be used to change expressions, start a timer, switch modes, wake the pet, or control a simple game. It is a good choice for small projects because it is compact and easy to connect with ESP32 C3 Super Mini.
The LiPo battery provides portable power, allowing the desktop pet to work without being connected to USB all the time. A small battery around 100mAh can be used for compact versions, while larger custom designs can use bigger battery capacity if there is enough internal space. The USB Type-C charging module makes charging more modern and convenient.
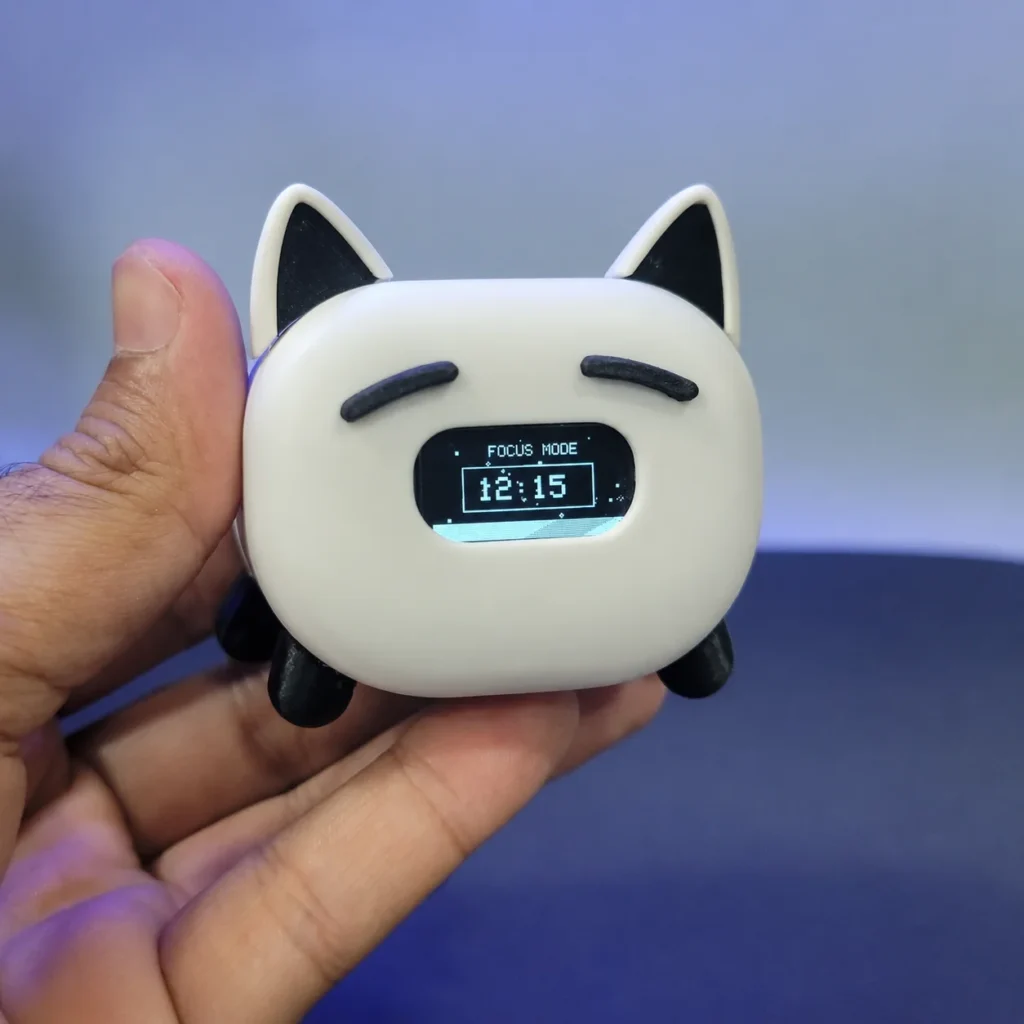
The 3D printed casing is the body of the desktop pet. This is where the project becomes more creative. The same circuit can be placed inside different casing styles. For example, a cube-shaped casing can create a minimal robot, a cat-shaped casing can create a playful pet, and a headphone-inspired casing can create a modern gadget-style robot. The casing must be designed carefully so the OLED screen, touch sensor, battery, switch, charging port, and internal wiring all fit properly.
Main Functions of Arduino Expert Desktop Pet Buddy Project
This desktop pet project can include:
- Animated OLED eyes
- Multiple expressions such as happy, sleepy, angry, cute, normal, and surprised
- Touch sensor control
- Focus/timer mode
- Mini Snake game
- Startup screen
- Rechargeable battery
- USB Type-C charging
- Custom 3D printed body
Components Required for making Desktop Pet Robot
Below is a typical component list for this project.
| Component | Purpose |
|---|---|
| ESP32 C3 Super Mini | Main controller for display, touch input, and logic |
| OLED Display (0.96 inch) | Shows eyes, text, game screen, and animations |
| TTP223 Touch Sensor | Used for touch interaction and mode switching |
| LiPo Battery | Provides portable power |
| Tp4056 Charging Module | Charges the LiPo battery safely |
| USB Type-C Port/Module | Charging input |
| Switch Button | Turns the pet on and off |
| Wires | Connect components |
| 3D Printed Body | Holds all components inside the casing |
| Screws or adhesive | Used for assembly depending on casing design |
For compact desktop pets, a small battery around 100mAh can be used, but battery size may be increased if you want the increase body size of pet.
Circuit Diagram of ESP32 C3 Super Mini with Touch Sensor and OLED for Desk Buddy
The circuit is simple and suitable for beginners who already have basic Arduino or ESP32 experience.
The ESP32 Mini is the main controller. The OLED display connects to the ESP32 using I2C communication. The TTP223 touch sensor connects to one digital GPIO pin. The LiPo battery powers the system through a charging/protection module, and the switch is used to turn the pet on or off.
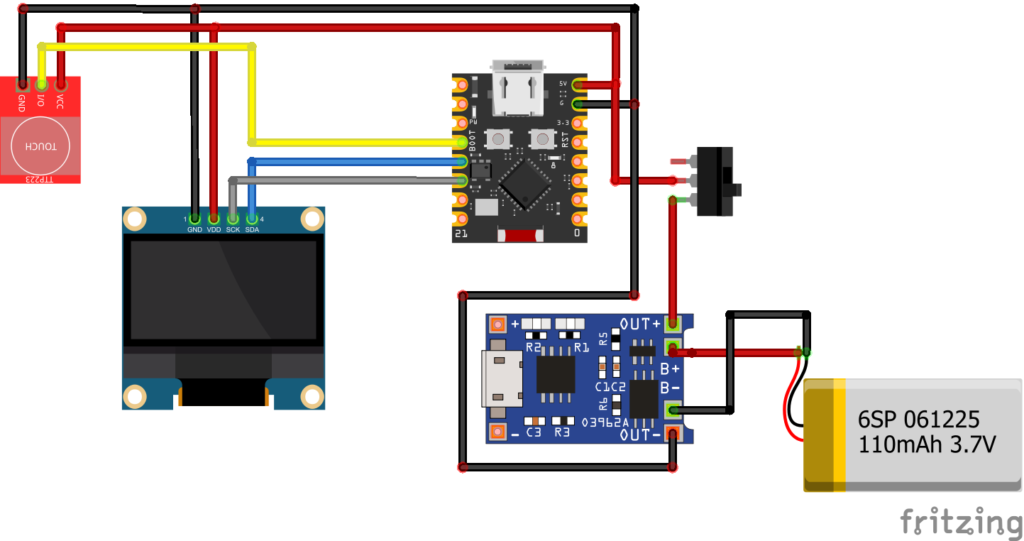
Basic Connection Flow
- OLED display connects to ESP32 through I2C pins.
- Touch sensor signal pin connects to a digital GPIO pin.
- Battery connects to the charging module.
- Charging module output powers the ESP32.
- Power switch is placed between the power output and circuit supply.
- All grounds must be common.
Example Wiring Table
| Module | Pin | Connects To |
| OLED | VCC | 3.3V or 5V depending on OLED module |
| OLED | GND | ESP32 GND |
| OLED | SCL/SCK | GPIO9/SCL ESP32 I2C clock pin |
| OLED | SDA | GPIO8/ESP32 I2C data pin |
| TTP223 | VCC | 3.3V or 5V |
| TTP223 | GND | ESP32 GND |
| TTP223 | I/O | ESP32 C3 any digital GPIO pin |
| Battery | B+ / B- | Charging module battery input |
| Charging Module | OUT+ / OUT- | Power output to ESP32 circuit |
| Switch | Positive line | On/off control |
Pin numbers can change depending on the ESP32 board you are using. In your code, keep the OLED I2C pins and touch sensor pin consistent with your wiring.

How the OLED Face Works
The OLED display is the main personality element of the desktop pet. Instead of using mechanical eyes, the robot uses graphics drawn on the OLED screen.
The ESP32 can draw different shapes using an OLED graphics library. For example:
- Circles for normal eyes
- Bigger circles for cute eyes
- Lines for sleepy eyes
- Triangles or slanted shapes for angry eyes
- Rectangles for robotic eyes
- Blinking animation using short horizontal lines
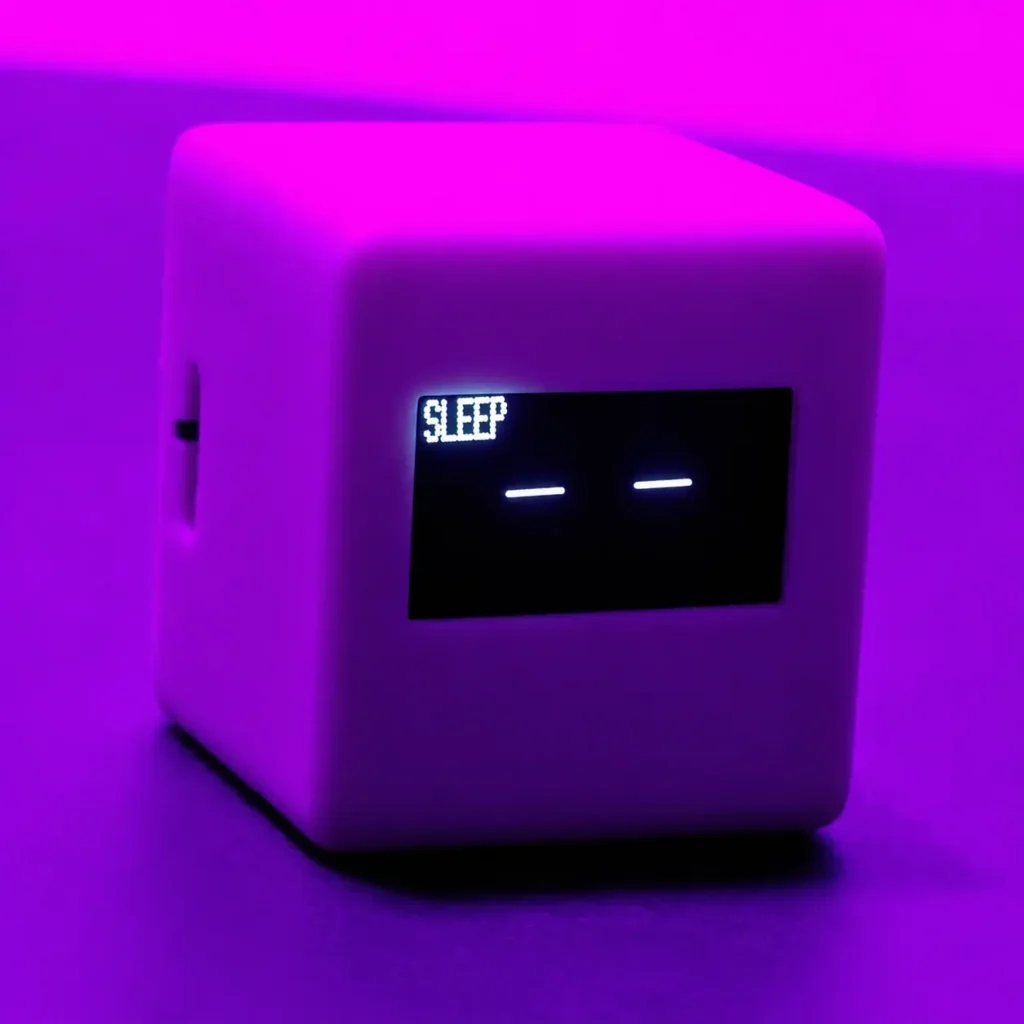
- Text labels such as “HAPPY,” “SLEEP,” or “FOCUS MODE”
The key idea is simple: clear the display, draw the new face, then update the screen.
Common Expression Modes in Arduino Expert Desktop Pet
A desktop pet can show:
- Normal eyes
- Cute eyes
- Sleepy eyes
- Angry eyes
- Happy eyes
- Surprised eyes
- Blinking eyes
- Moving pupils
These small visual changes make the pet feel expressive and alive.
Touch Interaction Logic
The touch sensor allows the user to interact with the pet without mechanical buttons. A TTP223 touch module is commonly used because it is small and easy to connect.
The touch input can be used for:
- Changing expression style
- Starting the Snake game
- Switching to focus timer mode
- Waking the pet from sleep mode
- Increasing happiness in mood logic
- Changing game direction
A simple logic is:
- Read the touch sensor.
- Detect a new touch press.
- Change the current mode or expression.
- Update the OLED display.
It is better to detect a fresh touch press instead of continuously reading HIGH state, otherwise one long touch may trigger many actions.
Firmware Logic
The firmware can be divided into small sections.
1. Startup Screen
When the pet turns on, the OLED can show a short boot screen such as:
- Desktop Pet
- Booting…
- Touch to Start
This gives the device a more polished feel.
2. Animation Mode
In animation mode, the ESP32 displays different eye styles and expressions. Touch input can switch between styles.
Example logic:
- Touch once: normal eyes
- Touch again: cute eyes
- Touch again: sleepy eyes
- Touch again: angry eyes
- Touch again: happy eyes
- Touch again: surprised eyes
Random blinking and small pupil movement can also be added to make the pet feel more natural.
3. Mood Mode
A more advanced version can use simple mood variables such as:
- Happiness
- Hunger
- Sleepiness
- Energy
These are not real emotions, but simple values inside the program. Over time, happiness may decrease and hunger may increase. When the user touches the pet, happiness can increase again.
This creates a basic digital pet behavior.
4. Focus/Timer Mode
Focus mode is useful for students, programmers, and office users. The OLED can display a countdown timer for study or work sessions.
For example:
- Focus Mode
- 15:00
- 25:00
- Break Time
This makes the desktop pet more practical, not just decorative.
5. Mini Snake Game
A small Snake game can be created on the OLED screen using a grid system. The touch sensor can change the snake direction. The ESP32 stores the snake position, food location, score, and high score.
Basic Snake game logic includes:
- Draw snake on OLED grid
- Move snake after a fixed delay
- Detect wall collision
- Detect self collision
- Spawn food randomly
- Increase score when food is eaten
- Save high score if required
- Show game over screen
This feature makes the pet more interactive and fun.
ESP32 Code for Desktop Pet
For a clean project, divide the code into sections like this:
#include <Wire.h>
#include <Adafruit_GFX.h>
#include <Adafruit_SSD1306.h>

#define SCREEN_WIDTH 128
#define SCREEN_HEIGHT 64

#define TOUCH_PIN 6

Adafruit_SSD1306 display(SCREEN_WIDTH, SCREEN_HEIGHT, &Wire, -1);

int eyeStyle = 0;
bool lastTouch = LOW;

void setup() {

  pinMode(TOUCH_PIN, INPUT);

  display.begin(SSD1306_SWITCHCAPVCC, 0x3C);
  display.clearDisplay();
}

void loop() {

  bool touch = digitalRead(TOUCH_PIN);

  if (touch == HIGH && lastTouch == LOW) {
    eyeStyle++;
    if (eyeStyle > 5) eyeStyle = 0;
  }
..........Contact Arduino Expert for Full Code.........
3D Design of the Desktop Pet Casing
The casing is one of the most important parts of a desktop pet. The electronics make it work, but the body shape gives it character.
A desktop pet casing should be designed around the components, not the other way around. Before making the outer design, measure all internal parts:
- ESP32 Mini board
- OLED display
- Touch sensor
- Battery
- Charging module
- Switch
- Wiring space
- USB Type-C charging access
- Screws or locking points
Important 3D Design Considerations for Desk Buddy
1. OLED Display Opening
The front face should have a clean rectangular window for the OLED screen. The display should fit tightly but not be forced into place. Leave a small tolerance around the screen because 3D prints are not always exact.
2. Internal Space
Small pets look cute, but very small bodies are difficult to assemble. Make sure there is enough internal space for wires, battery, and charging module.
3. Charging Port Access
The USB Type-C charging port should be easy to access from the side or back. Do not place it too deep inside the casing.
4. Switch Placement
The switch should be reachable but not too visible from the front. Side or back placement usually looks cleaner.
5. Touch Sensor Position
The touch sensor can be placed under a thin plastic wall or near the top/body surface. If the wall is too thick, touch sensitivity may reduce.
6. Battery Safety Space
Do not compress the LiPo battery inside the casing. Leave enough room so the battery is not bent, pressed, or damaged during assembly.
7. Snap-Fit or Screw Design
For prototypes, a simple friction-fit cover may work. For a better product, screw holes or a removable back cover are more practical.
8. Character Shape
Once the internal layout is ready, you can create different outer designs:
- Cube shape
- Cat shape
- Headphone style
- Rounded pod shape
- Custom character body
- Branded mascot shape
This is how one electronics platform can support many different desktop pet designs.
3D Printing the Casing
Most desktop pet casings can be printed using PLA because it is easy to print, affordable, and available in many colors.
Recommended 3D Printing Settings
| Setting | Suggested Value |
| Material | PLA or PLA+ |
| Layer Height | 0.16mm to 0.2mm |
| Infill | 15% to 25% |
| Walls | 2 to 3 perimeters |
| Supports | Only where needed |
| Print Speed | Medium speed for better finish |
| Nozzle | 0.4mm standard nozzle |
Surface Finish Tips for casing
To make the casing look more premium:
- Use lower layer height for smoother print
- Sand visible surfaces lightly
- Clean stringing and rough edges
- Use primer before painting if needed
- Use acrylic or glossy black sheet for the face window if desired
- Avoid sharp edges; rounded corners look more friendly
Fit Testing
Before printing a final batch, print only small test parts:
- OLED window test
- USB Type-C opening test
- Switch slot test
- Back cover fit test
This saves time and filament.
Assembly of Desktop Pet
A typical assembly flow can be:
- Print the casing parts.
- Clean the printed body.
- Test-fit the OLED display.
- Test-fit the ESP32 Mini.
- Fit the battery and charging module.
- Install the switch.
- Connect OLED, touch sensor, power, and ground wires.
- Upload firmware to ESP32.
- Test all modes before closing the casing.
- Close the casing using screws, clips, or adhesive.
- Perform final charging and function test.
Do not permanently close the casing before testing the circuit.
Testing Checklist for Desktop Pet
Before final use, test the following:
- OLED turns on properly
- Startup screen appears
- Touch sensor responds correctly
- Expressions change correctly
- Focus timer starts and displays properly
- Snake game starts and responds to touch
- Charging module works
- Battery powers the device
- Switch turns the pet on and off
- USB Type-C port is accessible
- No wires are loose inside the casing
- Display is aligned with the front opening
Common Problems and Troubleshooting
OLED Display Not Turning On
Check:
- OLED VCC and GND
- SDA and SCL wiring
- OLED I2C address, commonly 0x3C
- Correct screen size in code
- Loose soldering or jumper wires
Touch Sensor Not Working
Check:
- Touch sensor VCC and GND
- Correct GPIO pin in code
- Sensor output logic
- Touch pad placement inside casing
- Casing wall thickness over sensor
ESP32 Keeps Restarting
Possible reasons:
- Weak battery
- Loose power wire
- Battery voltage too low
- Short circuit
- Power module not supplying stable output
Battery Not Charging
Check:
- Battery polarity
- Charging module input
- USB cable and charger
- Charging port soldering
- Battery connector
Display Is Misaligned
Check:
- OLED mounting position
- Front window size
- Internal support ribs
- Display thickness
- Casing tolerances
Safety Notes
Because this project uses a LiPo battery, basic safety is important.
- Do not short the battery wires.
- Do not puncture or bend the battery.
- Do not charge a damaged battery.
- Use a proper charging module.
- Check polarity before connecting power.
- Keep the battery away from heat.
- Do not leave damaged electronics connected to power.
If you are a beginner, test the circuit through USB first before using battery power.
Customization of Desktop Pet Robot
Once the basic desktop pet is working, you can customize it in many ways.
Hardware Customization
- Larger battery
- Different OLED size
- Buzzer for sound
- RGB LED
- More touch pads
- Small speaker
- Additional buttons
- Light sensor
Software Customization
- More expressions
- Custom startup name
- Personal logo
- Study timer presets
- Game menu
- Sleep mode
- Pet mood system
- Score saving
- Special animations
Body Customization
- Cube robot body
- Cat body
- Headphone-style body
- Mini pod shape
- Custom mascot
- Custom color
- Custom name plate
This flexibility makes the ESP32 desktop pet a good STEM, Arduino, robotics, and 3D printing project.
Final Result
After assembly, you will have a small ESP32-powered desktop pet robot with an OLED face, touch interaction, focus/timer mode, mini game feature, rechargeable battery, and custom 3D printed casing.
It can be used as:
- A cute desk buddy
- A mini robot pet
- A STEM learning project
- An Arduino/ESP32 practice project
- A coding and electronics demo
- A unique handmade tech gift
Do you need STL Files or ESP32 Code?
If you want the STL files for the 3D printed desktop pet casing or the ESP32 code for OLED animations, touch interaction, focus/timer mode, or mini game features, you can contact Arduino Expert directly.
We can provide project files, custom firmware, modified code, or customized 3D designs based on your requirements. Whether you want to build your own desktop pet, customize the body shape, change animations, or create a special version, we can help you with the required files and guidance.
For STL files, ESP32 code, or custom desktop pet development, contact us on WhatsApp
Want a Ready-Made Desktop Pet?
If you like the idea but do not want to build it from scratch, Arduino Expert also offers ready-made DeskPets.
Available models include:
Each ready-made DeskPet includes OLED animated expressions, touch interaction, focus/timer mode, mini Snake game, USB Type-C charging, and a compact 3D printed body.
You can explore the full DeskPets Series or contact Arduino Expert on WhatsApp to order a ready-made version.
Conclusion
Building a desktop pet robot with an ESP32, OLED display, touch sensor, rechargeable battery, and 3D printed casing is a great project for anyone interested in electronics, coding, robotics, and product design. This project is small in size, but it covers many practical concepts, including display control, touch input, power management, firmware modes, game logic, 3D design, 3D printing, and final assembly.
The most interesting part of this project is that the same basic circuit can be used to create many different desktop pet styles. By changing the casing design, OLED animations, colors, and firmware behavior, you can create a simple cube robot, a cat-style pet, a headphone-style desk buddy, or a fully custom character.
This project is also a good example of how hardware and creativity work together. The ESP32 controls the logic, the OLED screen gives the pet its expressions, the touch sensor makes it interactive, and the 3D printed body gives it personality. With careful design and testing, a simple circuit can become a fun, useful, and attractive desktop companion.
Whether you build it for learning, personal use, STEM education, or as a custom tech gift, an ESP32 desktop pet robot is a practical and enjoyable project that can be improved and customized in many ways.
Frequently Asked Questions (FAQs)
Can beginners make this ESP32 desktop pet project?
Yes, beginners can make a basic version if they understand simple wiring, Arduino IDE setup, and ESP32 programming. The casing and battery assembly may require extra care.
Which display is used in this project?
A small OLED display is used as the face of the desktop pet. It shows animated eyes, expressions, text, timer, and game graphics.
Can I use Arduino instead of ESP32?
Yes, a basic version can be made with Arduino boards, but ESP32 is more compact and powerful for advanced features.
Does this project need a mobile app?
No, this desktop pet can work without a mobile app.
Can I add sound?
Yes, you can add a buzzer or small speaker if you want sound effects.
Can I use a larger battery?
Yes, but the casing must have enough internal space, and the charging circuit should be suitable for the battery used. or size of pet should be increased.
Is 3D printing required?
3D printing is not required for testing the circuit, but it is strongly recommended for making a clean final desktop pet body.
Can the casing be customized?
Yes, the casing can be designed in different shapes, colors, and sizes depending on your idea and component layout.