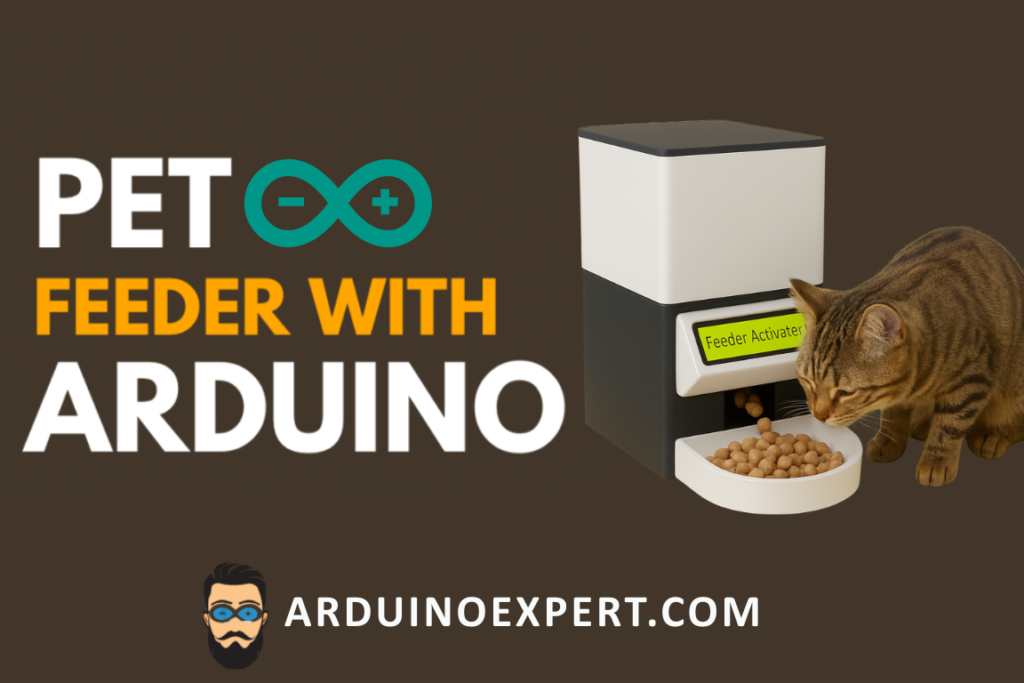
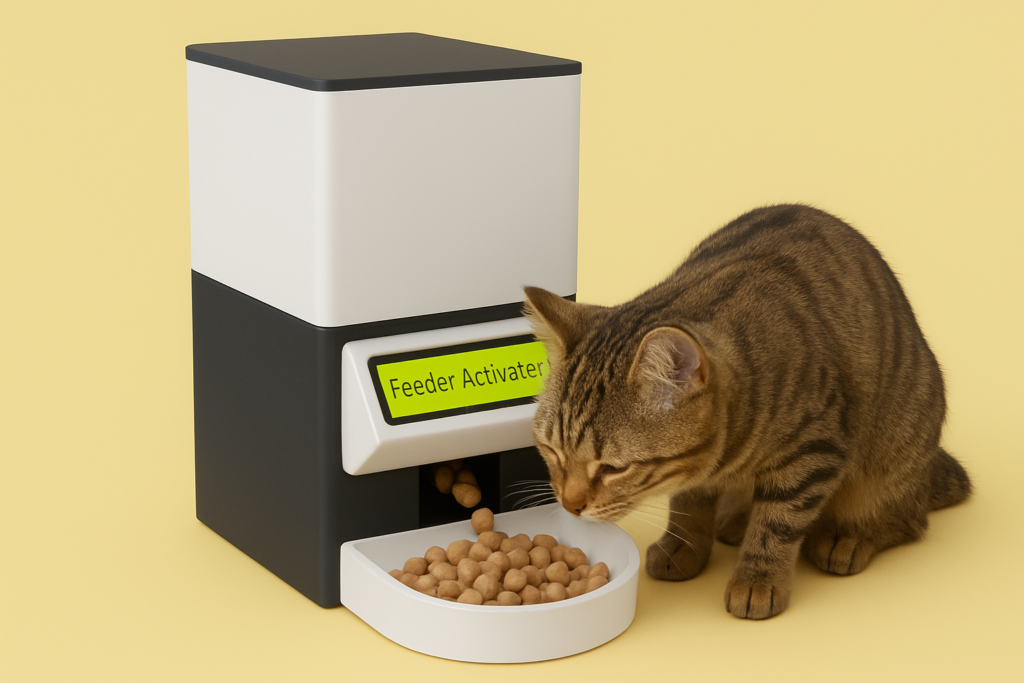
Are you concerned about feeding your pet when you’re away from home? This DIY Arduino Automatic Pet Feeder is the perfect solution for pet owners who want to ensure their pets are fed on schedule. In this project, you’ll learn how to build a programmable Arduino Automatic Pet Feeder that dispenses food at specified times using an Arduino, a Servo Motor, RTC Module, Keypad and a few other components with the help of Arduino programming language.
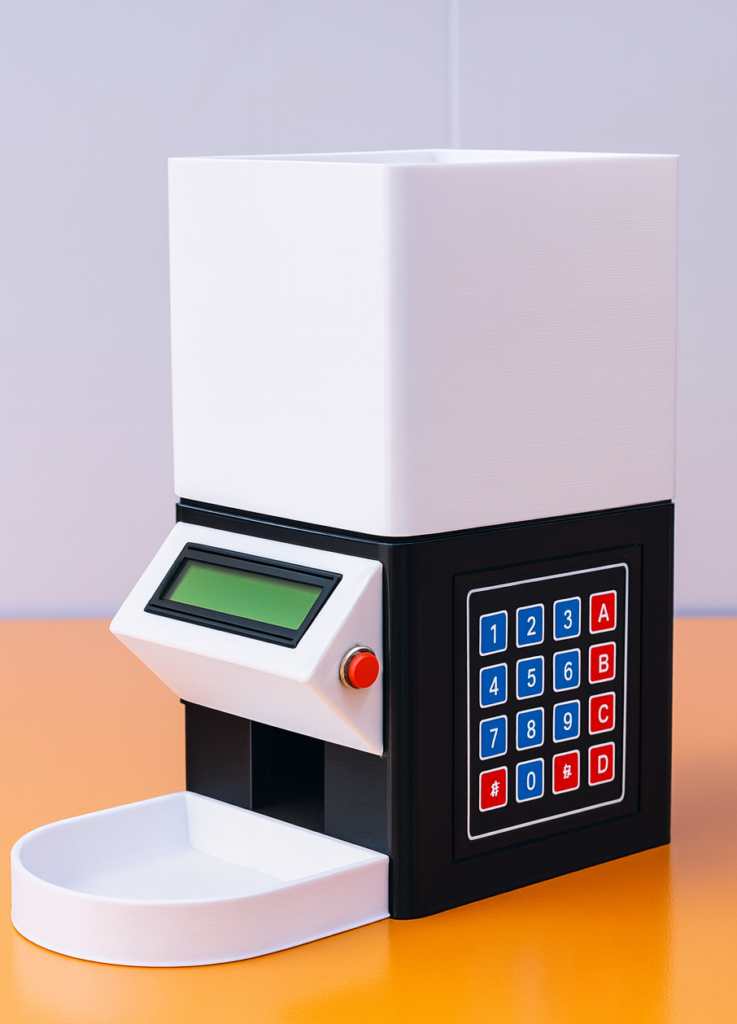
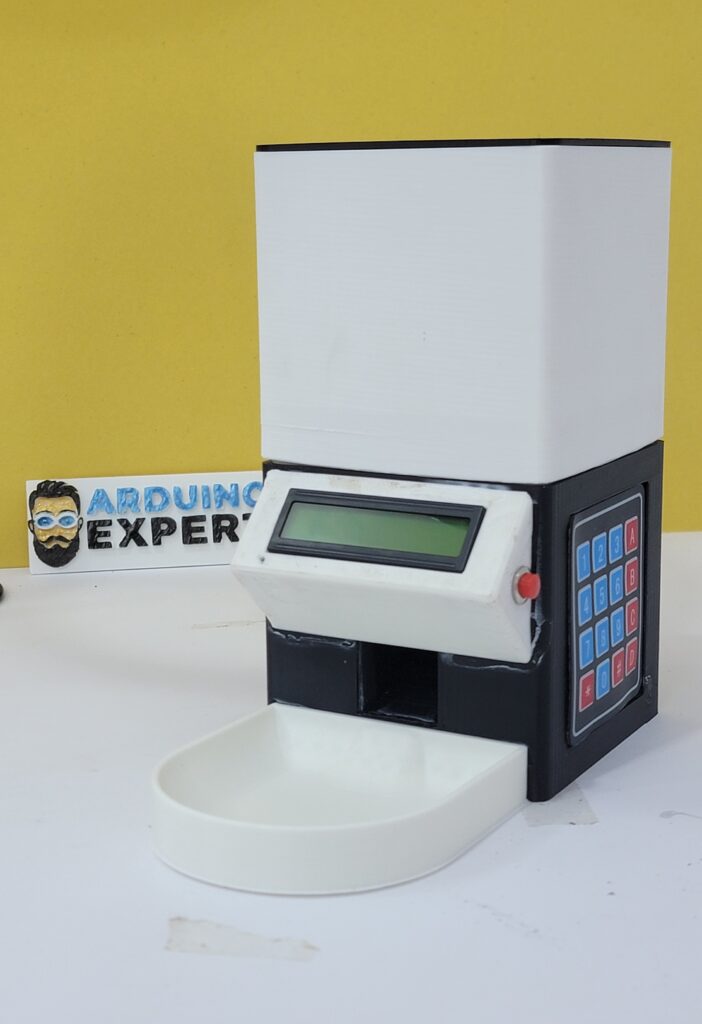
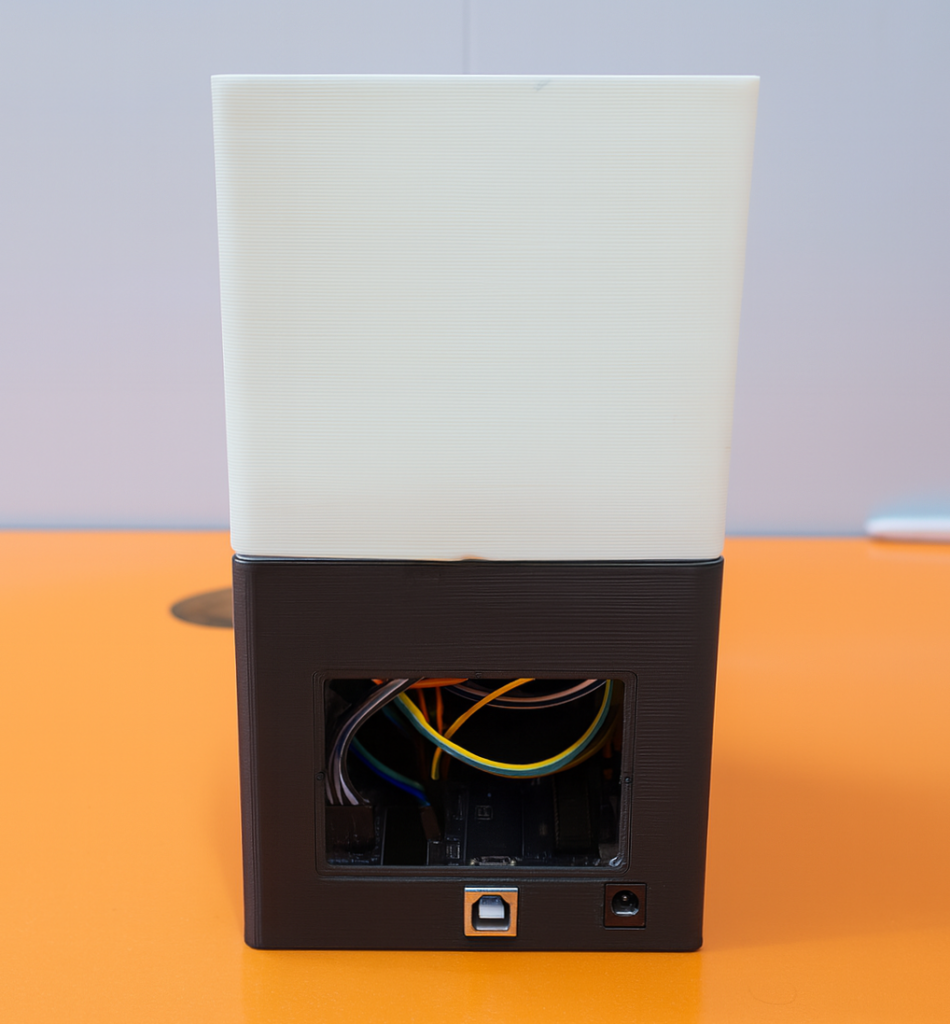
To make this project more practical, professional and product-ready, we have also completed the full product design and development of a custom enclosure. This includes 3D design and modeling, 3D printing, and complete hardware assembly. Our professionally designed 3D-printed body gives the feeder a clean, durable, and modern look — making it suitable for everyday home use, not just for prototyping. The enclosure provides safe food storage, smooth dispensing, easy refilling, and secure mounting for all components.
We are currently working on a new and upgraded pet feeder design as well. This upcoming version will feature an improved enclosure and enhanced functionality, allowing users to select the design that best fits their needs. Whether you prefer the current 3D-printed model or the next-generation design, we offer custom building options and can develop the entire unit according to your requirements.
With this combination of smart automation, professional 3D printing, and high-quality product development, you now have a reliable, modern, and practical solution to ensure your pet is fed on time — even when you’re away..
Benefits of Using an Arduino Automatic Pet Feeder
Automating your pet’s feeding schedule with an Arduino Automatic Pet Feeder has several advantages:
- Consistency: Ensures your pet gets fed at the same time every day.
- Convenience: Eliminates the need for manual feeding, especially when you’re away from home.
- Customization: Easily adjustable feeding times to suit your pet’s needs.
Arduino Automatic Pet Feeder Introduction Video
Project Overview
In this project, an Arduino Automatic Pet Feeder uses an Arduino Uno to manage a servo motor that controls a food dispenser. A 4×4 matrix keypad enables you to set feeding times, and a 16×2 I2C LCD displays the current time and date. The DS3231 RTC module ensures accurate timekeeping, even when the Arduino is turned off.
Key Features:
- Set feeding times using a 4×4 matrix keypad
- Display current time and date on a 16×2 I2C LCD
- Automatic food dispensing at programmed times
- Easy-to-use interface for setting and adjusting feeding schedules
Components Needed for the Arduino Automatic Pet Feeder
To build your Arduino Automatic Pet Feeder, you’ll need the following components:
- Arduino Uno: The core of your Arduino Automatic Pet Feeder project.
Buy on Amazon - 4×4 Matrix Keypad: For setting feeding times on your Arduino Automatic Pet Feeder.
Buy on Amazon - 16×2 I2C LCD: Displays the current time and date, as well as input feedback.
Buy on Amazon - DS3231 RTC Module: Keeps accurate time for your Arduino Automatic Pet Feeder.
Buy on Amazon - Servo Motor: Controls the food dispenser mechanism.
Buy on Amazon - Push Button: Used to set feeding times.
Buy on Amazon - Connecting Wires: For making electrical connections between components.
- Power Supply or Battery 5V External DC Power Supply for Arduino Pet Feeder through USB Jack or DC Power Jack.
- Breadboard (Optional): For assembling your Arduino Automatic Pet Feeder.
Buy on Amazon
3D Design & 3D Printed Enclosure (Our Custom-Built Pet Feeder Body)
Building an automatic pet feeder is not just about electronics — a strong, durable, and user-friendly enclosure is equally important. To make this project more practical, we have fully designed, modeled, and 3D-printed a complete pet feeder body for real-world use.
Below is a detailed overview of how we designed the enclosure, its features, and how you can get one built for your own project.
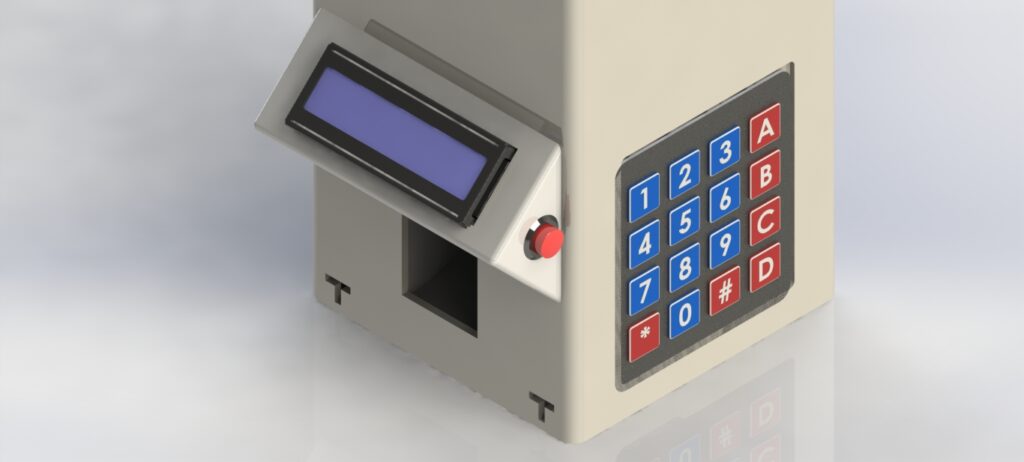
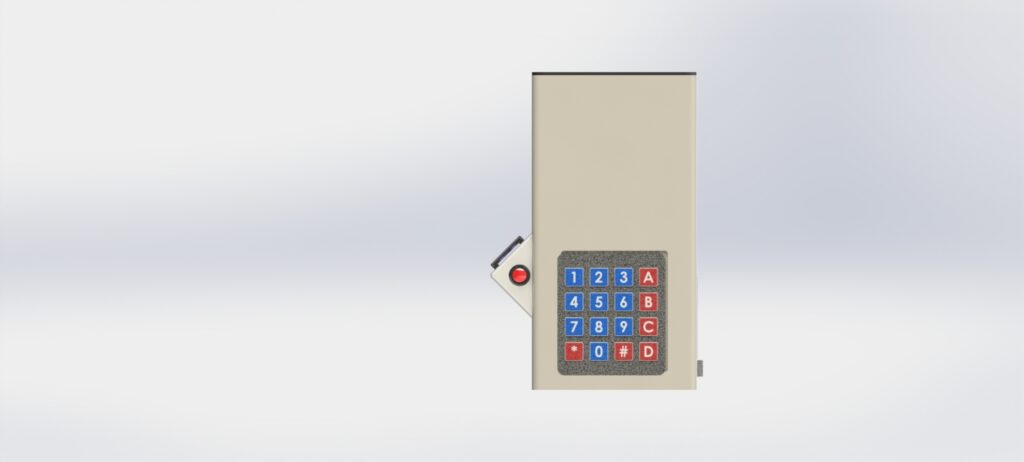
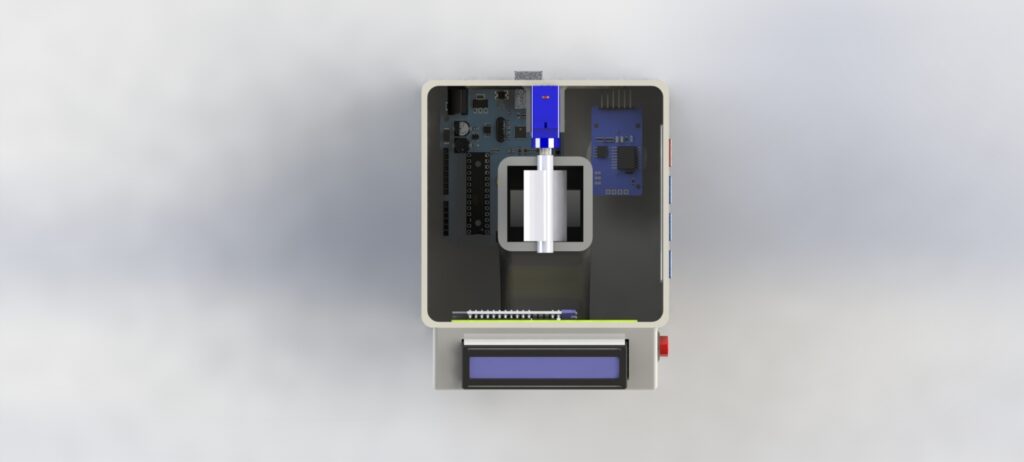
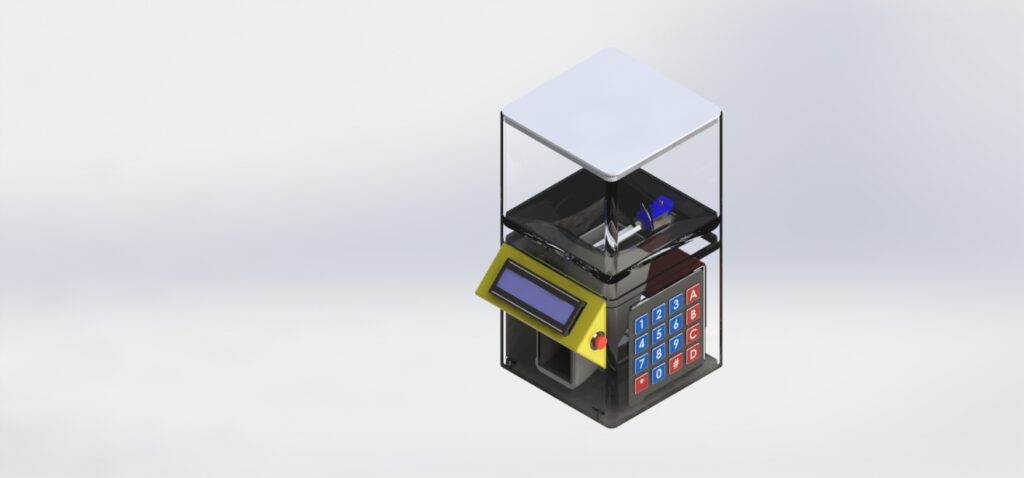
3D Design and Modeling (CAD) of Pet Feeder Body
Our enclosure is professionally modeled in CAD with:
- Perfect fitting for Arduino, RTC, servo, LCD, keypad, and wiring
- Easy refilling lid and accessible electronics area
- Clean, modern, compact design
- Smooth, pet-safe edges
The goal is to make the feeder look like a commercial device.
Below you can see the 3D Rendered images of our 3D Design of Pet Feeder.
Need 3D Cad Files of Automatic Pet Feeder Body?
Do you need 3D CAD Files/STL/STEP Files of Pet Feeder? Contact Us for more information.
3D Printing of Pet Feeder Body
The enclosure is printed using PLA/ABS for strength and durability.
We use:
- Thick, strong walls
- Food-safe inner surfaces
- Reinforced dispensing chamber
- Stable base to prevent tipping
You can easily wipe or clean the inside as needed.

★Two Designs Available (New Version Coming Soon)
Along with this printed model, we are also working on a new Pet Feeder design with a completely fresh look, improved mechanism, and optional IoT features.
Users can choose between:
- Current 3D-printed Pet Feeder
- Upcoming next-generation design
We can also make custom enclosures based on your requirements.
Circuit Diagram of Arduino Automatic Pet Feeder

Step-by-Step Guide for Your Arduino Automatic Pet Feeder
Step 1: Install Required Libraries
Before starting with the code for your Arduino Automatic Pet Feeder, you need to install the required libraries. These libraries add functionality to your project, such as controlling the LCD display and reading time from the RTC module.
- Open the Arduino IDE.
- Go to Sketch > Include Library > Manage Libraries.
- Search for and install the following libraries:
- LiquidCrystal I2C: For controlling the I2C LCD display.
- DS3231: For interfacing with the DS3231 RTC module.
- Keypad: For reading input from the 4×4 matrix keypad.
Step 2: Assemble the Hardware for Your Arduino Automatic Pet Feeder
Follow these steps to set up the hardware for your Arduino Automatic Pet Feeder:
- Connect the Servo Motor:
- Attach the servo motor’s signal wire to pin 10 on the Arduino.
- Set Up the Keypad:
- Connect the 4×4 keypad’s rows and columns to pins 2 through 9 on the Arduino.
- Connect the LCD:
- Connect the 16×2 I2C LCD to the Arduino using the I2C interface (SDA to A4, SCL to A5).
- Connect the RTC Module:
- Connect the DS3231 RTC module to the I2C interface.
- Add the Push Button:
- Connect the push button to pin A3 on the Arduino.
Step 3: Upload the Code for the Arduino Automatic Pet Feeder
Here’s the complete code for your Arduino Automatic Pet Feeder. Copy the following code into the Arduino IDE and upload it to your Arduino Uno.
#include <Wire.h>
#include <LiquidCrystal_I2C.h>
#include <DS3231.h>
#include <Servo.h>
#include <Keypad.h>

const byte ROWS = 4;
const byte COLS = 4;

char keys[ROWS][COLS] = {
  {'1','2','3','A'},
  {'4','5','6','B'},
  {'7','8','9','C'},
  {'*','0','#','D'}
};

byte rowPins[ROWS] = { 2, 3, 4, 5 };
byte colPins[COLS] = { 6, 7, 8, 9 };

Keypad kpd = Keypad(makeKeymap(keys), rowPins, colPins, ROWS, COLS);

DS3231 rtc(A4, A5);
Servo servo_test;
LiquidCrystal_I2C lcd(0x27, 16, 2);

int t1, t2, t3, t4, t5, t6;
boolean feed = true;
char key;
int r[6];
int btn = 12;

void setup() {
  servo_test.attach(10);
  rtc.begin();
  lcd.init();
  lcd.backlight();
  lcd.clear();
  servo_test.write(0);
  Serial.begin(9600);

  pinMode(A0, OUTPUT);
  pinMode(A1, OUTPUT);
  pinMode(A2, OUTPUT);
  pinMode(A3, INPUT_PULLUP);
}

void loop() {
  lcd.setCursor(0,0);
  int buttonPress = digitalRead(A3);
  if (buttonPress == 0) setFeedingTime();

  lcd.print("Time: ");
  String t = rtc.getTimeStr();

  t1 = t.charAt(0)-48;
  t2 = t.charAt(1)-48;
  t3 = t.charAt(3)-48;
  t4 = t.charAt(4)-48;
  t5 = t.charAt(6)-48;
  t6 = t.charAt(7)-48;

  lcd.print(rtc.getTimeStr());
  lcd.setCursor(0,1);
  lcd.print("Date: ");
  lcd.print(rtc.getDateStr());

  if (t1==r[0] && t2==r[1] && t3==r[2] && t4==r[3] && t5<1 && t6<3 && feed==true) {
    servo_test.write(100);
    delay(1000);
    servo_test.write(0);
    feed = false;
  }
}

void setFeedingTime() {
  feed = true;
  int i = 0;
  int j = 0;

  lcd.clear();
  lcd.setCursor(0,0);
  lcd.print("Set feeding Time");
  delay(500);
  lcd.clear();
  lcd.print("HH:MM");
  lcd.setCursor(0,1);

  while (1) {
    key = kpd.getKey();

    if (key != NO_KEY) {
      lcd.setCursor(j,1);
      lcd.print(key);
      r[i] = key - 48;
      i++;
      j++;

      if (j == 2) {
        lcd.print(":");
        j++;
      }
      delay(300);
    }

    if (key == 'D') {
      key = 0;
      break;
    }
  }
}
Step 3: Set the Feeding Time
- Use the Keypad: Press the keys to set the hour and minute of the feeding times for your Arduino Automatic Pet Feeder.
- Save the Time: Press the ‘D’ key to save the feeding time.
Step 4: Test Your Pet Feeder
- Check the LCD Display: Ensure the current time and date are displayed correctly.
- Observe the Servo Motor: At the programmed time, the servo motor should rotate to release food.
Step 5: Plug in External Power Supply or Battery to Your Pet Feeder
- Plug the Power Supply, Place the Pet Feeder at appropriate location, Enjoy.
Project Demo Video:
Additional Tips and Enhancements
- Power Supply: Ensure you have a reliable power source for your Arduino and servo motor.
- Modify Feeding Schedule: Adjust the feeding schedule as needed to accommodate your pet’s diet.
- Add a Buzzer: Integrate a buzzer to alert when feeding is about to occur.
Conclusion
Building an Arduino Automatic Pet Feeder is a fulfilling project that guarantees your pet receives consistent meals. The Automatic Pet Feeder Project is a practical, smart, and highly useful solution for every pet owner who wants to ensure consistent feeding—even when they’re not at home. By combining components like the Arduino, RTC module (DS3231), servo motor, and keypad, this system lets users set precise feeding times and automatically dispense food with reliability and accuracy.
This project not only demonstrates the power of embedded systems, real-time automation, and mechatronics, but also showcases how easily hobbyists and beginners can build professional-grade smart home products. With a simple user interface, stable timekeeping, and smooth servo operation, the system performs exactly like a commercial pet feeder—but at a fraction of the cost.
Overall, this project is an excellent example of how DIY electronics, Arduino programming, and smart automation can be used to improve daily life. Whether you are a student, maker, or pet lover, this feeder offers a scalable base that can be expanded with IoT monitoring, mobile control, or weight-sensing capabilities. It reflects a perfect blend of creativity, engineering, and practical usefulness—making it a rewarding and impactful build for any electronics enthusiast.
Need Help in DIY Automatic Pet Feeder Project?
If you need Help or Assistance Automatic Pet Feeder Project Project with or without Modifications or Customization then you can contact us through WhatsApp. We can deliver you this Project in the Following Ways.
⭐Project Code:
we can provide you Project Code along with Zoom Assistant, through Zoom meeting for Setup of this Project or any other Arduino Project of your need.
⭐Fully Functional Project with Hardware/Components Shipment:
if you can not make this project yourself then you can use this option. We will assemble the Project and will ship it to your Doorstep with Safe Packaging.
⭐Learn More about the services we offer.
Frequently Asked Questions?
1. What is an Arduino Automatic Pet Feeder?
It is a DIY device that automatically dispenses pet food at scheduled times using an Arduino, servo motor, RTC module, and a dispensing mechanism. It helps ensure pets are fed even when the owner is away.
2. How does an Arduino Automatic Pet Feeder work?
An Arduino Automatic Pet Feeder automates the feeding process by using a servo motor to control a dispensing mechanism. The Arduino board, programmed with specific feeding times, signals the motor to release a set amount of food when it reaches the programmed time.
3. Can I customize the feeding times or schedule?
Yes, the feeding schedule can be easily customized by using the keypad to input different times. You can set the feeder to dispense food at multiple times throughout the day, depending on your pet’s needs.
4. How does the system know the correct time? What happens if power goes off?
This project uses the DS3231 Real-Time Clock (RTC) module, which keeps accurate time even if the device loses power, thanks to its onboard battery. If power goes off, The RTC module continues to track time, so your feeding schedule stays intact. However, food won’t dispense until power is restored.
5. Is the pet feeder suitable for both cats and dogs?
Yes. It works for any pet that eats dry food. You can adjust the servo angle and dispensing mechanism depending on pellet size.
6. Can I 3D print the feeder body?
Absolutely. In fact, we designed and 3D-printed the complete feeder enclosure using CAD software. You can customize the size, shape, and design based on your needs.
7. Do you offer the 3D design files for download?
Yes, you can download the STL/STEP files from our website. Contact us more information.
8. Can I add IoT or mobile app control?
Yes. You can upgrade this project using ESP8266/ESP32 to control feeding remotely via Wi-Fi, Blynk app, or MQTT. We will soon add IoT based Automatic Pet Feeder Project ⭐
9. Can I customize/increase the size of the pet feeder?
Yes. The size of the pet feeder is fully customizable, especially since the enclosure is 3D designed and 3D printed. You can adjust the food container capacity, dispenser size, and bowl dimensions according to your pet’s needs. Whether you want a compact version for cats or a larger feeder for big dogs, the design can be easily modified in the CAD model before printing. You need to just Contact us.
10. Do you offer custom development services for pet feeder projects?
Yes. Arduino Expert team specializes in Product Design & Development, 3D Printing, Electronics Prototyping, and Arduino Programming. We can create custom feeders based on user requirements.
Latest Posts
- Build a Desktop Pet Robot with ESP32 C3 Super Mini, OLED Display & Touch Sensor
- ESP32 Projects: Complete Guide to Custom ESP32 Project Development Services
- What Is Arduino Project Development and How Does It Work?
- Offline GPS Geo-Fence Navigation System Using Arduino
- xArm Robot Integrated Laser Tray Automation System Using Arduino Leonardo | Robotics & Embedded Automation Project

In it something is also to me it seems it is excellent idea. I agree with you.
I am sorry, that has interfered… I understand this question. It is possible to discuss.
Sure you can contact us any time to discuss your idea
Many thanks for support how I can thank you?
Thanks for your support, you can buy me a coffee if you want!
Абсолютно согласен
Спасибо
[…] https://arduinoexpert.com/arduino-automatic-pet-feeder/ […]
Yes Sir