NeoPixel LEDs are individually addressable RGB LEDs, which means each LED can be programmed to display a specific color and brightness level independently of others. This makes them ideal for decoration purposes, especially for events like Christmas, Halloween, weddings, or home décor.
The Arduino UNO is used as the brain of the system to control the NeoPixel strings, creating a wide variety of lighting patterns, effects, and colors. With this project, users can implement different lighting effects such as chasing lights, color wipes, fading effects, rainbow patterns, and more. This can be expanded to include control through physical buttons, infrared remotes, or smartphone apps.

What is NeoPixel Led?
NeoPixel strips are made up of WS2812 or WS2812B LEDs, which combine red, green, and blue LEDs into a single package. Each LED has an integrated driver chip that receives data from the Arduino, allowing for individual control of each LED’s color and brightness. The LEDs are daisy-chained, meaning data flows from one LED to the next along the strip.
Components used in NeoPixel Leds Control Arduino Project:
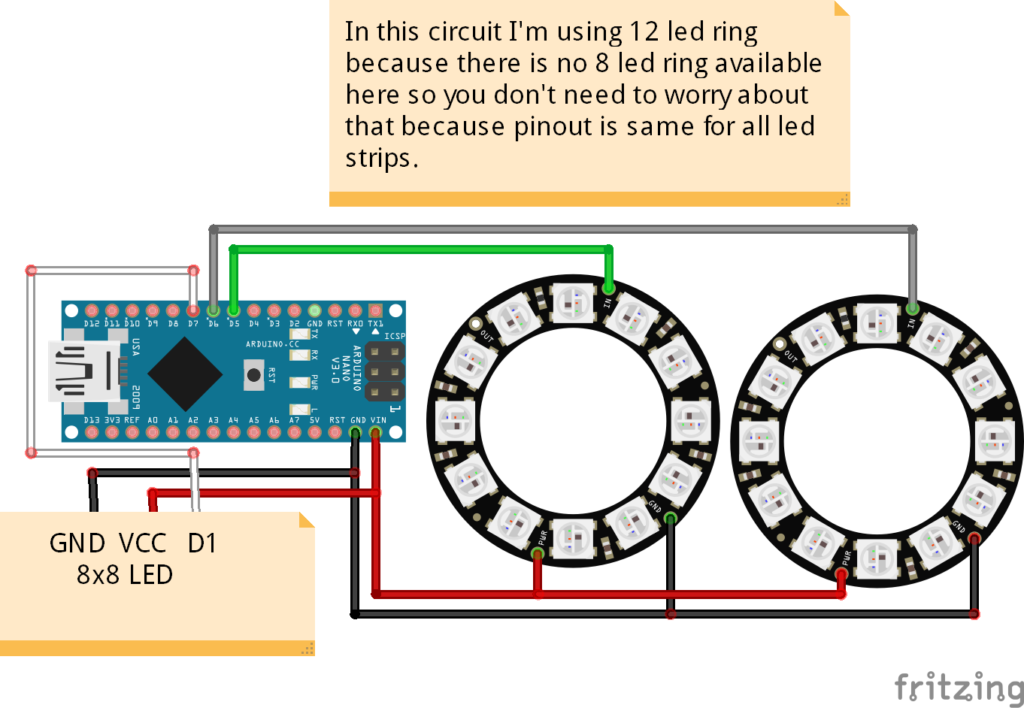
Arduino UNO or Nano: The microcontroller that will control the NeoPixel LED strip.
NeoPixel LED Strip (WS2812B): A strip of individually addressable RGB LEDs (commonly known as NeoPixels).
5V Power Supply: NeoPixel strips require a separate 5V power supply, especially if using many LEDs.
Capacitor (1000μF, 6.3V or higher): Helps stabilize the power supply.
Resistor (330Ω): Prevents voltage spikes on the data line.
Jumper Wires and Connectors: For making connections between the Arduino and the NeoPixel strip.
Control Mechanisms (Optional): Buttons, potentiometers, IR remote, or Bluetooth module for adding interaction.
Circuit Diagram of NeoPixel Leds Control Arduino Project:

Code for NeoPixel Leds Control Arduino Project:
#include <FastLED.h>
#define NUM_LEDS_STRIP_A 8  //number of led's in strip1
#define NUM_LEDS_STRIP_B 8  //number of led's in strip2
#define NUM_LEDS_STRIP_C 64 //number of led's in strip3

#define PIN_STRIPA 5 //strip1 pin
#define PIN_STRIPB 6 //strip2 pin
#define PIN_STRIPC 7 //strip3 8x8 pin

CRGB leds1[NUM_LEDS_STRIP_A];
CRGB leds2[NUM_LEDS_STRIP_B];
CRGB leds3[NUM_LEDS_STRIP_C];

void setup() {
FastLED.addLeds<WS2812B, PIN_STRIPA, GRB>(leds1, NUM_LEDS_STRIP_A);
FastLED.setBrightness(200);  //setting brightness level to 200 out of 255
FastLED.addLeds<WS2812B, PIN_STRIPB, GRB>(leds2, NUM_LEDS_STRIP_B);
FastLED.setBrightness(200);  //setting brightness level to 200 out of 255
FastLED.addLeds<WS2812B, PIN_STRIPC, GRB>(leds3, NUM_LEDS_STRIP_C);
FastLED.setBrightness(200);  //setting brightness level to 200 out of 255
}
void loop() {
  FastLED.clear();
  //for Strip1
for (int i = 0; i < NUM_LEDS_STRIP_A; i++) {
fill_solid(leds1, NUM_LEDS_STRIP_A, CRGB::Blue);
}

//for strip2
for (int i = 0; i < NUM_LEDS_STRIP_B; i++) {
    fill_solid(leds2, NUM_LEDS_STRIP_B, CRGB::Blue);
}

//for strip 3 8x8
for (int i = 0; i < NUM_LEDS_STRIP_C; i++) {
    fill_solid(leds3, NUM_LEDS_STRIP_C, CRGB::Blue);
}
FastLED.show();

}
Customization of NeoPixel Leds Control Arduino Project:
- Adding Buttons for Manual Control:
- You can add physical buttons to the circuit to switch between different lighting effects.
- For example, pressing one button could switch the strip to the color wipe effect, while another could enable the rainbow cycle.
- Bluetooth Control:
- By using a Bluetooth module (e.g., HC-05) with Arduino, you can control the lights from a smartphone app such as Bluetooth Terminal. This would allow users to select different lighting effects or colors remotely.
- Remote Control:
- You can use an IR remote control to switch between different lighting patterns. The IRremote library allows you to use any standard IR remote with your project.
- Sound-Activated Effects:
- Adding a microphone sensor module allows the NeoPixels to react to sound, creating a music-activated light show.
- Motion Detection:
- Integrating a PIR motion sensor can activate the lights when movement is detected, making this perfect for decorative lighting in entryways or walkways.
Applications:
Holiday Decorations:
- Ideal for creating festive decorations for Christmas, Halloween, or any other holiday. The NeoPixels can be programmed to create holiday-themed effects such as snowflakes, candy canes, or color patterns matching the event.
Stage and Event Lighting:
- This project is perfect for stage lighting or decoration during events like weddings, concerts, or parties. The lights can be programmed to change dynamically or to react to music or motion.
Home Decoration:
- NeoPixels can be used to create custom ambient lighting for your home, giving any room a modern and colorful atmosphere.
Interactive Art Projects:
- Artists and designers can use this project to create interactive light installations, where the lights respond to user input, sound, or motion.
Conclusion:
This project provides a dynamic, customizable, and visually appealing lighting system using Arduino and NeoPixel strips. With the help of the Adafruit NeoPixel library, users can create a wide variety of lighting effects for decoration, entertainment, and artistic purposes. The project can be expanded further by incorporating control mechanisms like buttons, remotes, or Bluetooth, making it a versatile solution for various decorative lighting needs.
Need This Project?
If you need this Project with or without Modifications or Customization then you can contact us through WhatsApp. We can deliver you this Project in the Following Ways.
Project Code:
we can provide you Project Code along with Zoom Assistant, through Zoom meeting for Setup of this Project or any other Arduino Project of your need.
Fully Functional Project with Hardware/Components Shipment:
if you can not make this project yourself then you can use this option. We will assemble the Project and will ship it to your Doorstep with Safe Packaging.
Learn More about the services we offer.


