A Line Following Robot is an autonomous robot that follows a pre-defined path, usually a black line on a white surface or vice versa. It is widely used in industrial applications, automated guided vehicles (AGVs), and robotics competitions.

Objective of Line Following Robot Project:
The objective of this project is to design and develop an autonomous Line Following Robot using an Arduino, IR sensors, DC motors, and an L298N motor driver. The robot will:
- Detect and follow a predefined path (black line on a white surface or vice versa).
- Automatically adjust direction based on sensor inputs.
- Use basic motor control techniques for smooth movement.
- Demonstrate real-world applications in automation and robotics.
Components used in Line Following Robot Project:
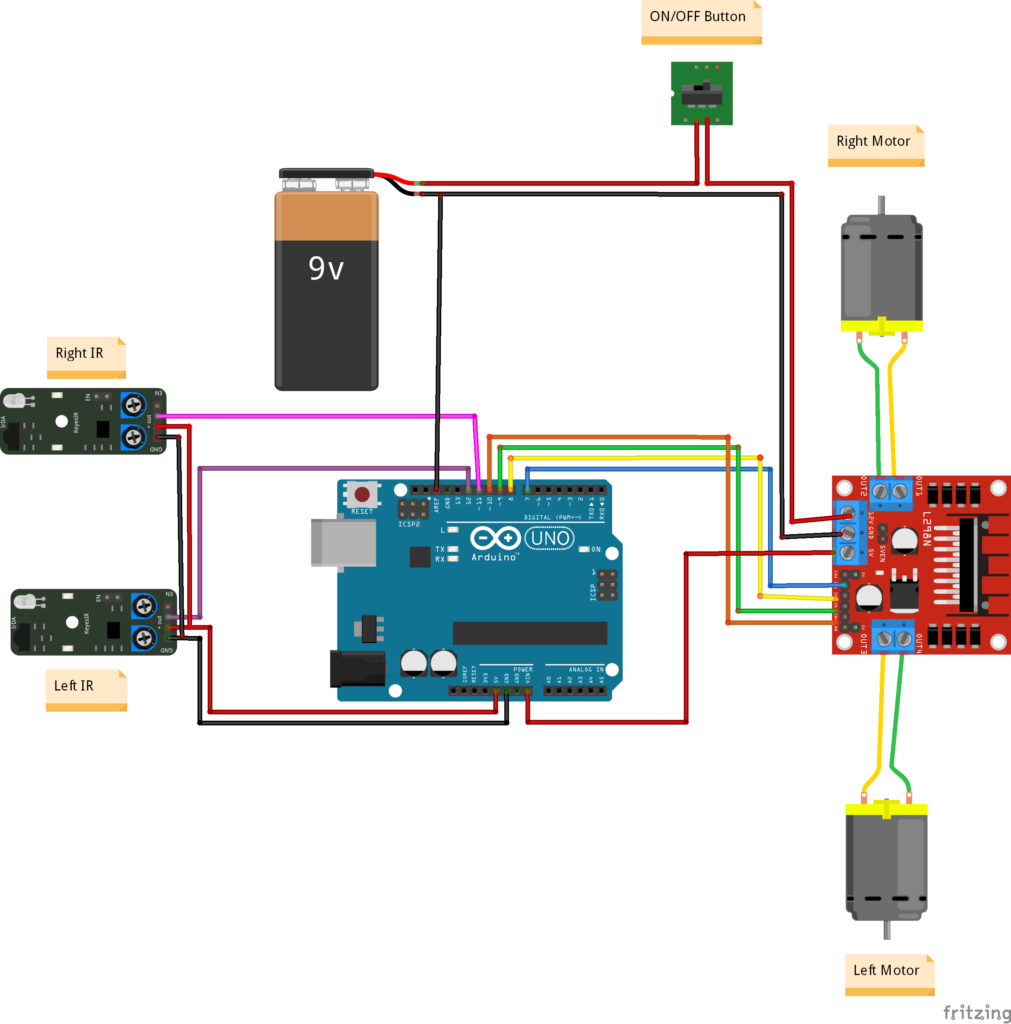
Arduino UNO – The microcontroller for processing sensor inputs and controlling the motors.
L298N Motor Driver Module – Controls the speed and direction of two DC motors.
Two IR Sensors (Right & Left) – Detects the line and provides feedback to the Arduino.
Four DC Motors – Drives the wheels of the robot.
12V Battery – Provides power to the motor driver and motors.
Chassis – The robot frame to hold all components.
Wheels – Attached to the motors for movement.
Working Principle of Line Following Robot with Arduino Project:
IR Sensors Detect the Line
- IR sensors emit infrared light and detect the reflection from the surface.
- Black Line: Absorbs IR light (sensor output = LOW).
- White Surface: Reflects IR light (sensor output = HIGH).
Decision Making in Arduino
- Based on the sensor readings, the Arduino decides which motor should move or stop to keep the robot on track.
Motor Control Using L298N
- If the left sensor detects black, the robot turns left.
- If the right sensor detects black, the robot turns right.
- If both sensors detect white, the robot moves forward.
- If both sensors detect black, the robot stops.
Circuit Diagram of Line Following Robot with Arduino Project:

Code for Line Following Robot with Arduino Project:
#define IR_SENSOR_RIGHT 11
#define IR_SENSOR_LEFT 12
#define MOTOR_SPEED 180

//Right motor

int rightMotorPin1=7;
int rightMotorPin2=8;

//Left motor

int leftMotorPin1=9;
int leftMotorPin2=10;

void setup()
{

  // put your setup code here, to run once:
//  pinMode(enableRightMotor, OUTPUT);
  pinMode(rightMotorPin1, OUTPUT);
  pinMode(rightMotorPin2, OUTPUT);

//  pinMode(enableLeftMotor, OUTPUT);
  pinMode(leftMotorPin1, OUTPUT);
  pinMode(leftMotorPin2, OUTPUT);

  pinMode(IR_SENSOR_RIGHT, INPUT);
  pinMode(IR_SENSOR_LEFT, INPUT);
  rotateMotor(0,0);
}
Working Video of Line Following Robot Project:
Applications of Line Following Robot with Arduino Project:
1. Industrial Automation
- Used in factories and warehouses for automated material transport.
- Plays a key role in conveyor belt automation for assembly lines.
2. Autonomous Guided Vehicles (AGVs)
- Helps in automated guided vehicle (AGV) systems for moving products in industries.
- Used in logistics and supply chain management for automated deliveries.
3. Smart Transportation Systems
- Serves as a prototype for self-driving cars that follow lanes using sensors.
- Can be integrated into public transport systems for guiding autonomous vehicles.
4. Hospital and Healthcare
- Used in hospitals to transport medical supplies, medicines, or food.
- Can be implemented in quarantine zones to reduce human intervention.
5. Defense and Military
- Used in unmanned vehicles for carrying supplies in dangerous areas.
- Can be modified for autonomous surveillance robots.
6. Robotics Competitions and Education
- A great beginner project for students and hobbyists to learn robotics.
- Used in robotic competitions to demonstrate automation principles.
7. Smart Shopping Carts
- Can be used to create automated shopping carts that follow customers in malls and supermarkets.
Conclusion:
The Line Following Robot is a fundamental autonomous robotic system with vast applications in industry, logistics, healthcare, and transportation. It serves as a stepping stone to advanced robotics like self-driving vehicles and warehouse automation.
Would you like me to add sensor calibration, PID control, or Bluetooth connectivity for an advanced version?
Need Help in Line Following Robot Project?
If you need this Project with or without Modifications or Customization then you can contact us through WhatsApp. We can deliver you this Project in the Following Ways.
Project Code:
we can provide you Project Code along with Zoom Assistant, through Zoom meeting for Setup of this Project or any other Arduino Project of your need.
Fully Functional Project with Hardware/Components Shipment:
if you can not make this project yourself then you can use this option. We will assemble the Project and will ship it to your Doorstep with Safe Packaging.
Learn More about the services we offer.


