Automation systems that combine sensor-based detection with electromagnetic actuation are widely used in security, industrial automation, and smart product development. For this client-based requirement, we designed and developed an IR Sensor Magnet Control System using Arduino Nano, capable of intelligently controlling a 12V DC electromagnet based on object detection.
This project demonstrates how Arduino-based embedded systems can be used to build reliable, cost-effective, and scalable control solutions. Developed as part of our Arduino Project Services, the system integrates sensor input, power management, and actuator control into a compact and efficient design. If You want to Control 12V DC Solenoid Lock remotely then explore our Project “IoT Smart Door Lock Using ESP32“.
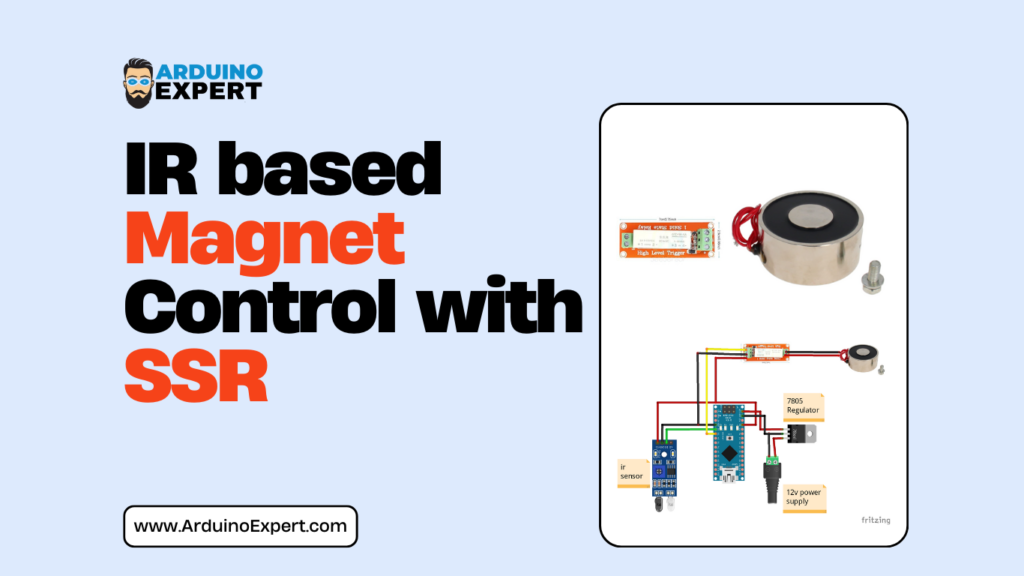
Components Used in IR Sensor Magnet Control System
| Component | Description |
|---|---|
| Arduino Nano | Main microcontroller |
| IR Sensor Module | Object detection |
| 12V DC Electromagnet | Actuator |
| 12V DC Power Supply | Main power source |
| 7805 Voltage Regulator | 5V supply for Arduino |
| SSR Relay | For Controlling 12V Magnet |
| Connecting Wires | Circuit connections |
Project Overview
The IR Sensor Magnet Control with Arduino Nano project is designed to:
- Detect the presence of an object using an IR proximity sensor
- Process detection logic using an Arduino Nano
- SSR Relay Turns ON/OFF Magnet
- Energize or de-energize a 12V DC electromagnet
- Use a 7805 voltage regulator to safely power the Arduino from a 12V supply
This architecture is commonly used in smart locking mechanisms, automation modules, and industrial safety systems.

Working Principle of IR Sensor Magnet Control System
The system operates using a single 12V DC power source, which powers both the electromagnet and the control electronics.
→Power Supply Design
- A 12V DC power supply is used as the main source.
- The 7805 linear voltage regulator converts 12V to regulated 5V.
- This 5V supply safely powers the Arduino Nano and IR sensor.
This approach simplifies wiring and is widely adopted in commercial Arduino projects.
→IR Sensor – Object Detection
- The IR sensor continuously monitors its detection area.
- When an object enters the sensing range, the sensor output changes state.
- This signal is sent to a digital input pin of the Arduino Nano.
IR sensors provide fast, non-contact detection, making them ideal for automation and security applications.
→Arduino Nano – Control Logic
The Arduino Nano:
- Reads the IR sensor output
- Applies predefined control logic
- Controls the electromagnet accordingly through SSR Relay
Depending on the client’s requirement, the magnet can:
- Activate when an object is detected
- Deactivate when the object moves away
- Work in momentary or latch-based modes
→12V DC Electromagnet – Actuation using SSR Relay
- The electromagnet is powered using the 12V supply.
- When SSR Relay is turned ON it is energized
- When energized, it generates a strong magnetic field.
- When de-energized, the magnetic field collapses, releasing the object.
This type of control is commonly used in electromagnetic locks, clamps, and holding mechanisms.
Key Features of Custom Arduino Magnet Control System Project
- IR-based non-contact detection
- Arduino Nano compact control solution
- 12V DC electromagnet actuation
- Single power supply design using 7805 regulator
- Reliable and fast response system
- Custom-developed for client requirements
- Expandable for IoT and access control systems
Circuit Diagram of Arduino Nano with IR Sensor, SSR Relay and Magnet

Arduino Code for IR Sensor Controlled Electromagnet
// Define the pin numbers
const int sensorPin = 2; // IR sensor PIN
const int relayPin = 3;  // Solid State Relay PIN

// Define the activation time for the SSR
unsigned long activationTime = 600; // Duration in milliseconds

void setup() {
  // Initialize the serial port at 9600 bps:
  Serial.begin(9600);

  // Set the sensor pin as input
  pinMode(sensorPin, INPUT);

  // Set the relay pin as output
  pinMode(relayPin, OUTPUT);

  // Ensure the relay is OFF initially
  digitalWrite(relayPin, LOW);
}

void loop() {
  // Read the sensor value
  int sensorValue = digitalRead(sensorPin);

  // Check if the sensor is triggered (assuming HIGH means triggered)
  if(sensorValue == HIGH) {
    Serial.println("Ball bearing detected, activating relay.");

    // Activate the relay
    digitalWrite(relayPin, HIGH);

    // Wait for the activation period
    delay(activationTime);

    // Deactivate the relay
    digitalWrite(relayPin, LOW);

    // Print status
    Serial.println("Relay deactivated.");

    // Small delay to avoid bouncing effects or rapid re-triggering
    delay(100);
  }
}Applications of Smart Magnet Control System
- Smart door locking systems
- Access-controlled cabinets
- Industrial safety interlocks
- Smart lockers and storage units
- Automated clamps and holders
- Exhibition and demo automation models
- Educational embedded system projects
If You to make Bluetooth Door Lock Project visit this Page.
Future Enhancement Possibilities
- RFID, keypad, or biometric authentication
- Wi-Fi or Bluetooth-based remote control
- LCD or OLED status display
- Battery backup for power failure scenarios
Conclusion
The IR Sensor Magnet Control with Arduino Nano project is a compact yet powerful demonstration of sensor-based automation using Arduino. Developed for a client under our Arduino Project Services, this solution highlights our ability to deliver custom, reliable, and application-ready embedded systems.
If you are looking for custom Arduino projects, automation solutions, or embedded product development, this project reflects our capability to convert concepts into functional, real-world products.
Need Help/Assistance in Smart Magnet Control System Project?
If you need this Smart Magnet Control System Project with or without Modifications or Customization then you can contact us through WhatsApp. We can also provide you Zoom Assistant
Learn More about the services we offer.