The DS18B20 Temperature Sensor is a highly accurate digital temperature sensor commonly used in weather stations, home automation, greenhouses, aquariums, and even industrial systems. Unlike analog sensors like LM35, the DS18B20 communicates with Arduino using the OneWire protocol, which means you can connect multiple sensors using a single data pin.
One of the easiest and cheapest way to add temperature sensor in Arduino project is to use DS18B20 1-Wire Temperature Sensor. This sensor is very easy to use and needs no external components to work. So, by using this sensor and few connections some Arduino code you’ll be sensing temperature in no time!
This blog will walk you through everything you need to know to interface the DS18B20 with an Arduino: how it works, how to wire it, how to use the required library, and how to read and display temperature values.
What is the DS18B20 Temperature Sensor?
The DS18B20 is a digital temperature sensor manufactured by Maxim Integrated. DS18B20 is 1-Wire interface Temperature sensor requires only one digital pin for two way communication with Arduino. It communicates over the OneWire bus, allowing multiple devices to share a single data line. It can measure temperatures from -55°C to +125°C with an accuracy of ±0.5°C.

Key Features of DS18B20:
- Digital output (no ADC needed)
- Operating voltage: 3.0V to 5.5V
- Temperature Range: -55°C to +125°C
- Accuracy: ±0.5°C from -10°C to +85°C
- 9 to 12-bit resolution
- Unique 64-bit ID for each sensor
- Waterproof variant available
Working Principle of DS18B20 Temperature Sensor:
The DS18B20 sensor works based on the OneWire digital communication protocol, which allows data transfer using a single data line plus ground. Each DS18B20 sensor has a unique 64-bit serial code, allowing you to connect many sensors in parallel and access them individually.
How it Works:
- The Arduino sends a temperature request to the sensor over OneWire.
- The sensor processes the request internally and returns a digital temperature value.
- The data is read using the DallasTemperature library, which simplifies communication.

Multiple DS18B20 on Single Bus:
We can use multiple DS18B20 sensor to a single wire because each DS18B20 has a unique 64-bit serial code. And it is easy to differentiate from one another. This feature is very useful when you want to control many DS18B20s distributed over a large area.
Components Required for Using DS18B20 Temperature Sensor with Arduino:
- Arduino UNO (or any compatible board)
- Soil Moisture Sensor Module (with analog output)
- Breadboard
- Jumper Wires
- Buzzer or LED (optional)
- Relay module (optional for pump control)
- Arduino IDE installed
DS18B20 Temperature Sensor Pinout:
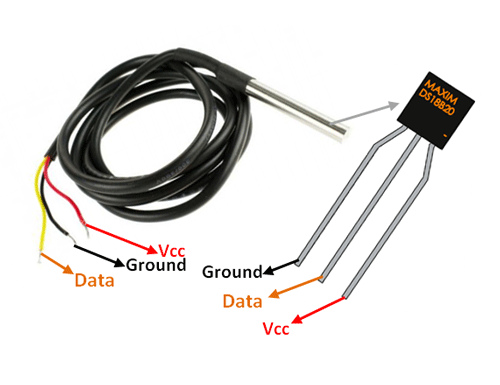
GND is a ground pin.
DQ is 1-Wire Data Bus should be connected to a digital pin on Arduino.
VDD pin supplies power to sensor from 3.3 to 5V.
Circuit Diagram of DS18B20 Sensor with Arduino:
You need to connect a 4.7kΩ pull-up resistor between the DQ pin and VCC.
| DS18B20 Pin | Function | Arduino Pin |
|---|---|---|
| GND | Ground | GND |
| VCC | Power Supply | 5V |
| DQ | Data Pin | D2 (example) |

If you are using the waterproof version of the DS18B20, connect Red wire to 5V, Black wire connects to GND and Yellow wire is data that goes to digital pin # 2 on Arduino. You also need to connect a 4.7K pull up resistor from data to 5V.

Installing Required Libraries for DS18B20 Sensor:
Before using the DS18B20 sensor, install the following Arduino libraries:
- OneWire by Paul Stoffregen
- DallasTemperature by Miles Burton
Steps:
- Open Arduino IDE
- Go to Sketch > Include Library > Manage Libraries
- Search for and install
- 1.”DallasTemperature”
- 2.”OneWire”
Arduino Code for DS18B20 Temperature Sensor:
Here’s a basic sketch to read temperature from a DS18B20 sensor and print it to the Serial Monitor:
#include <OneWire.h>
#include <DallasTemperature.h>

#define ONE_WIRE_BUS 2  // Data pin connected to D2

OneWire oneWire(ONE_WIRE_BUS);
DallasTemperature sensors(&oneWire);

void setup() {
  Serial.begin(9600);
  sensors.begin();
  Serial.println("DS18B20 Temperature Sensor");
}

void loop() {
  sensors.requestTemperatures(); // Send command to get temperatures
  float tempC = sensors.getTempCByIndex(0); // Get temperature in Celsius
  float tempF = sensors.toFahrenheit(tempC); // Optional: convert to Fahrenheit

  Serial.print("Temperature: ");
  Serial.print(tempC);
  Serial.print(" °C / ");
  Serial.print(tempF);
  Serial.println(" °F");

  delay(1000);
}
The output of code on serial monitor
Applications of DS18B20 Sensor:
- Precision weather stations
- Greenhouse temperature control
- Water temperature monitoring (aquariums, pools)
- Industrial temperature logging
- Cold storage systems
- Home automation and HVAC systems
Precautions for DS18B20 Temperature Sensor:
- For long-distance wiring, use shielded cables and proper pull-up resistors.
- Waterproof version is ideal for harsh environments.
- Each sensor has a unique address, useful for multi-sensor systems.
- Avoid using breadboard for waterproof modules to prevent short circuits due to moisture.
Conclusion:
The DS18B20 Temperature Sensor is a highly accurate and reliable sensor that works beautifully with Arduino for temperature monitoring applications. Its digital interface, waterproof version, and ability to connect multiple sensors on a single pin make it one of the best choices for hobbyists and professionals alike.
With simple wiring and the help of the OneWire and DallasTemperature libraries, you can set up a highly precise temperature monitoring system in just a few minutes.
Need Help in Setup of DS18B20 Temperature Sensor with Arduino?
If you need any Help or Assistance for Setup of DS18B20 Temperature Sensor with Arduino, with Modifications or Customization then you can contact us through WhatsApp. We can deliver you this Project in the Following Ways.


[…] In this blog post, you’ll learn how to wire, identify, and read temperature data from multiple DS18B20 sensors connected in parallel on a single Arduino input pin. This is especially useful in applications like multi-zone climate control, environmental monitoring, greenhouses, aquariums, and industrial systems. if you want to know more about DS18B20 Temperature Sensor then you can click here. […]