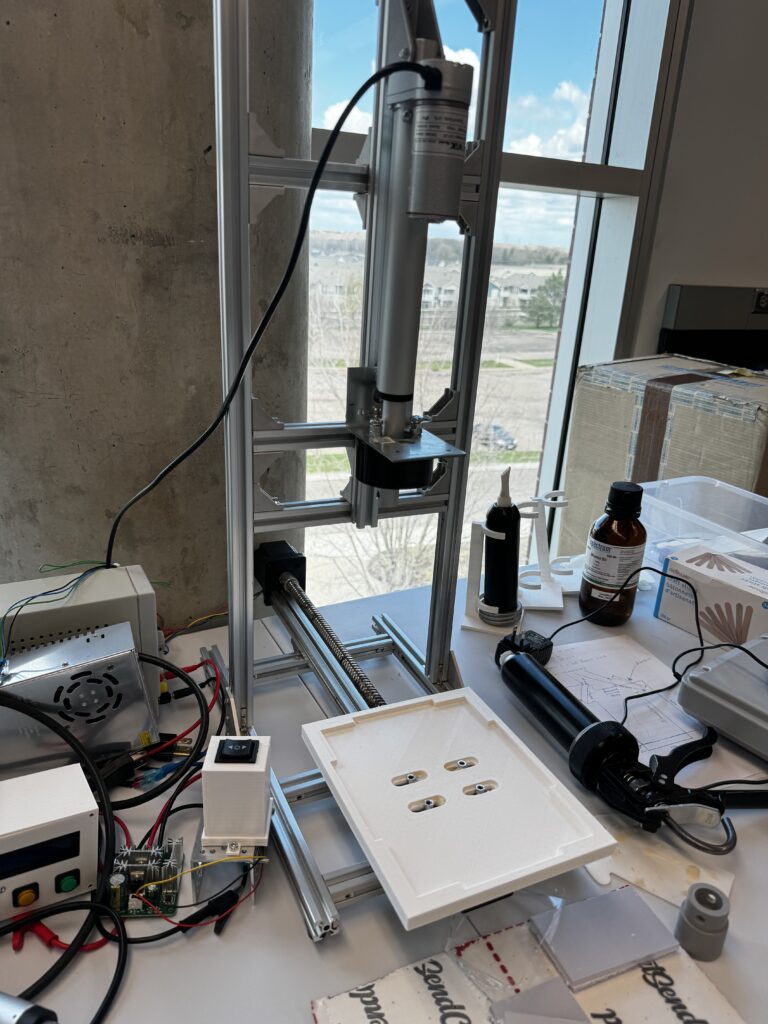
At Arduino Expert, we developed a custom fluid dispensing system using Arduino GIGA, linear actuator control, stepper-driven motion, and a Nextion LCD interface for a client who required precise and repeatable liquid dispensing on a moving surface. This project is an excellent example of our expertise in Product Design and Development Services, Custom Electronics Project Development, Embedded Systems Development, and advanced Arduino Projects for industrial and semi-industrial automation.
This custom machine was designed to perform two important operations. The first was a coating operation, where liquid had to be dispensed evenly across a flat surface while the substrate moved underneath the nozzle. The second was a dispensing operation, where the operator could command a fixed amount of liquid to be dispensed at a controlled speed. The project requirement also called for configurable operating parameters, manual motion control, and real-time status visibility for the operator.
The result was a smart, operator-friendly dispensing solution that combined motion control, fluid control, HMI interaction, and custom firmware into a single integrated system. For businesses looking for custom automation, process optimization, or prototype machine development, this project shows how Arduino can be used to build powerful and cost-effective industrial solutions.

Components Used in the Fluid Dispensing System
This Fluid Dispensing System using Arduino and linear actuator was developed using a carefully selected combination of control electronics, motion components, operator interface hardware, and mechanical actuation elements. Each component played an important role in achieving accurate liquid dispensing, controlled movement, and reliable machine operation. This project is a strong example of Custom Electronics Project Development, Embedded Systems Development, and practical Product Design and Development for automation applications.
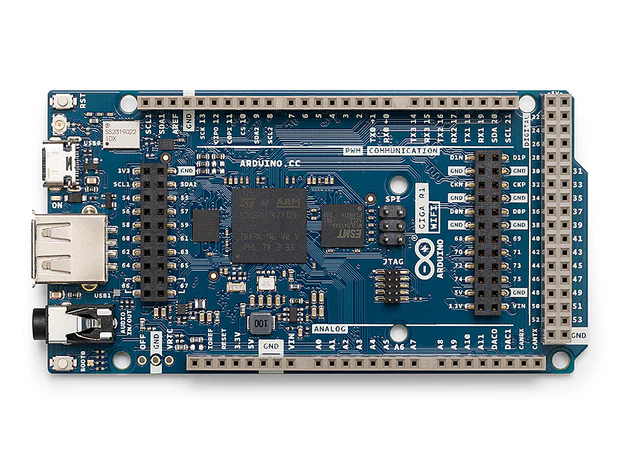
1. Arduino GIGA R1 WiFi / Main Controller
The core of the system is the Arduino GIGA R1 WiFi, which acts as the main controller for the entire fluid dispensing machine. It handles motion control logic, process sequencing, operator commands, and communication with the HMI. In this project, the Arduino board coordinates the linear actuator, the moving table, manual jogging functions, and the dispensing cycle parameters such as speed and volume.
Using Arduino as the main platform made the system highly flexible, programmable, and easier to customize for the client’s exact requirements. This is one of the reasons Arduino is widely used in advanced Arduino Projects, industrial prototypes, and custom machine development.
2. HMI Display Interface
The Nextion Touch LCD serves as the operator interface of the machine, allowing the user to control dispensing parameters, start and stop operation, manually jog the axes, and monitor cartridge usage. A dedicated HMI makes the machine easier to operate, improves workflow, and reduces dependency on direct firmware changes.
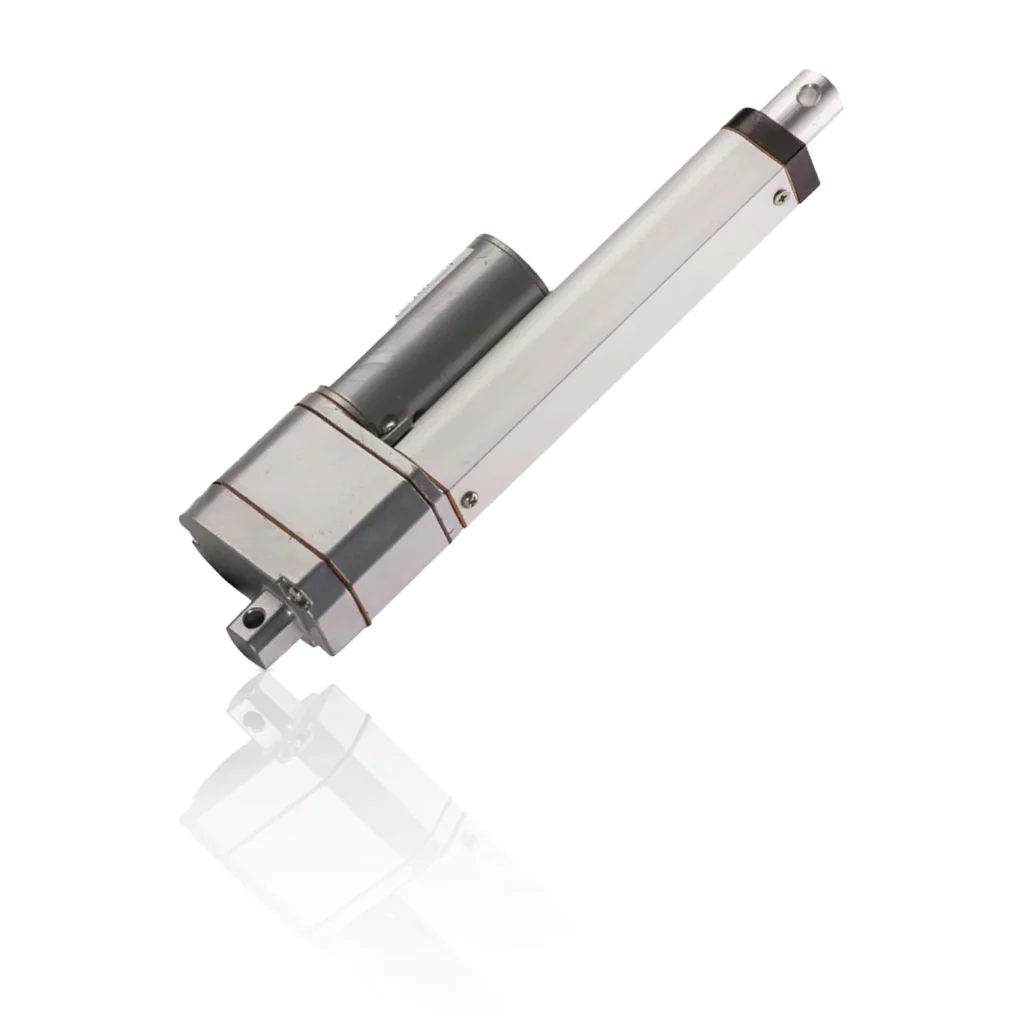
3. Linear Actuator with Potentiometer Feedback
The most critical motion component in the dispensing system is the linear actuator with potentiometer feedback. This actuator drives the plunger of the fluid cartridge and controls the dispensing motion along the Z-axis. It is an 8-inch stroke, 200 lb feedback rod actuator, which is ideal for pushing the cartridge plunger with controlled force and measurable displacement.
The built-in potentiometer feedback is especially important because it allows the controller to estimate actuator position in real time. This helps the machine:
- control dispense distance
- estimate dispensed volume
- monitor cartridge remaining level
- generate low-material alerts for the operator
This makes the actuator much more useful than a simple non-feedback linear mechanism.
4. BTS7960 43A High Power Motor Driver
To operate the linear actuator safely and effectively, the system uses a dedicated BTS7960 motor driver. The motor driver allows the Arduino GIGA R1 WiFi controller to switch and control the actuator movement in the required direction and at the required speed, depending on the dispensing mode.
This part of the system is essential because Arduino alone cannot directly drive a high-current actuator. The motor driver acts as the power interface between the low-voltage control electronics and the actuator hardware. In custom automation systems, correct driver selection is a key part of reliable Embedded Systems Development.
5. Linear Stage Actuator with Nema23 Stepper Motor
The moving work surface in this project is based on a linear stage with a Nema23 stepper motor. This assembly forms the Y-axis of the machine and moves the plate or flat workpiece underneath the dispensing nozzle. During coating mode, this motion is synchronized with the fluid dispensing action so that liquid can be applied evenly across the surface.
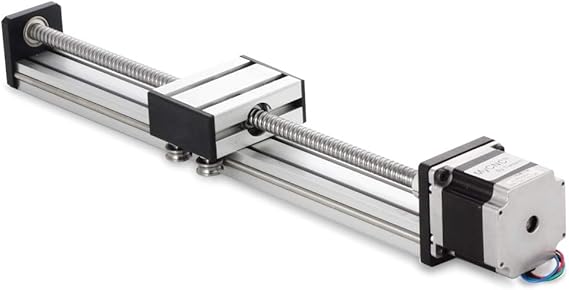
The use of a stepper-driven stage provides:
- repeatable positioning
- controlled travel speed
- precise movement over a defined distance
- better consistency for coating operations
This component is central to converting the project from a simple dispenser into a coordinated fluid coating and dispensing automation system.
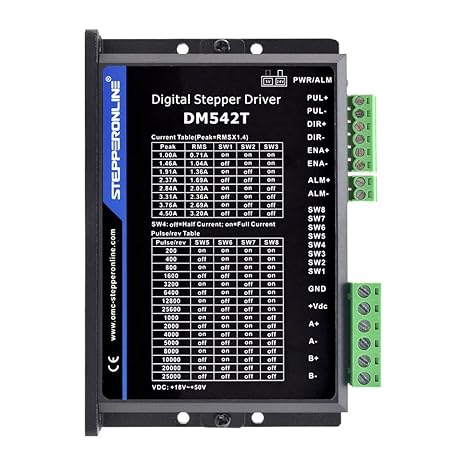
6. DM542 Stepper Motor Driver/Controller
The stepper motor controller drives the Y-axis linear stage and allows the Arduino to command controlled motion of the moving table. This controller receives motion signals from the main control system and converts them into accurate stepper movement.
The stepper controller is important for:
- setting table motion speed
- controlling start and stop positions
- returning the stage to the original position
- supporting repeatable coating cycles
This motion-control element is one of the major reasons the system can maintain synchronization between dispensing and substrate movement.
7. Push Buttons
These 16MM Momentary Push Buttons are useful for machine control, emergency handling, manual triggering, setup operations, or physical interface backup in addition to the screen-based HMI.
Push buttons improve operator convenience and add an extra layer of practical usability.
Checkout Our Project: Liquid Vending Machine Using Arduino Mega and Peristaltic Pumps
Features of the Fluid Dispensing Machine
Precise fluid dispensing control
The system was designed for precise low-flow liquid dispensing. The actuator position was mapped to dispense distance, allowing the firmware to manage repeatable output for coating as well as fixed-volume dispensing.
Dual operating modes
The machine supports:
Coating Mode
A continuous dispensing sequence where the table moves under the nozzle while the actuator pushes fluid at a controlled rate.
Dispensing Mode
A fixed-volume dispensing sequence where the actuator moves a calculated distance to deliver a configurable quantity of fluid.
Motion synchronization
One of the most important engineering aspects of this project was coordinating the table movement and plunger actuation. This synchronization is essential in any custom liquid dispensing machine where the fluid bead, coating thickness, or deposited volume must remain consistent.
Manual operation mode
The requirement sheet also included manual jog controls for both the dispenser and the table. This is extremely valuable during setup, calibration, maintenance, and trial runs. Operators can move each axis in small increments without running the full program.
Configurable process parameters
The operator can adjust key variables such as:
- dispense speed
- table speed
- dispense volume
- jog speed
- start and stop commands
These controls make the machine adaptable to different fluids, substrates, and production conditions.
Cartridge remaining indication
The client also required actuator position feedback to be used as a cartridge remaining indicator. This is a practical feature in real-world production because it helps the operator know when the cartridge is approaching empty and when a refill or replacement is needed.
Stop and cancel safety logic
Another important feature is the ability to stop the system at any point during operation. According to the project requirement, pressing stop during the sequence must immediately halt motion. That makes the system safer, easier to test, and more practical for operator-controlled workflows.
Don’t forget to Checkout Our Linear Actuator Control System with Arduino
Coating Mode and Dispensing Mode of Fluid Dispensing System
Coating Mode
In coating mode, the machine performs a sequence-driven process. The work table begins moving at a defined speed. Once the table reaches the correct position, the dispenser starts pushing fluid while the surface continues to move below it. After the required dispense distance or volume is reached, the actuator stops, the table continues slightly further, and then returns to its original position at a higher speed. This creates an efficient coating workflow for repetitive production tasks.
This mode is ideal for:
- controlled line application
- surface coating
- adhesive spreading
- sealant deposition
- material layering on flat substrates
Dispensing Mode
In dispensing mode, the operator sets the required dispense amount and speed, then starts the cycle. The actuator travels the exact calculated distance needed to push the desired fluid volume from the cartridge. This is useful where the system needs to place a known amount of fluid at one point rather than coating a moving surface.
This mode is suitable for:
- adhesive dosing
- resin dispensing
- gel application
- lubricant dosing
- chemical dispensing
- prototype fluid delivery systems
If you Need a Powder Dispenser Machine with Touch LCD Control and Arduino? then this project is for you.
Nextion LCD HMI for Easy Operator Control
A major strength of this project is the Nextion LCD HMI interface, which makes the machine far more practical for real users. Instead of relying on code changes or complex serial commands, the operator can interact with a visual control panel for setup and operation.
The HMI concept for this project includes controls for:
- coating speed
- dispensing speed
- table speed
- dispense volume
- start
- stop/cancel
- manual jog controls
- cartridge status or remaining percentage
This type of human-machine interface is especially valuable in custom equipment because it reduces the learning curve for operators and allows quick changes without editing firmware. In industrial automation, operator usability is just as important as electronics design and motion control accuracy.
Checkout our Project: Nextion Touch LCD based Weight Machine using Arduino
Product Design and Development Approach
This project is not just an Arduino code example. It is a complete case of Product Design and Development and Custom Electronics Project Development. This Approach usually involve several stages:
1. Requirement analysis
We first study the client’s process, application goals, movement requirements, liquid properties, target volume, and operator workflow.
2. System architecture
We define the control architecture, motion axes, feedback method, user interface requirements, power electronics, and control logic needed to make the system reliable.
3. Embedded systems development
We build the firmware that controls timing, actuator movement, dispense calculations, user commands, manual jogging, and operational safety handling.
4. HMI and operator workflow design
We develop the control screen layout and logic so the machine can be operated easily by non-programmers.
5. Prototyping and tuning
Because fluid behavior varies depending on viscosity, cartridge size, nozzle design, and mechanical setup, custom systems require calibration and fine tuning. The project brief itself notes that some offsets, speeds, and operational variables would need configuration on the real equipment.
6. Testing and refinement
Once integrated, the system is tested for repeatability, usability, motion reliability, and dispensing consistency.
This is exactly the kind of project where Embedded Systems Development meets real-world automation engineering.
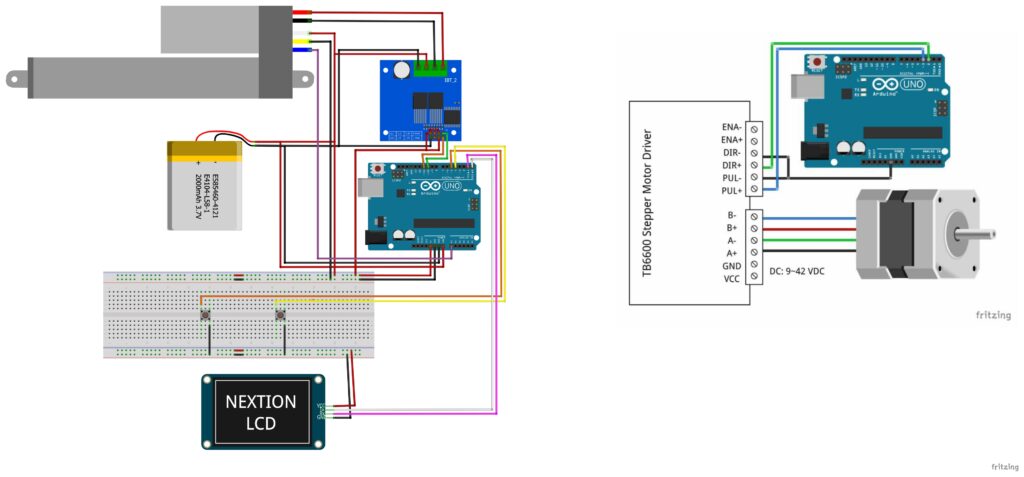
Circuit Diagram of Arduino GIGA Fluid Dispensing System
Arduino Code for Linear Actuator Dispensing Machine
// Define stepper motor connections and steps per revolution:
#define dirPin 2
#define stepPin 3
#define stepsPerRevolution 1600

int myVariable = 20; // Variable with initial myVariable 20
int stepDurationMicros = 0;
int speed;
// Variables to track time and step intervals
unsigned long previousStepMicros = 0;
unsigned long stepIntervalMicros = 1000; // Interval between steps in microseconds
//unsigned long stepDurationMicros = 500; // Duration of each step in microseconds
int stepCounter = 0;
int direction = 1; // 1 for clockwise, -1 for counterclockwise
bool flag=false;

void setup() {
Serial.begin(9600); // Start serial communication for debugging
// Initialize t0.txt variable on Nextion display with initial myVariable of myVariabl
updateNextionVariable();
// Declare pins as output:
pinMode(stepPin, OUTPUT);
pinMode(dirPin, OUTPUT);
}
Working Video of Fluid Dispensing System
Applications of This Fluid Dispensing System Machine
This type of Arduino fluid dispensing system can be adapted for many industries and use cases, including:
- adhesive dispensing
- epoxy or resin application
- sealant deposition
- lubricating fluid application
- laboratory dosing systems
- prototype manufacturing equipment
- electronics assembly support tools
- coating experiments and R&D setups
- packaging and process automation
- custom industrial automation lines
Because it is based on a flexible embedded control architecture, the same platform can be expanded with load sensors, flow sensors, vision alignment, recipe storage, or cloud-connected process monitoring.
Need Help in this Custom Liquid Dispensing Machine Project?
If you want:
- Full project files
- Custom modifications
- Commercial product development
→ You can contact us through WhatsApp. We can deliver you this Project to your Doorstep with Safe Packaging or we can also provide you assistance for this project.
Frequently Asked Questions (FAQs)
1. What is a fluid dispensing system using Arduino?
A fluid dispensing system using Arduino GIGA R1 WiFi is a custom automation solution that controls the release of liquid, adhesive, resin, or similar material with programmable accuracy. It can combine actuators, motors, sensors, and an HMI to create a repeatable dispensing process.
2. Why use a linear actuator in a dispensing machine?
A linear actuator is ideal for pushing a syringe or cartridge plunger in a controlled manner. It allows accurate movement, repeatable dosing, and easier integration with feedback-based control logic.
3. What is the benefit of a Nextion LCD in an Arduino automation project?
A Nextion LCD provides a user-friendly interface for operators to set volume, speed, start and stop commands, and other process variables without editing firmware or using a computer.
4. Can this dispensing system be customized for other liquids?
Yes. A custom dispensing system can be tuned for different fluid viscosities, cartridge sizes, nozzle diameters, and process requirements. That is one of the major benefits of custom product development.
5. Does Arduino Expert develop custom dispensing and automation systems?
Yes. Arduino Expert works on Arduino Projects, Product Design and Development, Custom Electronics Project Development, and Embedded Systems Development for custom industrial, commercial, and prototype applications.