Measuring temperature is one of the most common requirements in electronics projects. Whether you’re building a weather station, a smart thermostat, or a temperature-controlled fan, the LM35 Temperature Sensor is a reliable and affordable solution.
In this blog, we’ll walk you through how to use the LM35 with Arduino. You’ll learn how to wire it up, read temperature values in Celsius.
What is the LM35 Temperature Sensor?
The LM35 is a precision integrated-circuit temperature sensor whose output voltage is linearly proportional to the Celsius temperature. It provides an analog voltage that can be directly read by an Arduino’s analog pin.
This sensor is fairly precise and cheap. It is accurate and works with different environmental conditions. LM35 sensor does not require calibration and provides accuracy of ±0.5°C at room temperature and ±1°C over a full −55°C to +155°C temperature range.
Some specification on this sensors are as follows:
The disadvantage of this sensor is that it cannot measure temperature without negative biasing. For measuring negative temperature we recommend you to use another sensor (TMP36).

Key Features of LM35 Temperature Sensor:
- Calibrated directly in Celsius
- Linear +10.0 mV/°C scale factor
- Operating range: 0°C to 150°C
- Accuracy ±0.5°C (at room temperature)
- Low self-heating
Working Principle of LM35 Sensor:
The LM35 Temperature Sensor is an analog sensor that operates based on the principle that the output voltage is linearly proportional to the temperature in degrees Celsius.
It uses a solid-state method to measure the temperature. It makes use of the fact that the voltage drop between the base and emitter (forward voltage – Vbe) of the Diode-connected transistor decreases at a known rate as the temperature increases. By amplifying this voltage change, it is possible to generate analog signal that is directly proportional to the temperature.

The good thing is that these calculations are done by sensor itself it shows only voltage only that is directly proportional to the temperature.
The LM35 produces a voltage output of 10 millivolts (mV) for every 1°C rise in temperature. The LM35 produces a voltage output of 10 millivolts (mV) for every 1°C rise in temperature.
For example:
- At 0°C, the output voltage is 0.00V
- At 25°C, the output voltage is 0.25V
- At 50°C, the output voltage is 0.50V
This linear output allows the Arduino to easily read the temperature by converting the analog voltage signal using the ADC (Analog to Digital Converter).
Why LM35 is Better Than Thermistors:
- Pre-calibrated in Celsius
- Linear output, easy to interpret
- No external calibration required
- Low self-heating, ensuring more accurate readings over time
Components Required for using LM35 with Arduino:
- Arduino UNO (or any compatible board)
- LM35 Temperature Sensor
- Breadboard
- Jumper wires
- (Optional) 16×2 LCD Display with I2C module
- USB Cable for Arduino
- Arduino IDE installed on your
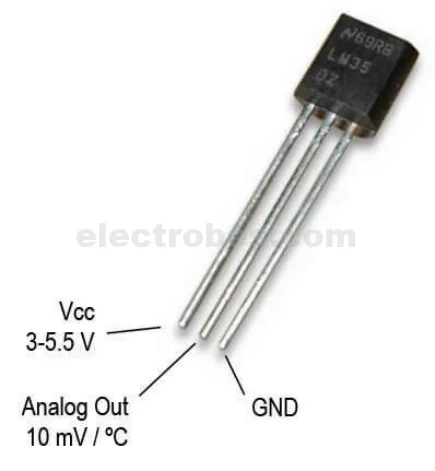
LM35 Temperature Sensor Pinout:
- Vcc is the power supply which can be between 4V to 30V.
- Vout pin produces an analog voltage that is directly proportional to the temperature.
- GND is a ground pin.
Circuit Diagram of LM35 Temperature Sensor to an Arduino:
Here’s how to connect the LM35 sensor to the Arduino:
| LM35 Pin | Connection |
|---|---|
| VCC | 5V on Arduino |
| GND | GND on Arduino |
| OUT | A0 on Arduino |

Arduino Code for LM35 Temperature Sensor:
const int lm35Pin = A0;  // Analog pin connected to LM35
float temperatureC;

void setup() {
  Serial.begin(9600);
}

void loop() {
  int sensorValue = analogRead(lm35Pin);  // Read analog voltage
  temperatureC = sensorValue * (5.0 / 1023.0) * 100.0;  // Convert to Celsius
  Serial.print("Temperature: ");
  Serial.print(temperatureC);
  Serial.println(" °C");
  delay(1000);  // Wait for 1 second
}
You can see the result by opening serial monitor:
Applications of LM35 Temperature Sensor:
- HVAC Control Systems
- Smart Home Temperature Monitoring
- Weather Stations
- Greenhouse Monitoring
- Fire Detection Systems
Troubleshooting LM35 Temperature Sensor with Arduino:
- Ensure stable 5V power for accurate readings.
- Use shorter wires to reduce noise in analog readings.
- Avoid touching the LM35 with your fingers during testing—it may affect readings.
Conclusion:
Using the LM35 temperature sensor with Arduino is simple and effective for many real-world projects. With just a few lines of code and minimal wiring, you can begin monitoring temperature in real time and even integrate it with displays or IoT platforms.
Need Help in Setup of LM35 Temperature Sensor with Arduino?
If you need any Help or Assistance for Setup of LM35 Temperature Sensor with Arduino, with Modifications or Customization then you can contact us through WhatsApp. We can deliver you this Project in the Following Ways.


Hello arduinotutors.com webmaster, Good work!