One of the very first and most exciting things to try when learning Arduino is lighting up an LED. LEDs are simple yet powerful indicators, and they serve as a great starting point for understanding digital outputs, analog signals (PWM), and coding basics.
In this blog, you’ll learn:
- How to connect an LED to an Arduino
- How to turn it ON and OFF using code
- How to control LED brightness using PWM (Pulse Width Modulation)

What is an LED?
An LED (Light Emitting Diode) is a component that emits light when current flows through it in the correct direction. LEDs are polarized, meaning they have a positive (anode) and a negative (cathode) terminal.

Important:
Always use a current-limiting resistor (typically 220Ω to 1kΩ) with an LED to avoid burning it out.
Components for Connecting LED to Arduino:
- Arduino UNO (or any compatible board)
- 1x LED (any color)
- 1x Resistor (220Ω recommended)
- Breadboard
- Jumper Wires
- USB Cable to upload code
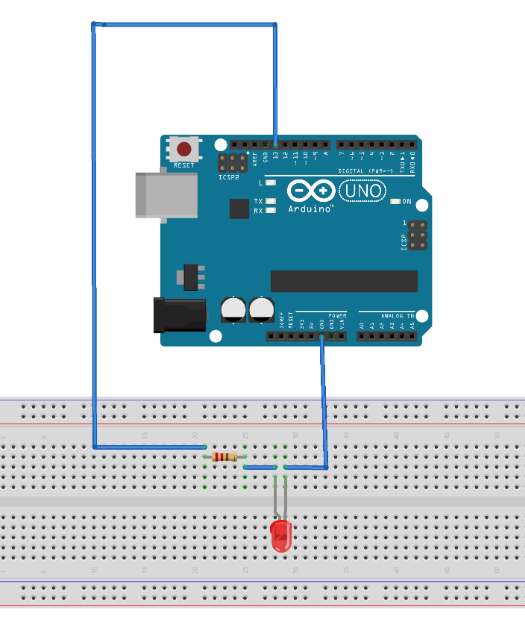
Circuit Diagram for Connecting LED to Arduino:
Connections:
- LED Anode (longer leg) → Arduino Digital Pin 12
- LED Cathode (shorter leg) → One end of 220Ω Resistor
- Other end of the resistor → Arduino GND
Note: You can also connect the resistor on the anode side; the position doesn’t matter as long as it is in series.
Arduino Code for Blink LED or to Turn LED ON and OFF:
int LED = 13;  // LED is connected to pin 13

void setup() {
  pinMode(LED, OUTPUT); // Declare the LED pin as an output
}

void loop() {
  digitalWrite(LED, HIGH); // Turn the LED on
  delay(500);
  digitalWrite(LED, LOW); // Turn the LED off
  delay(500);
}
How to control brightness of LED with Arduino?
Arduino can’t output analog voltage directly, but it can simulate it using PWM (Pulse Width Modulation). PWM turns the pin ON and OFF very fast — the longer the ON time, the brighter the LED appears.
Only certain pins on Arduino support PWM — usually marked with a ~ symbol (e.g., 3, 5, 6, 9, 10, 11 on UNO).
Controlling Brightness of LED with a Potentiometer and Arduino:
You can also control LED brightness manually using a potentiometer connected to an analog pin.
What is a Potentiometer :
Potentiometer is also known as “variable resistors”. Potentiometers have a knob or dial to change their resistance. We use the potentiometer to control the flow of current.
Pinout of Potentiometer:
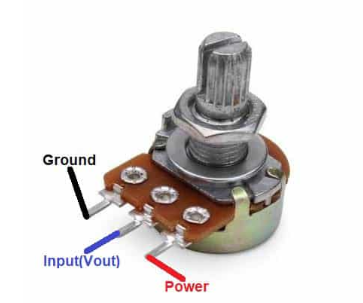
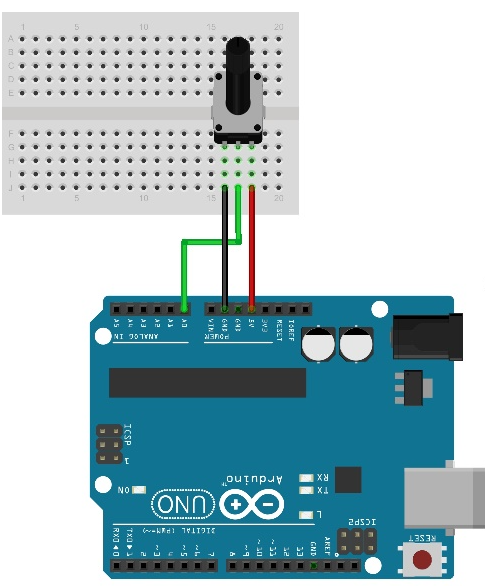
- Ground –> GND
- Vcc –> 5V(Vcc)
- Vout–> A0
How to Connect a Potentiometer with Arduino? Circuit Diagram:
Arduino Code for Reading Potentiometer Output Voltage:
void setup() {
  // initialize serial communication at 9600 bits per second:
  Serial.begin(9600);
}

// the loop routine runs over and over again forever:
void loop() {
  // read the input on analog pin 0:
  int sensorValue = analogRead(A0);

  // print out the value you read:
  Serial.println(sensorValue);
  delay(1);        // delay in between reads for stability
}
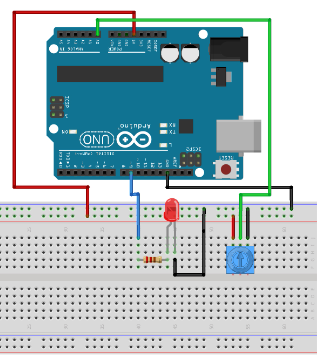
Circuit Diagram for Controlling LED Brightness with a Potentiometer:
Connections:
- Potentiometer middle pin → A0
- One outer pin → 5V
- Other outer pin → GND
Arduino Code for Controlling LED Brightness with a Potentiometer:
int led = 9;
int brightness = 0;

void setup() {

  Serial.begin(9600);
  pinMode(led, OUTPUT);
}


void loop() {
  // read the input on analog pin 0:
  int sensorValue = analogRead(A0);
  analogWrite(led, brightness);

  // Map function is used to map the value of potentiometer 0-255
  brightness = map(sensorValue,0,1023,0,255);

  // print out the value you read:
  Serial.println(brightness);
  delay(1);        // delay in between reads for stability
}
Video Tutorial for Using LED with Arduino and Control LED Brightness:
Applications of LEDs:
- Indicator lights (power ON/OFF, status)
- RGB LED effects
- Visual feedback in projects (temperature warnings, input confirmation)
- Light dimmers
- Traffic light simulations
Troubleshooting of LED with Arduino:
| Problem | Solution |
|---|---|
| LED not lighting up | Check polarity & resistor value |
| Always ON or OFF | Verify code logic and pin number |
| Brightness not changing | Ensure you’re using a PWM pin |
| LED flickers | Check your connections |
Conclusion:
Using an LED with Arduino is the perfect first step into the world of electronics and coding. You’ll learn about pin configuration, digital and analog signals, and how to make interactive effects. Once you master this, you can move on to controlling RGB LEDs, WS2812 strips, and even smart lighting systems.
Need Help in Setup of LED with Arduino?
If you need any Help or Assistance for Setup of LED with Arduino, with Modifications or Customization then you can contact us through WhatsApp. We can deliver you this Project in the Following Ways.
Learn More about the services we offer.

