In this guide, we will walk you through how to connect a joystick to an Arduino, read its values, and use it to control LEDs, motors, robots, or even games! Input devices are the heart of interactive electronics projects. One of the most versatile and easy-to-use input devices is the Joystick module.
What is a Joystick Module?
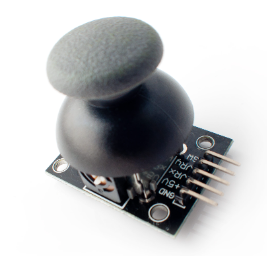
Joystick is basically a gaming controller. They are used for playing games. It is an input device. It is also called Control stick. In Electronics, you can do a lot of fun with it. Like controlling a robot, a car, controlling the movement of camera etc.
A joystick is a simple analog device that measures movement along two axes:
- X-axis (horizontal)
- Y-axis (vertical)
It usually also includes a push-button switch when you press it down.
The most common joystick for Arduino use is based on the PS2 (PlayStation 2) analog stick, which outputs two varying voltages corresponding to its position, and one digital signal for the button.
Joystick is similar like two potentiometer are connected together 1 for x-axis and the other for y-axis.
How Joystick Work?
The joystick uses two potentiometers (variable resistors) inside:
- Moving the stick left/right changes the resistance on the X-axis potentiometer.
- Moving the stick up/down changes the resistance on the Y-axis potentiometer.
These variable resistances are converted into analog voltages, which the Arduino can easily read using its analog input pins.
When pressed, the joystick triggers a digital LOW signal (ground).
Components Needed for Connecting Joystick with Arduino:
- Arduino Board (Uno, Nano, Mega, etc.)
- Analog Joystick Module
- Jumper Wires
- Breadboard (optional)
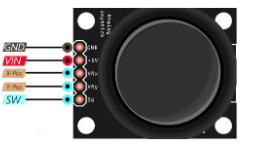
Joystick Module Pinout :
| Joystick Pin | Function |
|---|---|
| GND | Ground (0V) |
| +5V | Power supply (5V) |
| VRx | X-axis output (analog) |
| VRy | Y-axis output (analog) |
| SW | Switch output (digital) |
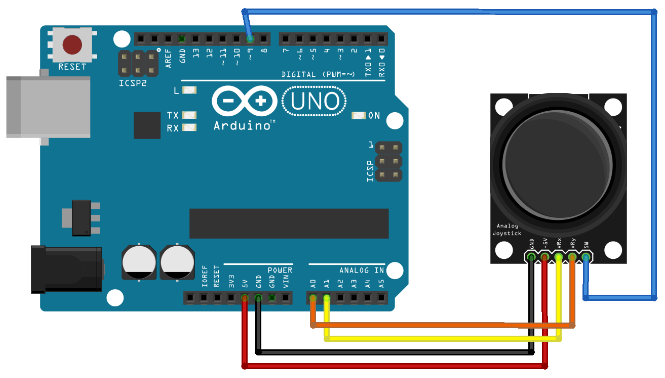
Circuit Diagram for Connecting Joystick Module with Arduino:
| Arduino Pin | Joystick Pin |
|---|---|
| GND | GND |
| 5V | +5V |
| A0 | VRx |
| A1 | VRy |
| D2 | SW |
Code for Joystick Module with Arduino:
#define joyX A0
#define joyY A1
#define SW 9
double xValue = 0;
double yValue = 0;


void setup() {
  Serial.begin(9600);
  pinMode(SW, INPUT_PULLUP);
}

void loop() {

  xValue = analogRead(joyX);
  yValue = analogRead(joyY);


//  xValue = map(xValue, 0, 1023, 0, 10000);
//  yValue = map(yValue, 0, 1023, 0, 10000);
  Serial.print ("xValue");
  Serial.print (xValue,0);
  Serial.print ("\t");
  Serial.print ("yValue");
  Serial.println (yValue,0);
  if(digitalRead(SW) == LOW)
  Serial.print("\n\n Button pressed \n\n");
}
Open the Serial Monitor (baud rate 9600) and start moving the joystick — you’ll see real-time values!
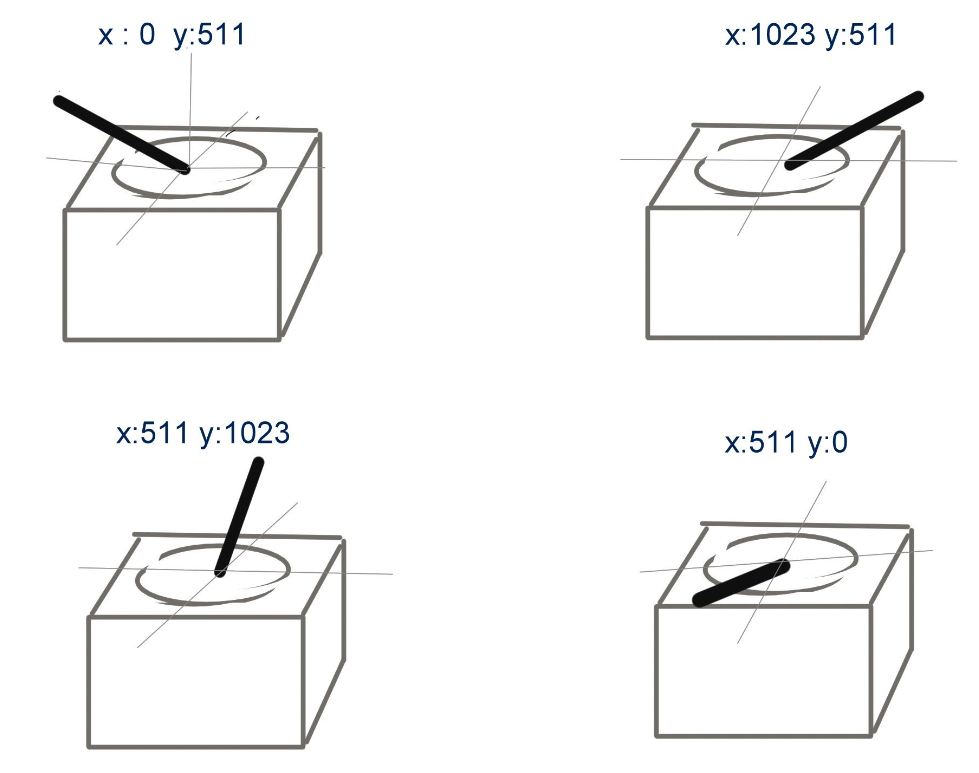
Understanding the Output of Joystick:
- X and Y Values:
- Range from around 0 to 1023.
- Centered position is usually around 512.
- Left/Down → Values decrease toward 0.
- Right/Up → Values increase toward 1023.
- Switch Value (SW):
- Pressed → Reads LOW (0).
- Released → Reads HIGH (1).
Joystick Module with Arduino Video Tutorial:
Applications of Joystick Module:
Controlling Robots: Move a robot forward, backward, left, and right.
Servo Motor Control: Move a servo arm based on joystick movement.
Game Controllers: Build your own gamepads.
Camera Gimbals: Pan and tilt a camera.
Menus and User Interfaces: Navigate screens on displays.
Common Troubleshooting Tips for Joystick Module:
- No readings or unstable values?
- Check the power and ground connections.
- Verify that you’re reading the correct analog pins.
- Button always reads “pressed”?
- Make sure you enabled
INPUT_PULLUPinpinMode()for the SW pin.
- Make sure you enabled
- Movement not smooth?
- Use
map()function and apply small dead zones (small margin around center) to avoid unwanted drift.
- Use
Conclusion:
The joystick module opens up so many exciting possibilities for control-based Arduino projects. With just a few lines of code and simple wiring, you can add powerful user interaction to your designs.
We encourage you to experiment and combine the joystick with servos, motors, displays, and wireless modules to create truly interactive systems!
Stay tuned for more Arduino tutorials, project ideas, and deep dives into amazing modules!
Need Help in Setup of Joystick Module?
If you need any Help or Assistance for Setup of Joystick Module with Arduino, with or without Modifications or Customization then you can contact us through WhatsApp. We can deliver you this Project in the Following Ways.
Learn More about the services we offer.


Good day! I just want to offer you a big thumbs up for your excellent information you have got here on this post. Ill be coming back to your blog for more soon.