we will guide you through one of the most important and useful interfaces for any Arduino project: connecting and using an I2C LCD display. By the end of this guide, you’ll be confidently displaying your own text, numbers, and messages using minimal wiring and simple Arduino code.
What is an I2C LCD?
LCDs (Liquid Crystal Displays) are widely used in Arduino projects to display information like sensor readings, system status, or user instructions.

The most common LCD is 16×2 LCD. The LCD which has 2 rows and 16 columns is called 16×2 LCD. While LCD with 4 rows and 20 columns is Known as 20×4 LCD. A standard 16×2 LCD requires 6 or more Arduino pins for connection, which can be quite messy and limiting. This is where I2C (Inter-Integrated Circuit) communication comes in.
I2C LCD modules have a small I2C adapter (usually PCF8574 chip) attached to the back of a standard LCD. This allows the LCD to communicate with the Arduino using only two wires:
- SDA (Serial Data Line)
- SCL (Serial Clock Line)
Key Benefits i2C LCD as Compare to Normal LCD:
- Saves Arduino pins (only 2 required)
- Simpler wiring
- Easy to expand (you can connect multiple I2C devices)
Components Requirements :
- LCDs (Liquid Crystal Displays) are widely used in Arduino projects to display information like sensor readings, system status, or user instructions.
- A standard 16×2 LCD requires 6 or more Arduino pins for connection, which can be quite messy and limiting. This is where I2C (Inter-Integrated Circuit) communication comes in.
- I2C LCD modules have a small I2C adapter (usually PCF8574 chip) attached to the back of a standard LCD. This allows the LCD to communicate with the Arduino using only two wires:
- SDA (Serial Data Line)
- SCL (Serial Clock Line)
- Key Benefits:
- Saves Arduino pins (only 2 required)
- Simpler wiring
- Easy to expand (you can connect multiple I2C devices)
Pinout of i2C LCD:

Circuit Diagram for connecting i2C LCD with Arduino:
| Arduino Pin | I2C LCD Pin |
|---|---|
| A4 (SDA) | SDA |
| A5 (SCL) | SCL |
| 5V | VCC |
| GND | GND |

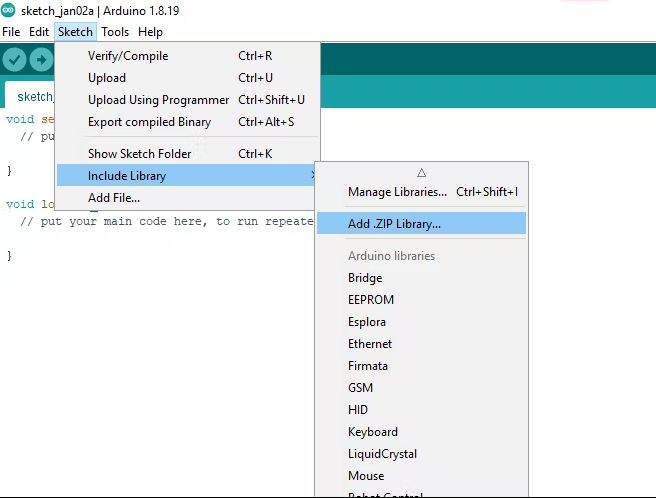
How to Add LCD Library in Arduino IDE Software:
Before we can program the LCD, we need to install a library that makes controlling it very easy.
(For New Arduino IDE)
Steps:
- Open Arduino IDE.
- Go to Sketch > Include Library > Manage Libraries.
- In the search bar, type “LiquidCrystal_I2C”.
- Install the one by Frank de Brabander or Marco Schwartz.
(For old Arduino IDE)
Step 1 –> Download the library
Here you can download the library:
https://www.arduino.cc/reference/en/libraries/liquidcrystal-i2c/
Step 2 –> Go to sketch –> Go to Include library –> Click on Add .ZIP library…
Arduino Code for Finding Your i2C Address :
Sometimes the I2C address is not 0x27. It could be 0x3F, 0x20, etc.
To find it:
- Install the I2C Scanner sketch:
#include <Wire.h>

void setup() {
  Wire.begin();
  Serial.begin(9600);
  Serial.println("\nI2C Scanner");
}

void loop() {
  byte error, address;
  int nDevices;

  Serial.println("Scanning...");

  nDevices = 0;
  for (address = 1; address < 127; address++) {
    Wire.beginTransmission(address);
    error = Wire.endTransmission();

    if (error == 0) {
      Serial.print("I2C device found at address 0x");
      if (address < 16)
        Serial.print("0");
      Serial.print(address, HEX);
      Serial.println(" !");
      nDevices++;
    }
  }

  if (nDevices == 0)
    Serial.println("No I2C devices found\n");
  else
    Serial.println("Done\n");

  delay(5000); // Wait 5 seconds for next scan
}
Arduino Code for i2C LCD :
#include <Wire.h>
#include <LiquidCrystal_I2C.h>

// Set the LCD address to 0x27 for a 16 chars and 2 line display
LiquidCrystal_I2C lcd(0x27, 16, 2);

void setup()
{
	// initialize the LCD
	lcd.begin();

	// Turn on the backlight and print a message.
	lcd.backlight();
  lcd.setCursor(0,0); // before comma set column number and after comma set row number
	lcd.print("ArduinoTutors.com");
  lcd.setCursor(6,0); // before comma set column number and after comma set row number
  lcd.print("Hello, viewer!");
}

void loop()
{
	// Do nothing here...
}
i2C LCD with Arduino, Video Tutorial:
Common Troubleshooting Tips for i2C LCD:
- Wrong Address: Use the I2C scanner to find the correct address.
- No Display: Ensure SDA and SCL are correctly connected.
- Dim Text: Adjust the contrast potentiometer on the I2C module.
- Library Errors: Make sure you install the correct
LiquidCrystal_I2Clibrary.
Applications of i2C LCD:
You can use an I2C LCD for:
- Sensor Data Displays
- Clocks and Timers
- Weather Stations
- Home Automation Dashboards
- Industrial Monitoring Systems
Conclusion:
Using an I2C LCD with Arduino makes your projects more efficient, neat, and scalable. With just a few lines of code, you can create beautiful, professional-looking displays!
At ArduinoExpert.com, we encourage you to experiment: try scrolling text, custom characters, or even multi-screen systems using I2C!
If you found this guide helpful, don’t forget to check out our other tutorials and Arduino project ideas!
Need Help in Setup of i2C LCD?
If you need any Help or Assistance for Setup of i2C LCD with Arduino, with or without Modifications or Customization then you can contact us through WhatsApp. We can deliver you this Project in the Following Ways.
Learn More about the services we offer.


Good day! I just want to offer you a big thumbs up for your excellent information you have got here on this post. Ill be coming back to your blog for more soon.