Hall effect sensor is powerful tool used to detect magnetic fields. In Arduino projects, they open up a wide range of possibilities, from measuring rotational speed and detecting proximity to creating contactless switches. In this detailed guide, we’ll walk you through how to use a Hall effect sensor with Arduino, complete with connections, code, and project ideas.
What is a Hall Effect Sensor?
A Hall effect sensor is an electronic device that responds to a magnetic field. When it detects a magnetic field near it, the sensor outputs a voltage signal that can be read by a microcontroller like Arduino.
There are two common types of Hall effect sensors:
- Analog Hall Sensors: Output a continuous voltage that varies with the magnetic field strength.
- Digital Hall Sensors: Output a simple HIGH or LOW signal depending on the presence of a magnetic field.
For most beginner Arduino projects, a digital Hall effect sensor like the A3144 is typically used.
Components Required for Hall Effect Sensor Demo:
- To get started, you’ll need the following components:
- Arduino Uno (or any other Arduino board)
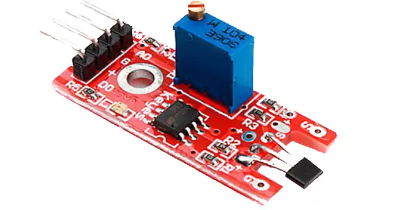
- Hall Effect Sensor Module (e.g., A3144)
- 10K ohm Pull-up Resistor (if not included in the module)
- Breadboard and Jumper Wires
- Small Magnet
Understanding the Pinout of a Hall Effect Sensor :
Most Hall sensors (like A3144) have three pins:
- VCC (Power): Connect to 5V on Arduino.
- GND (Ground): Connect to GND on Arduino.
- OUT (Signal): Connect to a digital pin on Arduino to read sensor output.
Many Hall sensor modules already have a pull-up resistor built in. If yours doesn’t, you’ll need to add a 10K resistor between VCC and OUT manually.
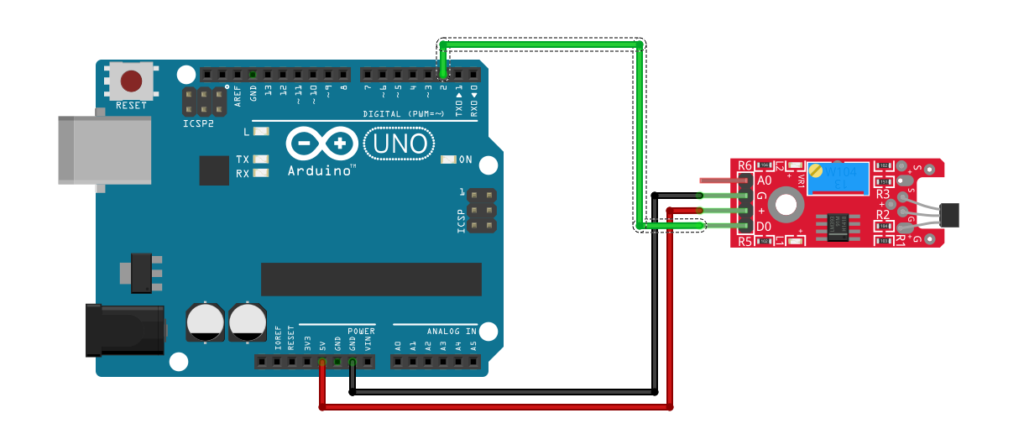
Circuit Diagram :
Here’s how to wire the Hall sensor to Arduino:
| Hall Sensor Pin | Arduino Pin |
|---|---|
| VCC | 5V |
| GND | GND |
| OUT | Digital Pin 2 |
Arduino Code for Hall Effect Sensor :
// constants won't change. They're used here to set pin numbers:
const int sensorPin = 2;     // the number of the Hall effect pin
const int ledPin =  13;      // the number of the LED pin (Built-in LED of Arduino Uno)

// variables will change:
int buttonState = 0;         // variable for reading the Hall effect status

void setup() {
  // initialize the LED pin as an output:
  pinMode(ledPin, OUTPUT);
  // initialize the Hall effect sensor pin as an input:
  pinMode(sensorPin, INPUT);
}

void loop() {
  // read the state of the Hall effect value:
  buttonState = digitalRead(sensorPin);

  // check if the magnet is near to sensor. If it is, the buttonState is LOW:
  if (buttonState == LOW) {
    // turn LED on:
    digitalWrite(ledPin, HIGH);
  } else {
    // turn LED off:
    digitalWrite(ledPin, LOW);
  }
}Explanation:
- When a magnet is near the sensor, the output pin goes LOW.
- Arduino reads this state and lights up the built-in LED.
- Serial Monitor prints whether a magnet is detected.
How it Works
The Hall effect sensor acts like a magnetic switch:
- When there is no magnetic field, the output stays HIGH (5V).
- When a magnetic field is present, the output goes LOW (0V).
You can use this behavior to trigger actions in your Arduino projects, like counting wheel rotations, detecting door openings, or creating a simple tachometer.
Hall Effect Sensor with Arduino, Video Tutorial:
Applications of Hall Effect Sensors:
Here are some popular project ideas you can try:
- Speed Measurement: Measure the RPM of a motor or wheel.
- Contactless Switch: Replace mechanical switches with magnetic switches for better durability.
- Position Sensing: Detect the position of a moving object.
- Security Systems: Use magnets and Hall sensors to detect if a door or window has been opened.
- Magnetic Encoder: Build a low-cost rotary encoder.
Conclusion:
Integrating a Hall effect sensor with Arduino is simple but opens up endless possibilities. Whether you’re building a high-speed counter or creating a contactless switch, Hall sensors are reliable and easy to use.
At ArduinoExpert.com, we encourage you to experiment with different magnets, distances, and setups to fully understand how magnetic sensing can enhance your projects.
Stay tuned for more tutorials and project ideas! If you have any questions or need help, feel free to leave a comment below or reach out to us!
Need Help in Setup of Hall Effect Sensor?
If you need any Help or Assistance for Setup of Hall Effect Sensor with Arduino, with or without Modifications or Customization then you can contact us through WhatsApp. We can deliver you this Project in the Following Ways.
Learn More about the services we offer.

Good day! I just want to offer you a big thumbs up for your excellent information you have got here on this post. Ill be coming back to your blog for more soon.