Monitoring temperature and humidity is crucial for a wide range of applications—from home automation and weather stations to greenhouse monitoring and industrial environments. The DHT22 Sensor is a widely used and reliable sensor that can measure both temperature and humidity with high accuracy. The DHT22 sensor (also known as AM2302) is one of the most reliable and widely used digital sensors for this purpose.
In this blog, we’ll guide you through how to interface the DHT22 with Arduino, read data from the sensor, and display it on the Serial Monitor or an LCD display. We’ll also explain the working principle of the DHT22 to give you a deeper understanding of how it functions.

What is the DHT22 Temperature and Humidity Sensor?
The DHT22 is a digital sensor that can measure both temperature and relative humidity. It provides calibrated digital output, making it easier to interface with microcontrollers like Arduino.
Key Features of DHT22 Sensor:
- Temperature Range: -40°C to +80°C (±0.5°C accuracy)
- Humidity Range: 0% to 100% RH (±2-5% accuracy)
- Supply Voltage: 3.3V to 6V
- Digital signal output (single-wire communication)
- Low power consumption
Comparison of DHT11 and DHT22 Sensor:
| Parameters | DHT11 | DHT22 |
| Operating Voltage | 3 to 5V | 3 to 5V |
| Max Operating Current | 2.5mA max | 2.5mA max |
| Humidity Range | 20-80% / 5% | 0-100% / 2-5% |
| Temperature Range | 0-50°C / ± 2°C | -40 to 80°C / ± 0.5°C |
| Sampling Rate | 1 Hz (reading every second) | 0.5 Hz (reading every 2 seconds) |
| Body size | 15.5mm x 12mm x 5.5mm | 15.1mm x 25mm x 7.7mm |
| Advantage | Ultra low cost | More Accurate |
Working Principle of DHT22 Sensor:
The DHT22, also known as AM2302, is a digital sensor used for measuring temperature and relative humidity. It consists of:
- A capacitive humidity sensor for measuring moisture in the air.
- A thermistor for measuring temperature.
- An onboard 8-bit microcontroller for processing and sending data.
Working of DHT22 Sensor:
- The sensor collects temperature and humidity data internally.
- It sends a digital signal (not analog) to the Arduino using a single-wire protocol.
- The signal includes a 40-bit data packet (16 bits for humidity, 16 bits for temperature, and 8 bits for checksum).
- Arduino decodes this packet using a DHT library and extracts the actual values.
Components Required for using DHT22 Sensor with Arduino:
- Arduino UNO (or any compatible board)
- DHT22 Temperature and Humidity Sensor
- Breadboard
- Jumper wires
- (Optional) 16×2 LCD with I2C module
- USB Cable for Arduino
- Arduino IDE installed on your PC
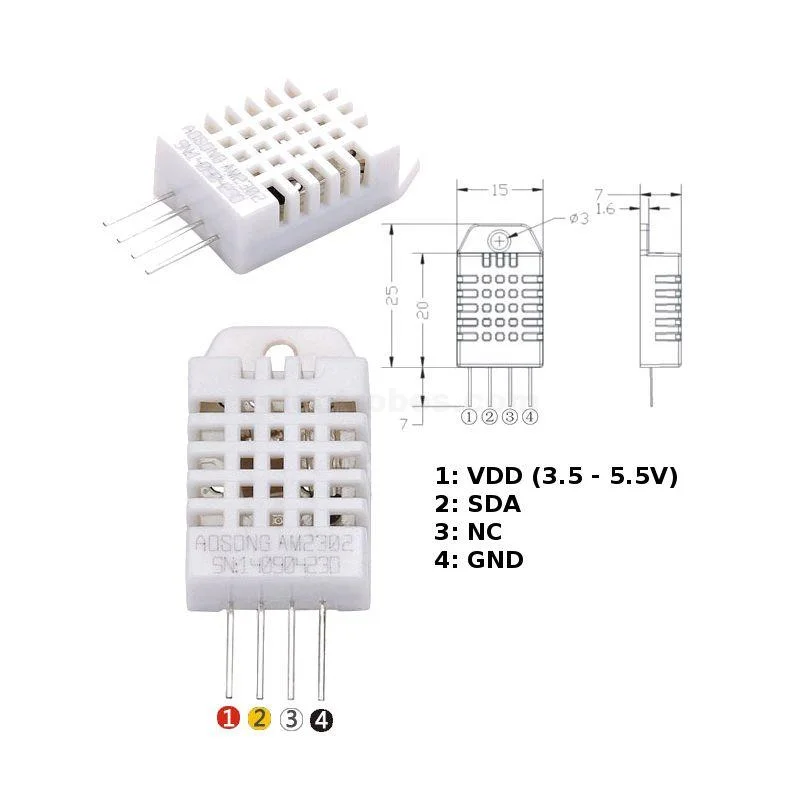
DHT22 Temperature and Humidity Sensor Pinout:
Circuit Diagram of DHT22 Temperature and Humidity Sensor with Arduino:
| DHT22 Pin | Function | Arduino Pin |
|---|---|---|
| VCC | Power Supply | 5V |
| DATA | Data Signal | D2 |
| NC | Not Connected | — |
| GND | Ground | GND |

Arduino code for DHT22 Temperature and Humidity Sensor:
To read temperature and humidity values from DHT22, you’ll need to install the DHT library by Adafruit.
Library Installation:
- Open Arduino IDE
- Go to Sketch > Include Library > Manage Libraries
- Search for “DHT sensor library” by Adafruit and install it.
- Also install “Adafruit Unified Sensor” library.
#include "DHT.h"

#define DHTPIN 8       // DHT22 data pin connected to digital pin 8
#define DHTTYPE DHT22  // Define sensor type

DHT dht(DHTPIN, DHTTYPE);

void setup() {
  Serial.begin(9600);
  dht.begin();
}

void loop() {
  float humidity = dht.readHumidity();
  float temperature = dht.readTemperature();

  if (isnan(humidity) || isnan(temperature)) {
    Serial.println("Failed to read from DHT sensor!");
    return;
  }

  Serial.print("Temperature: ");
  Serial.print(temperature);
  Serial.println(" °C");

  Serial.print("Humidity: ");
  Serial.print(humidity);
  Serial.println(" %");

  delay(2000);  // Wait for 2 seconds
}
After uploading code open serial monitor to see your results.
Applications of DHT22 Sensor:
- Smart HVAC Control
- Weather Monitoring Systems
- Indoor Climate Monitoring
- Greenhouse Automation
- Data Logging Projects
Troubleshooting of DHT22 Sensor
- Wait at least 2 seconds between readings to avoid getting
NaNvalues. - Make sure the 10K pull-up resistor is properly connected.
- If using long wires, use twisted-pair or shielded cables to reduce interference.
- Use proper library versions to avoid compatibility issues.
Conclusion
The DHT22 sensor is a great choice for accurate and reliable temperature and humidity measurements in Arduino projects. Its digital output, high accuracy, and ease of use make it perfect for both hobbyists and professional applications. With the help of libraries and a few lines of code, you can quickly integrate this sensor into your projects and visualize real-time environmental data.
Need Help in Setup of DHT22 Temperature and Humidity Sensor with Arduino?
If you need any Help or Assistance for Setup of DHT22 Temperature and Humidity Sensor with Arduino, with Modifications or Customization then you can contact us through WhatsApp. We can deliver you this Project in the Following Ways.


[…] For better accuracy and range, consider using DHT22 in more advanced […]