In this guide, we’ll walk you through everything you need to know about using the popular 28BYJ48 stepper motor with an Arduino, including wiring, code, and real-world applications. One of the most precise and affordable ways to achieve controlled movement is by using a stepper motor.
Why Use a Stepper Motor?
Unlike regular DC motors, stepper motors rotate in fixed steps, allowing for precise control of angle, speed, and direction—perfect for applications like:
- Smart Curtain Systems
- CNC Machines
- Robotic Arms
- Camera Sliders
- 3D Printers
What is a 28BYJ-48 Stepper Motor?
The 28BYJ-48 is a small, cheap, and widely used unipolar stepper motor ideal for beginners. It’s commonly found in printers, scanners, DVD drives, and automation projects.
Key Specifications:
- Voltage: 5V DC
- Reduction Ratio: 64:1
- Steps per Revolution: 2048 (for full 360° rotation)
- Current: ~240mA
- Torque: ~34 mNm
The motor comes bundled with a ULN2003 driver module, which makes it easy to control with an Arduino.. 28byj48 can move 2048 steps per revolution. 28byj48 used with UNL-2003 stepper motor driver.
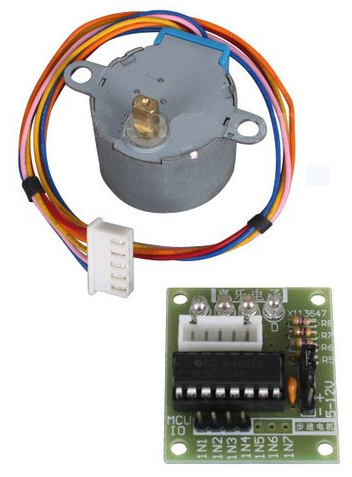
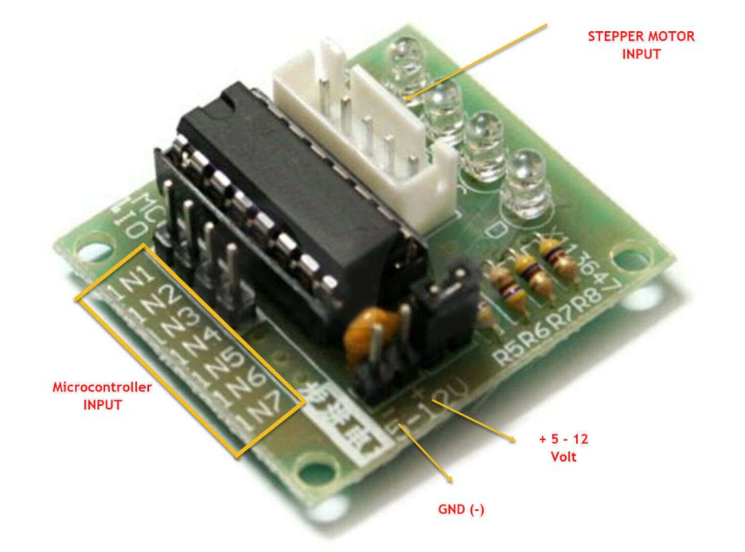
What is ULN2003 Driver Module?
The ULN2003 board acts as an interface between the Arduino and the stepper motor. It contains Darlington transistor arrays to amplify the control signals and protect your Arduino from overcurrent. UNL2003 is a stepper motor driver. Using this driver we can control stepper motor. It has 4 pins (IN1,IN2, IN3, IN4). By using these pins we can control the speed, direction and steps.
ULN2003 Motor Driver Pinout:
- IN1–IN4: Control signals from Arduino
- Stepper Motor Socket: Connects to 28BYJ-48 via 5-pin JST connector
- +5V and GND: Power for the motor
- Power LED and Step LEDs: For visual feedback
Components needed for Connecting 28BYJ-48 Stepper Motor :
- Arduino Board (Uno, Nano, Mega, etc.)
- 28BYJ-48 Stepper Motor
- ULN2003 Driver Board
- Jumper Wires
- Breadboard (optional)
- External 5V Power Supply (optional but recommended)
Circuit Diagram for Connecting 28BYJ48 Stepper Motor with Arduino:
| ULN2003 Pin | Arduino Pin |
|---|---|
| IN1 | 8 |
| IN2 | 9 |
| IN3 | 10 |
| IN4 | 11 |
| VCC | 5V (or external) |
| GND | GND |
| Motor | Connect 5-pin motor cable to socket |
Important: If the motor stalls or gets hot, use an external 5V supply to power the motor, not directly from the Arduino’s 5V pin.

Installing the Stepper Library
To control the stepper easily, we’ll use the built-in Stepper.h library.
Steps:
- Open Arduino IDE.
- Go to Sketch > Include Library > Stepper.
- If not present, you can also use third-party libraries like AccelStepper for advanced control.
Code for 28BYJ48 Stepper Motor:
#include <Stepper.h>

// Define number of steps per revolution
const int stepsPerRevolution = 2048;

// Define motor control pins
Stepper myStepper(stepsPerRevolution, 8, 10, 9, 11);
// (IN1, IN3, IN2, IN4) sequence

void setup() {
  myStepper.setSpeed(10); // RPM
  Serial.begin(9600);
  Serial.println("28BYJ-48 Stepper Motor Test");
}

void loop() {
  Serial.println("Clockwise Rotation");
  myStepper.step(stepsPerRevolution); // One full rotation
  delay(1000);

  Serial.println("Counter-Clockwise Rotation");
  myStepper.step(-stepsPerRevolution); // Reverse
  delay(1000);
}
28byj48 Stepper Motor with Arduino Video Tutorial:
Applications of Stepper Motor:
You can use the 28BYJ-48 with Arduino in:
- Automated blinds or smart curtain systems
- Safe or lock mechanisms
- Precision robotic movements
- Mini conveyor belts
- Camera or sensor rotation mounts
Troubleshooting of 28byj48 Stepper Motor with Arduino:
| Problem | Solution |
|---|---|
| Motor not rotating | Check wiring sequence: IN1→8, IN2→9, IN3→10, IN4→11 |
| Motor jitters or vibrates | Check power supply; consider using external 5V |
| Motor too slow | Use setSpeed() to increase RPM (10–15 is safe for this motor) |
| Motor overheating | Do not hold the motor in a stalled position for long |
Conclusion:
The 28BYJ-48 stepper motor is an incredibly affordable and beginner-friendly motor that opens the door to precise motion control in Arduino projects. Combined with the ULN2003 driver board and some simple code, you can start building real-world applications that move!
At ArduinoExpert.com, we always recommend this motor for anyone starting with automation or robotics. Stay tuned for future posts where we’ll show how to control this motor with a joystick, sensors, or even wirelessly!
Need Help in Setup of 28byj48 Stepper Motor with Arduino?
If you need any Help or Assistance for Setup of Stepper Motor 28byj48 with Arduino, with Modifications or Customization then you can contact us through WhatsApp.
Learn More about the services we offer.
Good day! I just want to offer you a big thumbs up for your excellent information you have got here on this post. Ill be coming back to your blog for more soon.