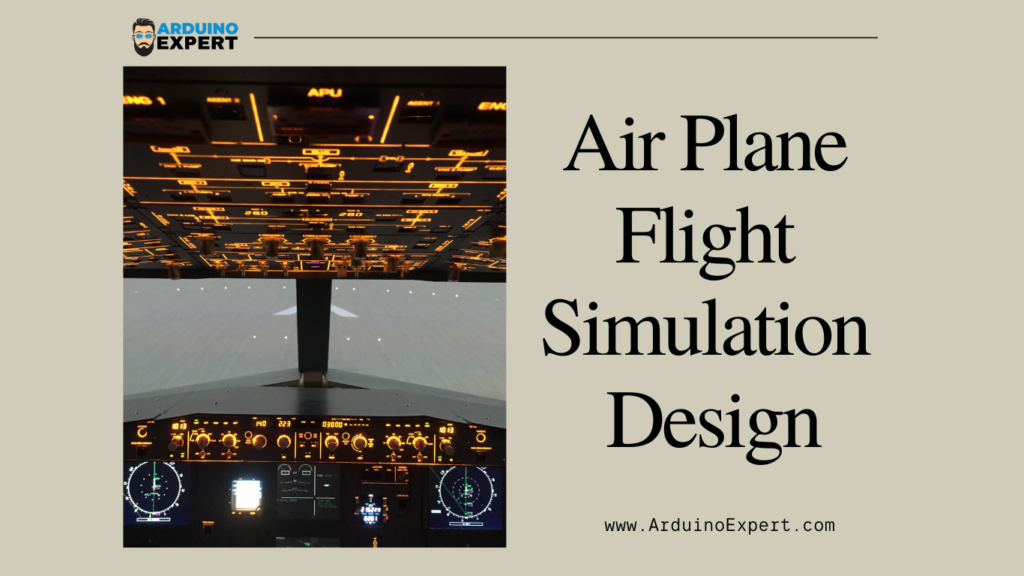
Flight simulation systems are widely used in aviation training, educational demonstrations, and embedded system research. In this project, we have developed an Airplane Flight Simulation System using Arduino that visually and physically represents aircraft movement based on real-time sensor data.
This Arduino-based Airplane Flight Simulator uses an MPU6050 accelerometer and gyroscope sensor to detect orientation changes, servo motors to simulate aircraft control surfaces, and an ILI9341 TFT display to show roll and pitch movements through animated needle indicators.
This project was developed as part of our Arduino Project Services, showcasing our expertise in product design, sensor interfacing, graphical displays, and real-time motion control.
Objective of Airplane Flight Simulation System Project
The main goal of this project is to:
- Simulate airplane roll and pitch movements
- Display real-time orientation data on a TFT flight-style interface
- Control servo motors to physically represent aircraft motion
- Provide an interactive and educational Arduino flight simulation system
System Overview of Airplane Flight Simulation System
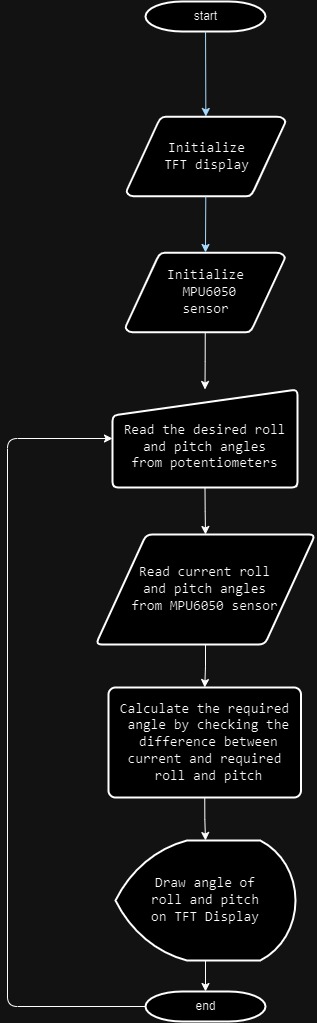
The system works by continuously reading motion data from the MPU6050 sensor, comparing it with user-defined target angles from potentiometers, and then:
- Updating servo motor positions
- Animating flight needles on a TFT display
- Providing real-time visual and mechanical feedback
Components Used in Arduino Flight Simulator Project
- Arduino Mega
- MPU6050 Accelerometer + Gyroscope
- ILI9341 TFT Display
- 2 × Servo Motors
- 2 × Potentiometers
- Jumper wires & breadboard
- External power supply (recommended for servos)
Key Features of MPU6050 Flight Simulation Project
- Real-time flight orientation display
- Interactive roll & pitch control
- Sensor-based motion simulation
- Graphical TFT flight indicators
- Modular and expandable design
Circuit Diagram of Arduino Mega with MPU6050 & TFT Display

The circuit is designed for stable sensor reading and smooth servo control:
→MPU6050 Connections
- Communicates with Arduino via I2C protocol
- SDA and SCL pins connected to Arduino’s I2C pins
- Provides real-time roll and pitch data
→TFT Display (ILI9341)
- Uses SPI communication
- Dedicated pins for CS, DC, RST, MOSI, MISO, and SCK
- Displays animated flight needles and indicators
→Potentiometers
- Used to set desired roll and pitch angles
- Connected to Arduino’s analog input pins
- Provide user interaction and control
→Servo Motors
- Connected to PWM pins
- One servo represents roll control
- Second servo represents pitch control
Related Project:
If you want to Robotic Arm with Arduino and Servo Motors Please check out our Robotic Arm Project.
✷ Working Principle of Arduino Flight Simulator Project
1. Sensor Data Acquisition
The MPU6050 continuously measures acceleration and angular velocity. These values are processed to calculate:
- Current roll angle
- Current pitch angle
2. User Input via Potentiometers
Two potentiometers allow the user to set desired roll and pitch angles, simulating pilot input in a real aircraft cockpit.
3. Servo Motor Control Logic
The system compares:
- Desired angles (from potentiometers)
- Actual angles (from MPU6050)
Using a custom servo control function, the Arduino:
- Maps angles to servo positions
- Smoothly moves servos to match target orientation
This simulates airplane control surface movement.
4. TFT Display Visualization
The ILI9341 TFT display acts as a mini flight instrument panel:
- Animated needles indicate roll and pitch
- Endpoints of needles are calculated using angle mapping
- Real-time updates create a realistic simulation effect
Recommended Reading:
Touch LCD based Weight Machine using Arduino
Arduino Code for Flight Simulation System
#include <Adafruit_ILI9341.h>

#define TFT_CS   9
#define TFT_DC   10
Adafruit_ILI9341 tft = Adafruit_ILI9341(TFT_CS, TFT_DC);
float last_angle;
float last_angle2;
#define WIDTH 320
#define HEIGHT 240

#define POT_PIN_1 A0
#define POT_PIN_2 A1

void setup(void) {
  tft.begin();
  tft.setRotation(1);
}
Arduino Code Logic Breakdown
→Libraries Used
- Servo motor control library
- MPU6050 sensor library
- TFT display & graphics libraries
These libraries ensure:
- Accurate sensor communication
- Smooth graphical rendering
- Precise servo positioning
→Setup Function
The setup routine:
- Initializes serial communication
- Starts MPU6050 sensor
- Initializes TFT display
- Attaches servo motors
- Sets servo neutral position (90°)
→Loop Function
The loop performs:
- Reading potentiometer values
- Reading MPU6050 roll & pitch
- Calculating display needle positions
- Updating servo angles
- Refreshing TFT display in real-time
→MoveServos Function
This dedicated function:
- Maps angle values to PWM range
- Prevents servo over-rotation
- Ensures smooth and safe movement
Applications of Airplane Flight Simulation Project
- Engineering & aviation education
- Basic flight dynamics demonstration
- Sensor fusion learning
- Embedded systems training
- Prototype for advanced flight simulators
Possible Enhancements
- Add yaw control using additional sensor data
- Integrate PID control for smoother servo response
- Add data logging via SD card
- Wireless monitoring using ESP32 or Bluetooth
- Full cockpit-style UI with multiple gauges
Arduino Project Services
This project demonstrates our expertise in:
- Custom Arduino Development
- Sensor-Based Embedded Systems
- Product Design & Prototyping
- Graphical Display Integration
- Servo & Motion Control Systems
→ Looking for a similar project or custom solution?
Visit our Custom Project Services page to get started.
Conclusion
The Airplane Flight Simulation Arduino Project is a powerful demonstration of how sensors, displays, and actuators can be combined to create a realistic and interactive system. With real-time motion tracking, servo-based actuation, and graphical visualization, this project is ideal for learning, demonstration, and product prototyping.
At Arduino Expert, we specialize in converting such ideas into fully functional embedded products.
Need Assistance in Airplane Flight Simulation Arduino Project?
If you need Flight Simulation System Project with or without Modifications or Customization then you can contact us through WhatsApp. We can deliver you this Project in the Following Ways.
Project Code:
we can provide you Project Code for Liquid Vending Machine along with Zoom Assistant, through Zoom meeting for Setup of this Project or any other Arduino Project of your need.
Fully Functional Project with Hardware/Components Shipment:
if you can not make this project yourself then you can use this option. We will assemble the Project and will ship it to your Doorstep with Safe Packaging.
Learn More about the services we offer.