In this project, we will create a Clap Switch Light using Arduino Uno — a fun and practical home automation system that allows you to turn ON and OFF an AC light with just a clap!
The system works using a Microphone Sound Detection Module (KY-038 or LM393) that detects the sound of a clap. When the sensor detects a clap sound, the signal is sent to the Arduino Uno, which then activates a 2-Channel Relay Module to control the AC light. This simple and affordable setup can be used in homes, classrooms, or offices to automate lighting control and reduce manual switching.
This is an ideal project for beginners in Arduino, DIY enthusiasts, and IoT learners who want to understand how sound sensors and relays work together in real-world applications.

Components Required for Clap Switch Light Project:
- Arduino Uno
- Microphone/Sound Detection Module (KY-038 or LM393)
- 2 Channel Relay Module
- AC Light Bulb
- Jumper Wires
- Breadboard
- Power Supply
Working Principle of Clap Switch Light Project:
The sound sensor module consists of a microphone that converts sound waves into electrical signals. When you clap near the sensor, it detects a sudden increase in sound intensity and sends a digital HIGH signal to one of the Arduino’s input pins.
The Arduino processes this signal and sends a control output to the relay module. The relay then acts as a switch to turn the AC light ON or OFF depending on the current state.
You can also modify the Arduino code to toggle the light on the first clap and turn it off on the second clap, creating a complete hands-free control system.
Circuit Diagram for Clap Switch with Arduino:
- Connect the VCC of the sound sensor to the 5V pin of Arduino.
- Connect the GND of the sensor to Arduino GND.
- Connect the OUT pin of the sound sensor to Digital Pin 8 on Arduino.
- Connect the IN1 pin of the relay module to Digital Pin 7 on Arduino.
- Connect the VCC and GND of the relay module to the Arduino’s 5V and GND respectively.
- Wire the AC light through the relay’s COM and NO (Normally Open) terminals.
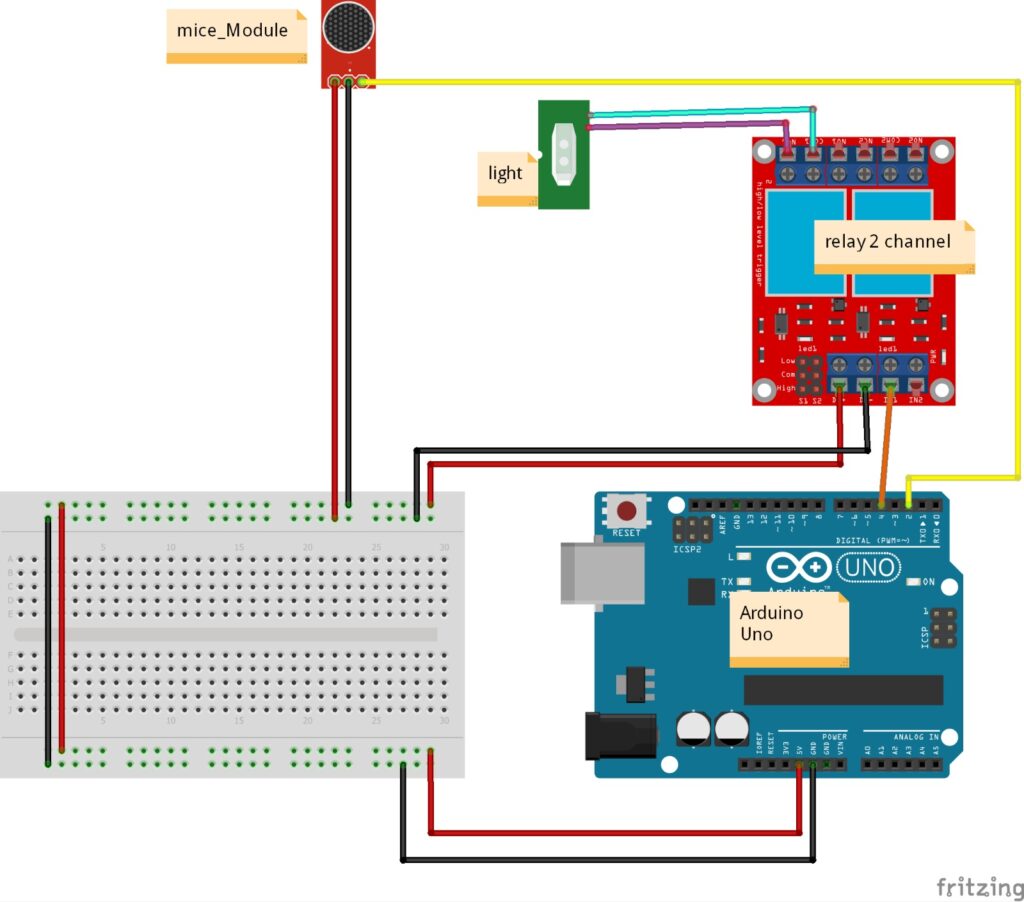
Caution: Be careful when working with AC mains voltage. Always ensure proper insulation and safety precautions.
Arduino Code (Logic Overview):
The code continuously monitors the sound sensor input.
When a HIGH signal (clap sound) is detected:
- Arduino toggles the relay state.
- The light turns ON if it was OFF, and OFF if it was ON.
This makes it a simple clap-controlled lighting system suitable for DIY Smart Home Projects.
// Clap Switch Light with Arduino Uno
// Components: Arduino Uno, Sound Sensor (KY-038 or LM393), 2 Channel Relay, AC Light

int soundSensor = 2;   // Sound sensor OUT pin connected to D2
int relayPin = 4;       // Relay IN1 connected to D7
int clapState = 0;      // 0 = OFF, 1 = ON
int sensorValue = 0;    // Variable to store sensor reading
unsigned long lastClapTime = 0;  // Used for debounce delay
int clapDelay = 400;    // Delay between two valid claps (ms)

void setup() {
  pinMode(soundSensor, INPUT);
  pinMode(relayPin, OUTPUT);
  digitalWrite(relayPin, LOW);  // Relay OFF initially
  Serial.begin(9600);
  Serial.println("Clap Switch Light System Initialized!");
}

void loop() {
  sensorValue = digitalRead(soundSensor);

  if (sensorValue == HIGH && (millis() - lastClapTime) > clapDelay) {
    clapState = !clapState;  // Toggle state
    digitalWrite(relayPin, clapState);
    Serial.print("Clap Detected! Light is now: ");
    Serial.println(clapState ? "ON" : "OFF");
    lastClapTime = millis();  // Update last clap time
  }
}
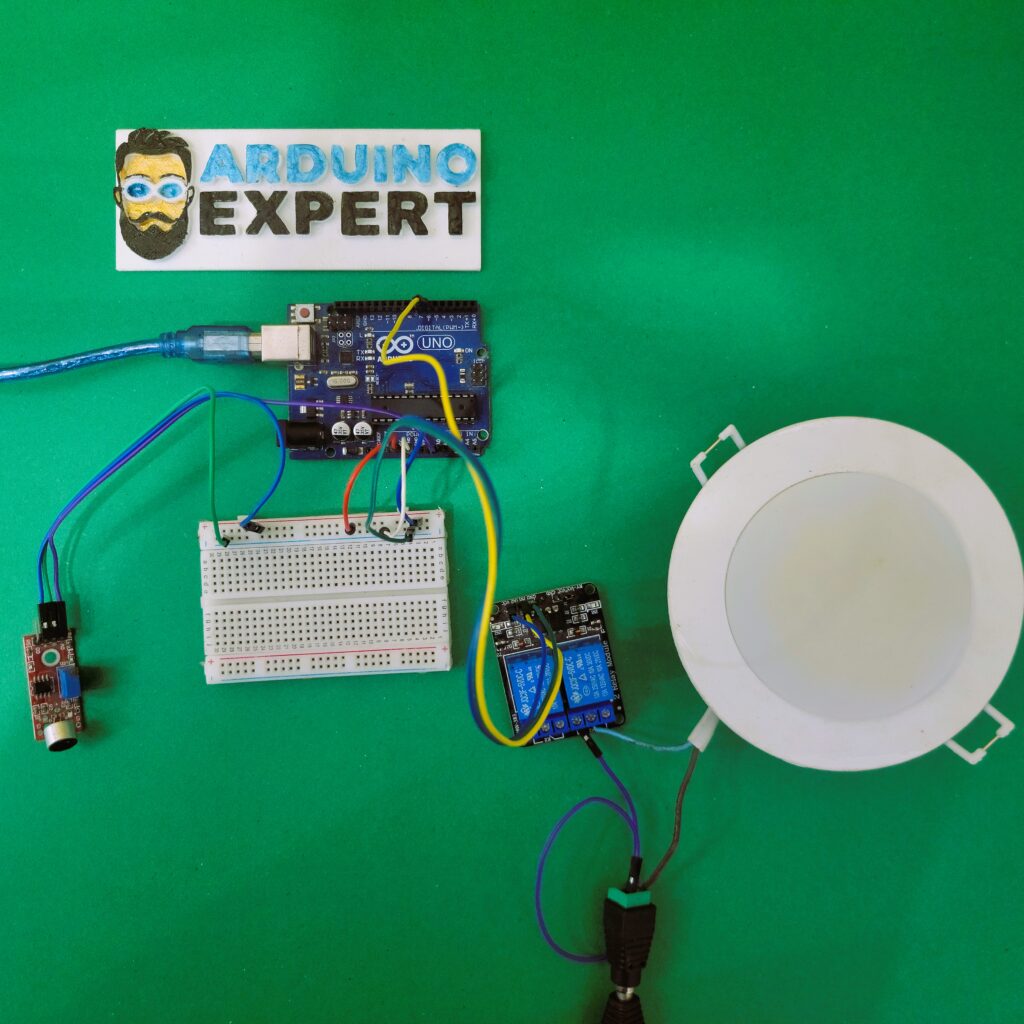
Project Setup:
Working Video of Clap Switch Light Project:
Applications of Clap Switch Light Project:
- Smart Home Automation
- Touch-less Lighting Systems
- Energy Saving Projects
- DIY Arduino Projects for Students
- IoT and Embedded System Learning Projects
Advantages of Clap Switch Light:
- No physical touch required to operate light
- Simple and low-cost setup
- Easy to customize for other appliances (fan, lamp, etc.)
- Great for learning sound sensing and relay control concepts
Conclusion:
The Clap Switch Light using Arduino project is a creative and practical way to automate lighting control using sound. It demonstrates how Arduino, sound sensors, and relay modules can be integrated to create smart and efficient home automation systems. With just a few components and basic coding, you can make your room lights respond to your clap — a simple yet futuristic touch of automation!
Need Help/Assistance in Clap Switch Project?
If you need this Clap Switch Light using Arduino System with or without Modifications or Customization then you can contact us through WhatsApp.
Learn More about the services we offer.


