The DHT11 sensor is one of the most widely used digital sensors for measuring temperature and humidity. It is simple, low-cost, and ideal for beginners in electronics and Arduino development. With only one data pin, it’s easy to integrate into various IoT, weather monitoring, and smart home projects.
In this tutorial, we will show you how to connect the DHT11 sensor to an Arduino, use a DHT library, and display temperature and humidity readings in the Serial Monitor. We will also go over the working principle and practical applications.
Working Principle of DHT11 Temperature and Humidity Sensor:
The DHT11 sensor consists of two parts:
- NTC Thermistor for measuring temperature
- Capacitive humidity sensor for measuring relative humidity
It uses a single digital pin to send calibrated digital signals to the Arduino. It measures:
- Temperature in Celsius (range: 0–50°C)
- Relative humidity (range: 20–90%)
Internally, the sensor samples data and sends a 40-bit data packet containing both temperature and humidity values every second.

How DHT11 Sensor Measures the Temperature and Humidity?
There are two main components of DHT11 Sensor. Humidity sensing component has two electrodes with moisture holding substrate sandwiched between them. The ions are released by the substrate as water vapor is absorbed by it, which increases the conductivity between the electrodes. The change in resistance between two electrodes is proportional to the relative humidity. Higher humidity decreases the resistance between these electrodes, while lower humidity increases the resistance between the electrodes.

DHt11 also contains a NTC/Thermistor to measure temperature. A thermistor is a thermal resistor whose resistance changes with temperature. The term “NTC” means “Negative Temperature Coefficient”, which means that temperature increases with decrease in resistance.

On the other side, there is a small PCB with an 8-bit SOIC-14 packaged IC. This IC measures and processes the analog signal with stored calibration coefficients, does analog to digital conversion and spits out a digital signal with the temperature and humidity.
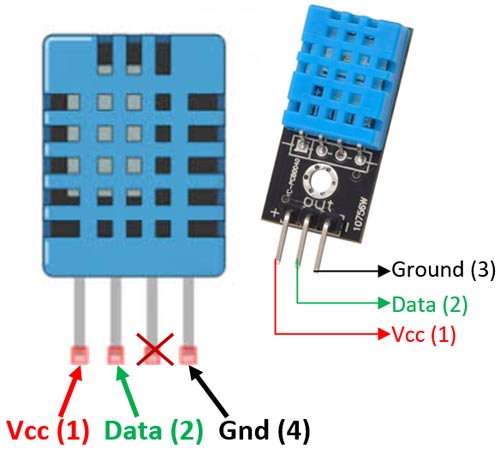
DHT11 Temperature and Humidity Sensor Pinout:
The DHT11 module is easy to connect. It has Three or Four pins:
| Pin | Function |
|---|---|
| 1 | VCC (3.3V or 5V) |
| 2 | Data (connect to Arduino digital pin) |
| 3 | NC (Not Connected) |
| 4 | GND (Ground) |
Components Required for using DHT11 with Arduino:
- Arduino UNO (or any compatible board)
- DHT11 Temperature & Humidity Sensor (with or without breakout board)
- 10KΩ Resistor (only for raw DHT11 module)
- Jumper wires
- Breadboard
Circuit Diagram of DHT11 Sensor with Arduino:
Here’s how to connect the DHT11 to Arduino:
| DHT11 Pin | Arduino Pin |
|---|---|
| VCC | 5V |
| DATA | D2 |
| GND | GND |

DHT11 Arduino Library Installation;
- Open Arduino IDE
- Go to Sketch > Include Library > Manage Libraries
- Search for “DHT sensor library” by Adafruit and install it
- Also install the “Adafruit Unified Sensor” library
Arduino Code for DHT11 Sensor:
Once you installed the library, you can copy this code into Arduino ide. This code will print the value of temperature and humidity on the Serial monitor.
#include "DHT.h"

#define DHTPIN 2       // DHT11 data pin connected to D2
#define DHTTYPE DHT11  // Define sensor type

DHT dht(DHTPIN, DHTTYPE);

void setup() {
  Serial.begin(9600);
  dht.begin();
  Serial.println("DHT11 Sensor Initialized");
}

void loop() {
  float humidity = dht.readHumidity();
  float temperature = dht.readTemperature(); // Celsius

  // Check if reading failed
  if (isnan(humidity) || isnan(temperature)) {
    Serial.println("Failed to read from DHT11 sensor!");
    return;
  }

  Serial.print("Temperature: ");
  Serial.print(temperature);
  Serial.print(" °C\t");

  Serial.print("Humidity: ");
  Serial.print(humidity);
  Serial.println(" %");

  delay(2000); // Wait 2 seconds before next reading
}
Applications of DHT11 Sensor
- Indoor Climate Monitoring
- Home Automation Systems
- Smart Agriculture
- Weather Stations
- Greenhouse Monitoring
- School & DIY Projects
Limitations of DHT11 Temperature and Humidity Sensor:
| Feature | Limitation |
|---|---|
| Accuracy | ±2°C for temperature, ±5% RH |
| Response Time | ~1 second |
| Sampling Rate | 1 reading per second |
| Temperature Range | 0°C to 50°C |
| Humidity Range | 20% to 90% RH |
Tip: For better accuracy and range, consider using DHT22 in more advanced projects.
Conclusion
The DHT11 sensor is an excellent choice for basic temperature and humidity monitoring projects using Arduino. Its simple interface, low cost, and decent accuracy make it a staple for beginners in embedded systems and IoT development.
Now that you know how to wire the sensor, use the Arduino library, and retrieve real-time temperature and humidity values—you can start building projects like weather stations, smart fans, and automated greenhouses.
Need Help in Setup of DHT11 Sensor with Arduino?
If you need any Help or Assistance for Setup of DHT Temperature and Humidity Sensor with Arduino, with Modifications or Customization then you can contact us through WhatsApp. We can deliver you this Project in the Following Ways.