Smart agriculture and gardening rely heavily on environmental sensing—and soil moisture is one of the most important parameters. The Soil Moisture Sensor allows you to detect the water content in soil and is perfect for creating automated irrigation systems, plant monitoring devices, or IoT-based farming solutions.
In this blog, we’ll explain how the soil moisture sensor works, how to wire it with an Arduino, and how to use it to make decisions like turning on a water pump or sending a notification when the soil gets too dry.
What is a Soil Moisture Sensor?
A Soil Moisture Sensor measures the volumetric water content in soil using the conductivity between two probes. The sensor usually comes with two parts:
- Probes (Sensor Fork): Inserted into the soil to measure moisture levels.
- Signal Conditioning Board: Provides analog (AO) and digital (DO) outputs for Arduino.
Key Features:
- Operating Voltage: 3.3V–5V
- Analog Output (0–1023 based on moisture)
- Digital Output with threshold adjustment
- Built-in potentiometer for sensitivity
- Compact and affordable
How Soil Moisture Sensor works?
- The working of the soil moisture sensor is very easy. The fork-shaped probe with two exposed conductors, react as a variable resistor (just like a potentiometer). The resistance changes according to the water level in the soil. This resistance is inversely proportional to the soil moisture:
• When the more water in the soil, conductivity will increase and resistance will decrease.
• When less amount of water in the soil, conductivity will decrease and resistance will increase. - Dry soil has high resistance and poor conductivity.
- Wet soil has low resistance and conducts electricity better.
The sensor outputs a voltage signal based on this resistance, which the Arduino reads as an analog value.
Sample Readings:
- 0–300 → Dry Soil
- 300–700 → Moist Soil
- 700–1023 → Wet Soil
You can also use the digital output if you only need a binary status (wet or dry), adjustable via the onboard potentiometer.
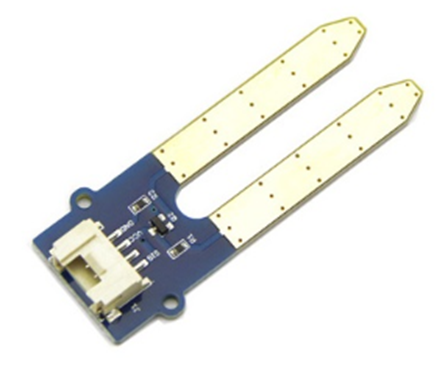
Hardware Overview of Soil Sensor:
A typical soil moisture sensor has two components.
Soil Moisture Sensor Probe
The sensor consist on a fork-shaped probe with two exposed conductors that goes into the soil where the water level is to be measured.
It works as a variable resistor whose resistance changes according to the soil moisture.

Soil Moisture Sensor Control Module
The sensor can also contain an electronic module that connects the probe with the Arduino.
This module generate output voltage according to the resistance of these two probe and read output from analog pin (A0).

A potentiometer is also built on with module for adjust the sensitivity. By using potentiometer you can set a threshold. So, when the moisture level is exceed from the adjusted value, the module will give output LOW otherwise HIGH. This setup is very useful when you want to trigger an action when certain threshold is reached. For example, when the moisture level in the soil crosses a threshold, you can activate a relay to start pumping water.
The module has two LEDs. One is power LED and other is status LED. The Power LED will ON when the module is powered. When the digital output is LOW, status LED will ON.
Pinout of Soil Moisture Sensor:
The soil moisture sensor has four pins to connect.
- AO (Analog Output) pin provide us an analog signal and it is connected to one of the analog inputs on your Arduino.
- DO (Digital Output) pin gives Digital output. Connect it to any digital pin on an Arduino or directly to a 5V relay or similar device.
- VCC pin supplies power for the sensor. It is recommended to power the sensor with between 3.3V – 5V. Please note that the analog output will vary depending on what voltage is provided for the sensor.
- GND is a ground connection. It is connected to the GND of Arduino.

Sensing Soil Moisture using Analog Output:
The Soil moisture module provide both analog and digital outputs. So, first of all we will calculate soil moisture value by reading analog output.
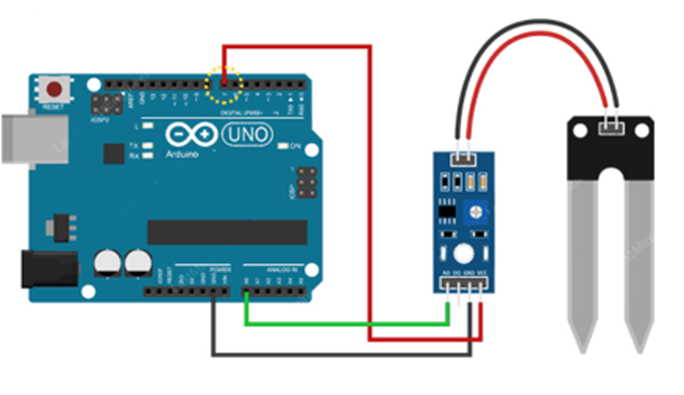
Circuit Diagram of Soil Moisture Sensor with Arduino:
The wiring is very simple. Frist of all you need to connect the VCC pin to the 5V of Arduino. As we know that the module is very sensitive and cannot run continuously. So, we connect the VCC pin to any digital pin on Arduino. So, we can LOW and HIGH the module as per the requirement. The power usage by the module is 8 mA. So, it’s ok to connect the VCC pin to the pin # 7 on Arduino. Connect the GND pin of module to the GND pin on Arduino. At the end connect the AO pin of module to A0 on Arduino.
Calibration of Soil Moisture Sensor:
It is recommended to measure the particular type of soil to get accurate reading. Different types of soil’s can effect the sensor.
You should see what readings you are actually getting from your sensor before you start storing data or triggering events
Use the below code to note the output values of sensor when the soil is as dry or when it is completely wet through with moisture.
// Sensor pins
#define sensorPower 7
#define sensorPin A0

void setup() {
	pinMode(sensorPower, OUTPUT);

	// Initially keep the sensor OFF
	digitalWrite(sensorPower, LOW);

	Serial.begin(9600);
}

void loop() {
	//get the reading from the function below and print it
	Serial.print("Analog output: ");
	Serial.println(readSensor());

	delay(1000);
}

//  This function returns the analog soil moisture measurement
int readSensor() {
	digitalWrite(sensorPower, HIGH);	// Turn the sensor ON
	delay(10);							// Allow power to settle
	int val = analogRead(sensorPin);	// Read the analog value form sensor
	digitalWrite(sensorPower, LOW);		// Turn the sensor OFF
	return val;							// Return analog moisture value
}
When you run this code, you’ll see the following readings in the serial monitor:
• when the soil was dry (~850)
• when the soil was completely wet (~400)
This test may take some trial and error. Once you get a good handle on these readings, you can use them as threshold if you intend to trigger an action.
Code for Soil Moisture Sensor with Arduino:
Based on the calibration values, the program below defines the following ranges to determine the status of the soil:
• < 500 is too wet
• 500-750 is the target range
• > 750 is dry enough to be watered
/* Change these values based on your calibration values */
#define soilWet 500   // Define max value we consider soil 'wet'
#define soilDry 750   // Define min value we consider soil 'dry'

// Sensor pins
#define sensorPower 7
#define sensorPin A0

void setup() {
	pinMode(sensorPower, OUTPUT);

	// Initially keep the sensor OFF
	digitalWrite(sensorPower, LOW);

	Serial.begin(9600);
}

void loop() {
	//get the reading from the function below and print it
	int moisture = readSensor();
	Serial.print("Analog Output: ");
	Serial.println(moisture);

	// Determine status of our soil
	if (moisture < soilWet) {
		Serial.println("Status: Soil is too wet");
	} else if (moisture >= soilWet && moisture < soilDry) {
		Serial.println("Status: Soil moisture is perfect");
	} else {
		Serial.println("Status: Soil is too dry - time to water!");
	}

	delay(1000);	// Take a reading every second for testing
					// Normally you should take reading perhaps once or twice a day
	Serial.println();
}

//  This function returns the analog soil moisture measurement
int readSensor() {
	digitalWrite(sensorPower, HIGH);	// Turn the sensor ON
	delay(10);							// Allow power to settle
	int val = analogRead(sensorPin);	// Read the analog value form sensor
	digitalWrite(sensorPower, LOW);		// Turn the sensor OFF
	return val;							// Return analog moisture value
}
The output on serial monitor.
Applications of Soil Moisture Sensor with Arduino
- Automatic irrigation systems
- Smart garden monitors
- IoT-based precision farming
- Hydroponic and greenhouse monitoring
- Plant care reminders and alert systems
Best Practices for Using Soil Sensor:
- Clean the sensor after use to prevent corrosion.
- Don’t leave the sensor in soil long-term; use intermittent sensing.
- For long-life use, consider capacitive soil sensors, which are more durable than resistive types.
- Calibrate the sensor for different soil types (sandy, loamy, clay, etc.)
Conclusion:
The Soil Moisture Sensor is an excellent addition to any smart farming or home gardening project. With Arduino, you can easily measure moisture levels, automate watering systems, and ensure your plants are always healthy and hydrated. Simple to use and affordable, this sensor can significantly improve plant care and resource efficiency.
Whether you’re a hobbyist, student, or engineer, this sensor will make your environmental monitoring projects smarter and more sustainable.
Need Help in Setup of Soil Moisture Sensor with Arduino?
If you need any Help or Assistance for Setup of Soil Moisture Sensor with Arduino, with Modifications or Customization then you can contact us through WhatsApp. We can deliver you this Project in the Following Ways.