This project simulates the Domination mode, “Search and Destroy” mode! from the Call of Duty video game series using Arduino Mega. Two teams, Team A and Team B, compete by searching for and capturing the opposing team’s device. The game is won when a team successfully finds and presses the button on the opposing team’s device first. This project uses Arduino Mega microcontrollers, P10 LED displays, Yx5300 Mp3 Music Player modules and Two devices communicate over HC12 433 MHz RF transceivers, allowing Team A and Team B to strategize and engage wirelessly. Each team has a device with a P10 display and an MP3 player for audio feedback.
Components Used in this Call of Duty, Domination Game Project:
Arduino Mega (2 Units)
Each device uses an Arduino Mega as the main microcontroller to handle game logic, communication, and peripheral control.
- Why Arduino Mega?
It provides more I/O pins and memory than the Arduino UNO, ensuring smooth operation with multiple connected modules such as P10 displays, Bluetooth, MP3 modules, and LED strips.
P10 LED Display Panels (2 Units)
Used to display real-time game status, such as team readiness, countdown timer, and victory messages.
LED Strips-WS2812 (2 Units)
Provide visual feedback:
- Indicate when a team is ready by lighting up in red (Team A) or blue (Team B).
- Blink during the countdown and upon game completion.
HC-12 Wireless Modules (2 Units)
Enable long-distance communication between the two devices, ensuring real-time data synchronization like button press detection and game status updates. Using an HC05 module, teams can update and store their timer values in the Arduino’s EEPROM for future games from mobile App
Bluetooth Module (HC-05) (2 Units)
Allow remote configuration of the countdown timer using a mobile phone. The updated time value is stored in the EEPROM of the Arduino Mega for persistent use.
Yx5300 Mp3 Music Player Modules (2 Units)
Play sound effects and announcements such as:
- “Team A is ready” or “Team B is ready.”
- Countdown timer beeps.
- Victory announcement for the winning team.
Push Buttons (2 Units)
Each device has a button that the opposing team must find and press to win the game.
Game Flow Call of Duty, Domination Game Arduino Project:
- Initialization:
- Power on both devices. The game announces “Team A is ready” or “Team B is ready.
- Both teams press the button on their device to indicate readiness.
- MP3 modules play “Team A is ready” or “Team B is ready” based on the button press.
- LED strips light up red for Team A and blue for Team B to show readiness status.
- Game Start:
- Once both teams are ready, the game starts automatically.
- A countdown timer begins, displayed on both P10 LED panels.
- The timer duration is set via Bluetooth using a mobile phone and stored in EEPROM for future games.
- Domination Challenge:
- Each team searches for the opposing team’s device.
- When Team A finds Device B (or vice versa), they press the button on the opposing device.
- The first team to press the button wins the game.
- Victory Announcement:
- The MP3 modules on both devices play “Team A has won” or “Team B has won.”
- The LED strips blink rapidly to indicate the game’s conclusion.
- The P10 LED displays show “VICTORY” for the winning team.
- After a few seconds, the devices reset automatically and display “READY” for the next game.
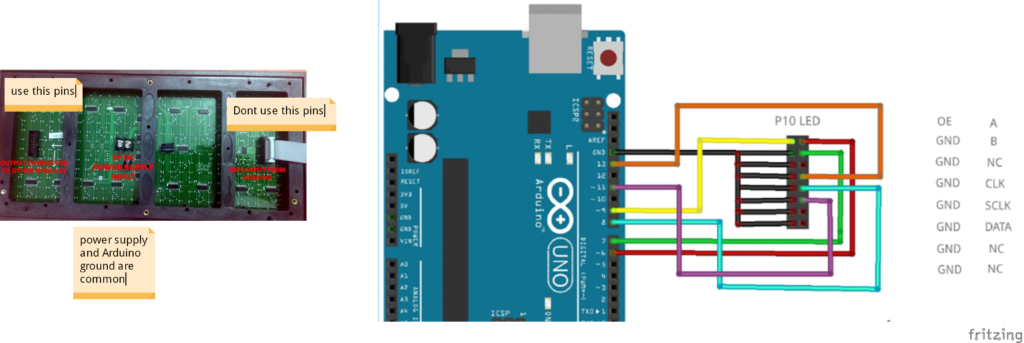
Circuit Diagram of Call of Duty, Domination Game Project:

P10 LED Display Connections:
Arduino Code for Team A, Call of Duty, Domination Game Project:
#include <SoftwareSerial.h>

//--------------------------------------- NeoPixel laibrary--------------------------------------
#include <Adafruit_NeoPixel.h>
#ifdef __AVR__
#include <avr/power.h> // Required for 16 MHz Adafruit Trinket
#endif

#define PIN        10 // On Trinket or Gemma, suggest changing this to 1
#define NUMPIXELS 30 // Popular NeoPixel ring size
Adafruit_NeoPixel pixels(NUMPIXELS, PIN, NEO_GRB + NEO_KHZ800);
#define DELAYVAL 20 // Time (in milliseconds) to pause between pixels
int R, G, B;

//------------------------------EEPROME laibrary---------------------------------------
#include <EEPROM.h>
int Timer_initial = 0;
String R_Str;
int Timer;
String Received;
int last_m;
//--------------------------------------- p10 board laibrary--------------------------------------
#include <SPI.h>
#include <DMD2.h>
#include "SystemFont5x7.h"
#include "Arial_black_16.h"

//---------------------------------------Intiliazied CountDown library------------------------------------
uint32_t start, stop;
bool reset = true;

unsigned long startTime;
unsigned long countdownDuration1 = 5;//5 * 60 * 1000; // 5 minutes in milliseconds
unsigned long countdownDuration = countdownDuration1 * 60000;//5 * 60 * 1000; // 5 minutes in milliseconds


//---------------------------------------Intiliazied  variables ------------------------------------
bool flag1 = true, Start = false;
char data;
int timer = 20000;
bool Game = false,  counter;
unsigned long prevmls = 0;
int count_down = 0;
int Btn = 12;
//---------------------------------------Intiliazied p10 board variables ------------------------------------
#include <SPI.h>
#include <DMD2.h>
#include <fonts/Arial14.h>

const uint8_t *FONT = Arial14;
SoftDMD dmd(1, 1);
DMD_TextBox box(dmd);

//--------------------------------------Intiliazied mp3 player -------------------------------------------
#include "SerialMP3Player.h"
#define TX 3
#define RX 2
SerialMP3Player mp3(RX, TX);
bool flag3=false;


void setup() {
  Serial.begin(9600);             // Serial port to computer
  Serial3.begin(9600);               // Serial port to HC12

  mp3.begin(9600);        // start mp3-communication
  //delay(500);             // wait for init
  mp3.sendCommand(CMD_SEL_DEV, 0, 2);   //select sd-card
  //delay(500);             // wait for init

  dmd.setBrightness(255);
  dmd.selectFont(SystemFont5x7);
  dmd.begin();
  pinMode(Btn, INPUT_PULLUP);
  start = millis();


  pixels.begin();
  for (int i = 0; i < NUMPIXELS; i++) {
    pixels.setPixelColor(i, pixels.Color(0, 0, 0));
    pixels.show();
  }
  //----------------------------EEPROME Save Value ---------------------------------------------
  EEPROM.begin();
  //  Write(0,"0"); // Comment this line after uploading the code for first time
  R_Str = Read(0);
  if (R_Str.substring(0, 1).toInt() == 0)
  {
    Write(0, "5/");
  }
  R_Str = Read(0);
  Timer = R_Str.substring(0).toInt();
  Serial.println((String)"Timer Value: " + Timer);
  countdownDuration = Timer * 60000;

}

void loop()
{ Read_Btn ();
  Read_HC12 ();
  Read_Btn ();
Arduino Code for Team B, Call of Duty, Domination Game Project:
#include <SoftwareSerial.h>

//--------------------------------------- NeoPixel laibrary--------------------------------------
#include <Adafruit_NeoPixel.h>
#ifdef __AVR__
#include <avr/power.h> // Required for 16 MHz Adafruit Trinket
#endif

#define PIN        10 // On Trinket or Gemma, suggest changing this to 1
#define NUMPIXELS 30 // Popular NeoPixel ring size
Adafruit_NeoPixel pixels(NUMPIXELS, PIN, NEO_GRB + NEO_KHZ800);
#define DELAYVAL 20 // Time (in milliseconds) to pause between pixels
int R, G, B;

//------------------------------EEPROME laibrary---------------------------------------
#include <EEPROM.h>
int Timer_initial = 0;
String R_Str;
int Timer;
String Received;
//--------------------------------------- p10 board laibrary--------------------------------------
#include <SPI.h>
#include <DMD2.h>
#include "SystemFont5x7.h"
#include "Arial_black_16.h"

//---------------------------------------Intiliazied CountDown library------------------------------------

uint32_t start, stop;
bool reset = true;

unsigned long startTime;
unsigned long countdownDuration1 = 5;//5 * 60 * 1000; // 5 minutes in milliseconds
unsigned long countdownDuration = countdownDuration1 * 60000;//5 * 60 * 1000; // 5 minutes in milliseconds

//---------------------------------------Intiliazied  variables ------------------------------------
bool flag1 = true, Start = false;
char data;
int timer = 20000;
bool Game = false,  counter;
unsigned long prevmls = 0;
int count_down = 0;
int Btn = 12;
//---------------------------------------Intiliazied p10 board variables ------------------------------------
#include <SPI.h>
#include <DMD2.h>
#include <fonts/Arial14.h>

const uint8_t *FONT = Arial14;
SoftDMD dmd(1, 1);
DMD_TextBox box(dmd);

//--------------------------------------Intiliazied mp3 player -------------------------------------------
#include "SerialMP3Player.h"
#define TX 3
#define RX 2
SerialMP3Player mp3(RX, TX);
bool flag3=false;


void setup() {
  Serial.begin(9600);             // Serial port to computer
  Serial3.begin(9600);               // Serial port to HC12

  mp3.begin(9600);        // start mp3-communication
  //delay(500);             // wait for init
  mp3.sendCommand(CMD_SEL_DEV, 0, 2);   //select sd-card
  //delay(500);             // wait for init

  dmd.setBrightness(255);
  dmd.selectFont(SystemFont5x7);
  dmd.begin();
  pinMode(Btn, INPUT_PULLUP);
  start = millis();


  pixels.begin();
  for (int i = 0; i < NUMPIXELS; i++) {
    pixels.setPixelColor(i, pixels.Color(0, 0, 0));
    pixels.show();
  }
  //----------------------------EEPROME Save Value ---------------------------------------------
  EEPROM.begin();
  //  Write(0,"0"); // Comment this line after uploading the code for first time
  R_Str = Read(0);
  if (R_Str.substring(0, 1).toInt() == 0)
  {
    Write(0, "5/");
  }
  R_Str = Read(0);
  Timer = R_Str.substring(0).toInt();
  Serial.println((String)"Timer Value: " + Timer);
  countdownDuration = Timer * 60000;

}

void loop()
{ Read_Btn ();
Project Working Video:
Conclusion:
The Call of Duty: Domination Game with Arduino is an exciting, interactive project that combines wireless communication, real-time feedback, and immersive audio-visual effects. It brings the thrilling gameplay of Call of Duty into the real world, offering a dynamic and customizable experience for players.
Need This Project?
If you need this Project with or without Modifications or Customization then you can contact us through WhatsApp. We can deliver you this Project in the Following Ways.
Project Code:
we can provide you Project Code along with Zoom Assistant, through Zoom meeting for Setup of this Project or any other Arduino Project of your need.
Fully Functional Project with Hardware/Components Shipment:
if you can not make this project yourself then you can use this option. We will assemble the Project and will ship it to your Doorstep with Safe Packaging.
Learn More about the services we offer.