How to control led with Arduino :

Components :
- LED (generic)
- Arduino Uno
- Bread Board
- Resistor 220 Ohm
- Jumper Wires
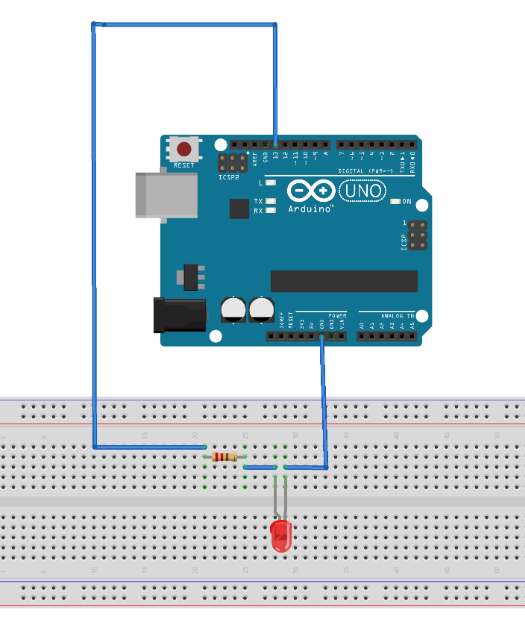
Circuit Diagram:

Code for Blink LED :
int LED = 13;  // LED is connected to pin 13

void setup() {
  pinMode(LED, OUTPUT); // Declare the LED pin as an output
}

void loop() {
  digitalWrite(LED, HIGH); // Turn the LED on
  delay(500);
  digitalWrite(LED, LOW); // Turn the LED off
  delay(500);
}
How to control brightness of LED :
int led = 9;           // the PWM pin the LED is attached to
int brightness = 0;    // how bright the LED is
int fadeAmount = 5;    // how many points to fade the LED by


void setup() {
  // declare LED pin to be an output:
  pinMode(led, OUTPUT);
}


void loop() {
  // set the brightness of pin 9:
  analogWrite(led, brightness);

  // change the brightness for next time through the loop:
  brightness = brightness + fadeAmount;

  // reverse the direction of the fading at the ends of the fade:
  if (brightness <= 0 || brightness >= 255) {
    fadeAmount = -fadeAmount;
  }
  // wait for 30 milliseconds to see the dimming effect, you can also change the delay according to your need
  delay(30);
}
Potentiometer :
Potentiometer is also known as “variable resistors”. Potentiometers have a knob or dial to change their resistance. We use the potentiometer to control the flow of current.
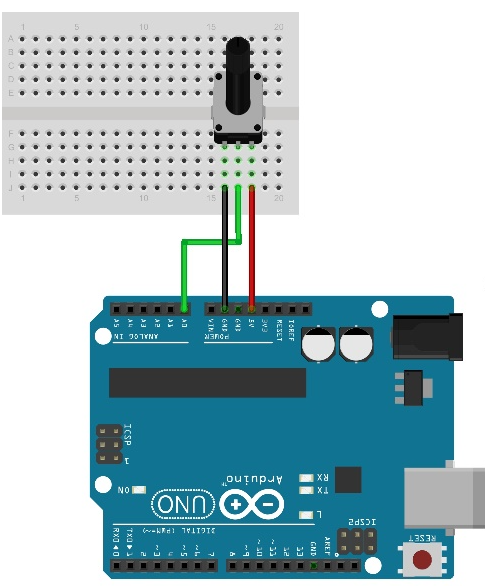
Potentiometer Pinout :

- Ground –> GND
- Vcc –> 5V(Vcc)
- Vout–> A0
Circuit Diagram :

Code:
void setup() {
  // initialize serial communication at 9600 bits per second:
  Serial.begin(9600);
}

// the loop routine runs over and over again forever:
void loop() {
  // read the input on analog pin 0:
  int sensorValue = analogRead(A0);

  // print out the value you read:
  Serial.println(sensorValue);
  delay(1);        // delay in between reads for stability
}
Dimmable LED project using Potentiometer :
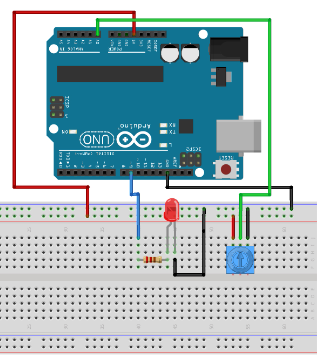
In this project we use a potentiometer to control the brightness of LED. Here is the circuit diagram :

Code :
int led = 9;
int brightness = 0;

void setup() {

  Serial.begin(9600);
  pinMode(led, OUTPUT);
}


void loop() {
  // read the input on analog pin 0:
  int sensorValue = analogRead(A0);
  analogWrite(led, brightness);

  // Map function is used to map the value of potentiometer 0-255
  brightness = map(sensorValue,0,1023,0,255);

  // print out the value you read:
  Serial.println(brightness);
  delay(1);        // delay in between reads for stability
}


