This Arduino project demonstrates an IR remote-controlled stepper motor system using the popular 28BYJ-48 stepper motor. The user can wirelessly select different motion modes and speeds using an IR remote. The project is built using the AccelStepper library, enabling smooth acceleration, deceleration, and precise motion control.
The system supports multiple predefined motion patterns, including limited-angle oscillation, extended swing, continuous rotation, and timed movement stop. Such functionality makes this project suitable for automation, robotics, camera sliders, smart displays, and educational demonstrations. If you want to make PCB for Controlling Stepper Motor then please check out our this project “PCB Design for Controlling Stepper Motor with Arduino“.

Features of IR Remote Controlled Stepper Motor
- Wireless control using an IR remote
- Three main motion patterns + one timed stop mode
- Multiple speed and acceleration profiles
- Direction reversal logic for swing motion
- Smooth motor control using half-step driving
- Serial monitoring for debugging IR commands
Components used in Remote Controlled Stepper Motor Project
1. Arduino (UNO / Nano / Compatible Board)
Acts as the main controller. It processes IR remote commands and controls the stepper motor accordingly.
2. 28BYJ-48 Stepper Motor
A low-cost, geared stepper motor capable of precise movement. It is driven in half-step mode, providing smoother motion and better resolution.
3. ULN2003 Stepper Motor Driver
Used to drive the 28BYJ-48 motor safely by amplifying the current required by the motor coils.
4. IR Receiver Module
Receives infrared signals from the IR remote and sends decoded values to the Arduino.
5. IR Remote Control
Used by the user to select different motion modes and speeds. Each button corresponds to a specific swing or motion behavior.
6. Jumper Wires & Power Supply
Required for connections and stable motor operation.
Working Principle of IR Stepper Motor Project
IR Command Handling
- The IR receiver continuously listens for remote signals.
- When a button is pressed, its hexadecimal IR code is decoded and displayed on the Serial Monitor.
- Based on the received code, a swing mode is selected.
Motion Modes Explained
Mode 1 – Short Swing (Button 1)
- Motor oscillates ±400 steps
- Moderate acceleration
- Direction reverses after each move
- Suitable for small-angle back-and-forth motion
Mode 2 – Wide Swing (Button 2)
- Motor oscillates ±2000 steps
- Higher acceleration
- Creates a wider swing range
- Useful for larger mechanical movements
Mode 3 – Continuous Rotation (Button 3)
- Motor rotates continuously in one direction
- Extremely large step value is used to simulate infinite rotation
- Ideal for conveyor-style or rotating platforms
Mode 4 – Timed Stop Mode (Button 4)
- Motor runs at low speed
- Automatically stops after 3 seconds
- Demonstrates time-based motion control using millis()
Acceleration & Speed Control
- AccelStepper handles acceleration and deceleration smoothly
- Prevents missed steps and mechanical stress
- Speed and acceleration vary per mode for optimized performance
If you want to control a Stepper Motor over the internet then please read this project “IoT, Stepper Motors Control using ESP32 and Smartphone App“
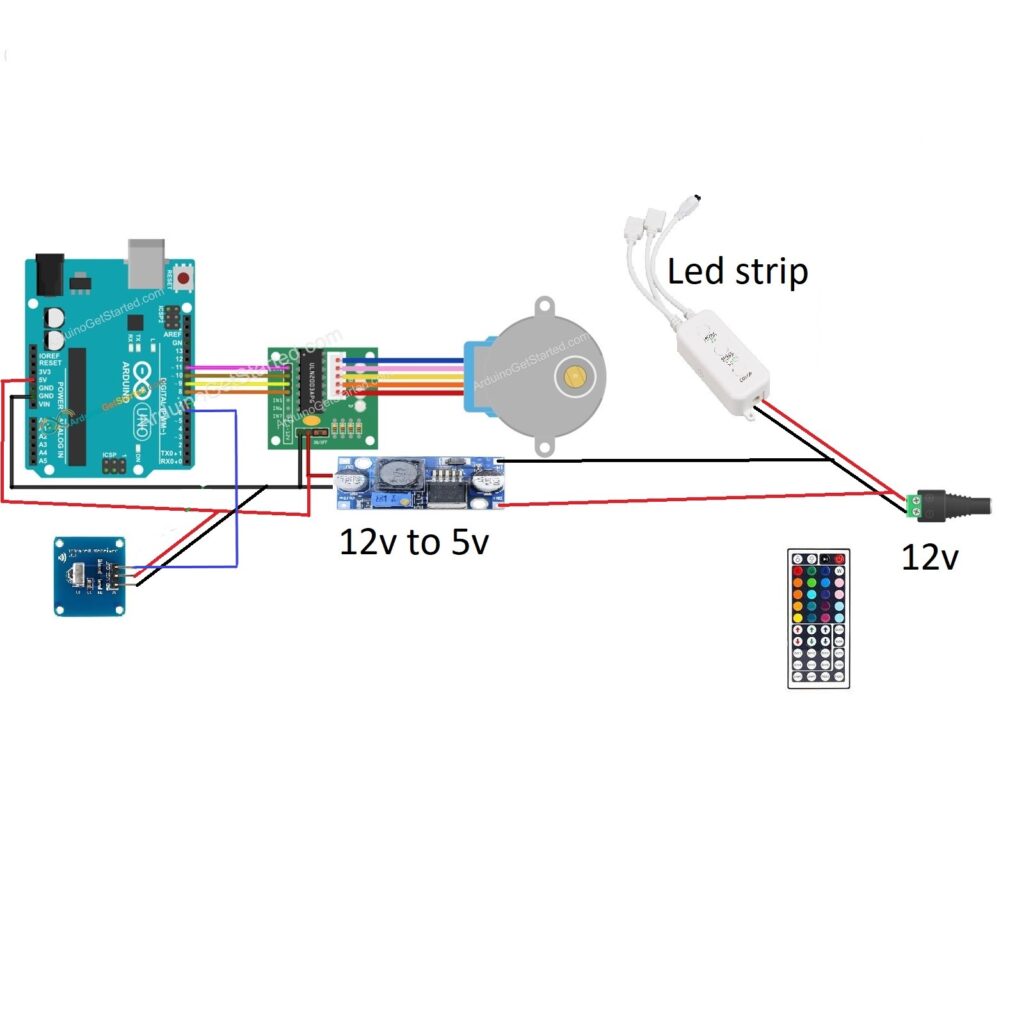
Circuit Diagram of IR Remote and Stepper Motor with Arduino
Arduino Code for Project
#include "IRremote.h"
#include <AccelStepper.h>
#define HALFSTEP 8

#define IN1  11
#define IN2  10
#define IN3  9
#define IN4  8
#define IR_Signal_Pin  6

AccelStepper stepper(HALFSTEP, IN1, IN3, IN2, IN4);
IRrecv irrecv(IR_Signal_Pin);
decode_results results;
unsigned long prevmls;
int swing_mode = 0;
int dir = 1;

void setup()
{ Serial.begin(9600); //Start Serial Communication.
  irrecv.enableIRIn(); // Start the IR_Signal_Pin
}

void loop()
{
  if (irrecv.decode(&results)) {
    irrecv.resume();
    Serial.print("0x");
    Serial.println(results.value, HEX);

    switch (results.value)
    { case 0xFF30CF: //  button 1 pressed
      Serial.println("swing_mode 1 Selected");
        swing_mode = 1;

        break;
      case 0xFF18E7: //  button 2 pressed
      Serial.println("swing_mode 2 Selected");
        swing_mode = 2;
        break;

      case 0xFF7A85: // button 3 pressed
      Serial.println("swing_mode 3 Selected");
        swing_mode = 3;
        break;

      case  0xFF10EF: // button 4 pressed
      Serial.println("swing_mode 4 Selected");
        swing_mode = 4;
        prevmls=millis();
        break;
    }
  }

  if (swing_mode == 1) {
    stepper.setMaxSpeed(1000);
    stepper.setAcceleration(100);
    stepper.run();
    if (!stepper.isRunning()) {
      stepper.move(dir * 400);
      dir *= -1;
    }
  }

  if (swing_mode == 2) {
    stepper.setMaxSpeed(1000);
    stepper.setAcceleration(300);
    stepper.run();
    if (!stepper.isRunning()) {
      stepper.move(dir * 2000);
      dir *= -1;
    }
  }

  if (swing_mode == 3) {
    stepper.setMaxSpeed(1000);
    stepper.setAcceleration(300);
    stepper.run();
    if (!stepper.isRunning()) {
      stepper.move(dir*2147483647);
    }
  }


  if (swing_mode == 4) {
    stepper.setMaxSpeed(500);
    stepper.setAcceleration(50);
    if ( millis()-prevmls>3000)
       {stepper.stop();
       }
      stepper.run();
  }
}
Applications of Remote Controlled Stepper Motor
- Camera pan/tilt mechanisms
- Smart curtain or blind controllers
- Automated display stands
- Educational robotics projects
- IR-controlled mechanical systems
Check Out Our Project: Control Steam Valve with Arduino and Stepper Motor
Conclusion
This project showcases a practical and scalable approach to stepper motor control using Arduino and an IR remote. By combining the AccelStepper library with wireless input, the system achieves smooth, flexible, and user-friendly motor control. The design is modular and can be easily expanded for industrial, educational, or commercial applications.
Need Help in Remote Controlled Stepper Motor Project?
If you need Help/Assistance in IR Remote Controlled Stepper Motor Project with or without Modifications or Customization then you can contact us through WhatsApp.
We can provide you along with Zoom Assistant, through Zoom meeting for Setup of this Project or any other Arduino Project of your need.
For any custom Arduino or Electronics Project, please visit our services page.