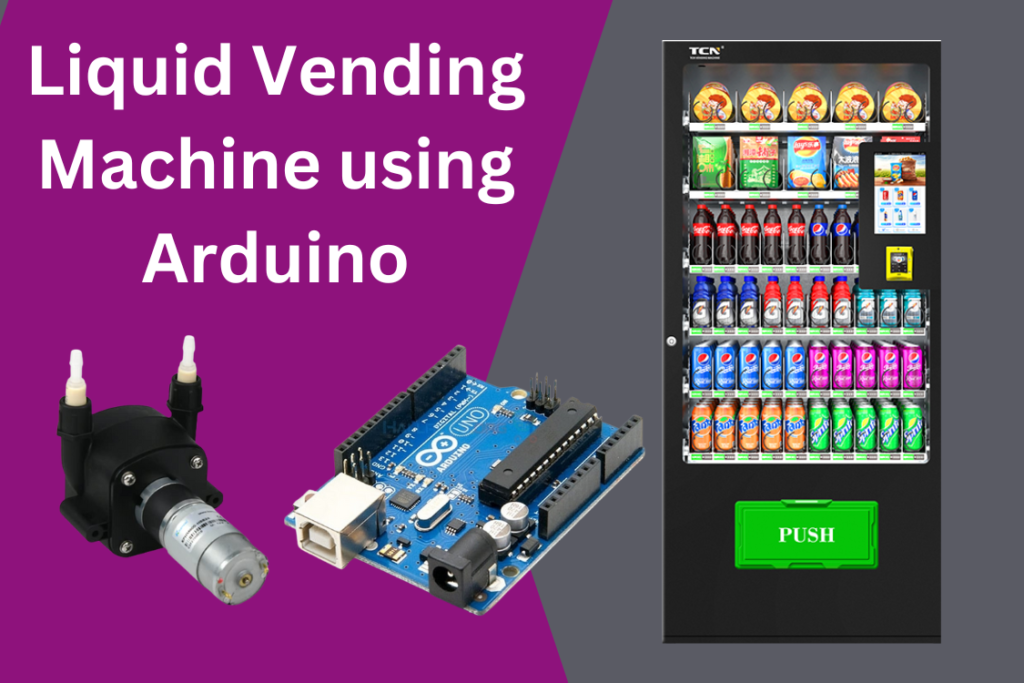
This project is a custom-built liquid dispensing system designed to function as a vending machine for various liquids. It uses 11 Peristaltic Liquid Transfer Pumps (12V) to deliver specific quantities of fluids like juices, syrups, or ingredients in a predefined recipe. A 20×4 I2C LCD display serves as the user interface, controlled by 4 navigation buttons. Additionally, 10 separate buttons trigger specific combinations of liquids, allowing users to choose predefined drink recipes. The entire system is powered by a 12V power supply and controlled via an Arduino Mega. A 16-channel relay module handles activation of the peristaltic pumps.
Components used in Liquid Vending Machine:
| Component | Quantity | Description |
|---|---|---|
| Arduino Mega | 1 | Main microcontroller to control all components |
| Peristaltic Pumps (12V) | 11 | For transferring fluids with precision |
| Relay Module (16-Channel) | 1 | Controls the 11 pumps via Arduino digital pins |
| I2C 20×4 LCD | 1 | Displays fluid quantity, menu, and interaction |
| Tactile Push Buttons | 14 | 4 for LCD control, 10 for liquid combinations |
| 12V Power Supply | 1 | Powers the pumps and relay module |
| Jumper Wires & Connectors | As required | For connections |
| Resistors (10KΩ) | Optional | Pull-down resistors for button stability |
| Breadboard or PCB | Optional | For prototyping and mounting |
System Overview of Liquid Vending Machine:
➤ User Interface:
- 20×4 I2C LCD shows fluid options and amounts.
- 4 Buttons (Next, Back, Enter, Return) allow:
- Scrolling through liquids A–L.
- Editing and saving the amount to be dispensed (in ml).
➤ Drink Selection:
- 10 physical buttons, each mapped to a predefined combination of liquids.
- Pressing a button activates related pumps for specific durations based on the quantity set.
➤ Dispensing:
- Each Peristaltic Pump is connected to a relay.
- When activated, a pump runs for a calculated time (based on ml × time/volume calibration).
- After dispensing, the relay turns off automatically.
➤Power Distribution:
- Arduino Mega is powered via USB or separate 9–12V adapter.
- Peristaltic Pumps (12V each) are powered via a 12V adapter connected to the relay module.
- Make sure grounds of Arduino and 12V supply are common/connected.
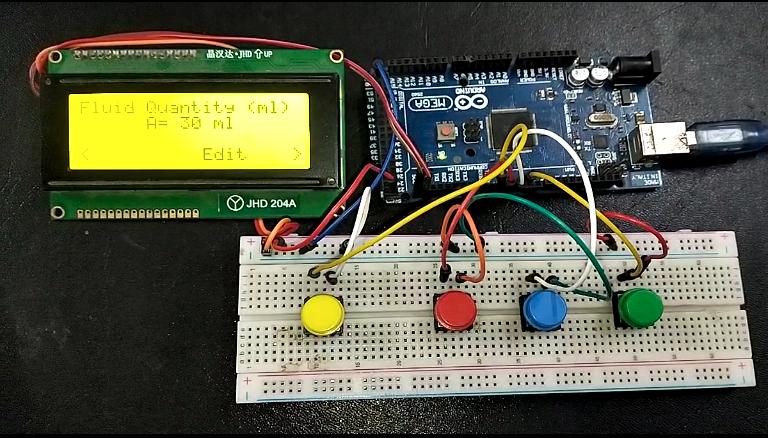
User Interface Workflow:
Screens:
- Main Screen: Shows selected fluid (A–L) and its quantity.
- Edit Mode: Lets user increase/decrease amount and save.
Button Functions:
| Button | Action |
|---|---|
| Next (Pin 16) | Move to next fluid (A → B → … L) |
| Back (Pin 19) | Go to previous fluid |
| Enter (Pin 17) | Increase quantity (in ml) |
| Return (Pin 18) | Decrease quantity or exit edit mode |
Fluid Quantity Logic:
- You define how many milliliters (ml) to dispense per fluid.
- The pump runtime is calculated using:
Duration (ms) = ml × calibration factor (≈67 ms/ml) - You can edit this for each fluid using the LCD interface.
Drink Selection Workflow:
- User presses button1 to button10.
- Each button is mapped to certain liquids.
- Code saves current
millis()time for each active fluid. - A
Run_Pumps()function checks elapsed time:- If within limit: relay ON → pump runs
- If time exceeded: relay OFF
Circuit Diagram of Liquid Vending Machine:
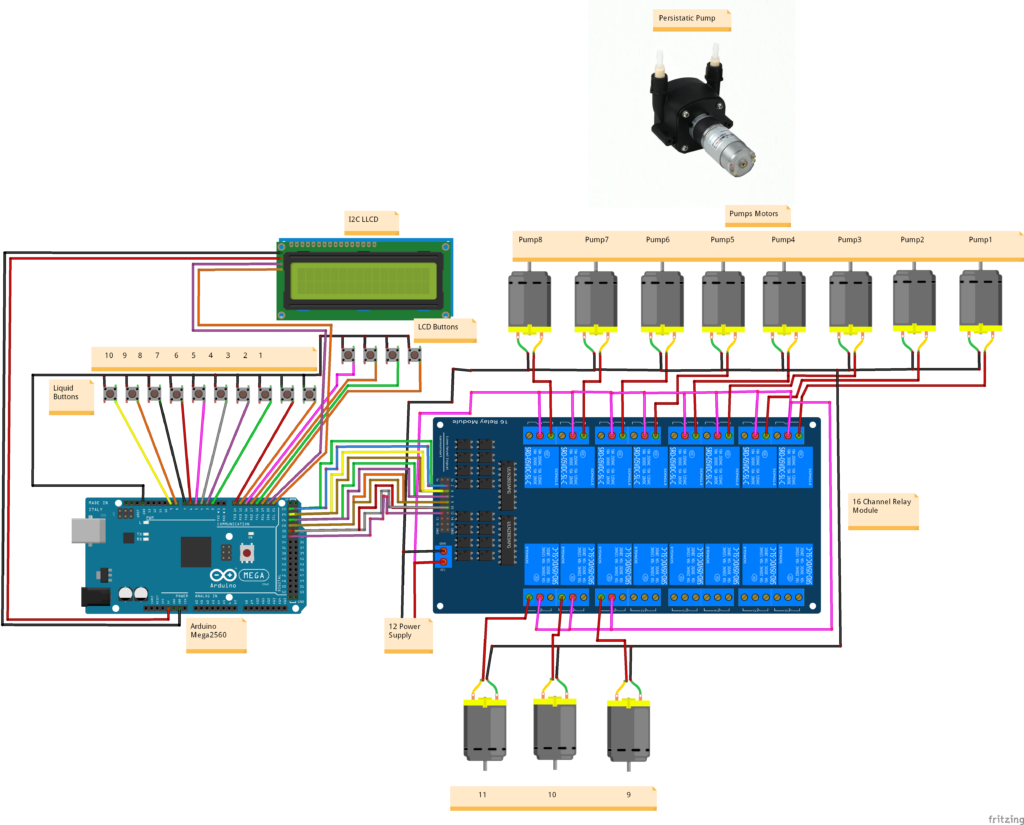
| Component | Arduino Pin | Description |
|---|---|---|
| LCD SDA | A4 | I2C Data |
| LCD SCL | A5 | I2C Clock |
| Button 1 | Pin 15 | Drink Selection Button |
| Relay 1 | Pin 22 | Controls Pump for Liquid A |
| Relay 11 | Pin 32 | Controls Pump for Liquid L |
| LCD Next | Pin 16 | Menu Scroll Right |
Arduino Code for Liquid Vending Machine:
#include <Wire.h>
#include <LiquidCrystal_I2C.h>

// Set the LCD address to 0x27 for a 16 chars and 2 line display
LiquidCrystal_I2C lcd(0x27, 20, 4);

#define bck_scr 19
#define back 18
#define enter 17
#define nxt_scr 16

// Pin numbers for buttons
const int button1Pin = 15;
const int button2Pin = 14;
const int button3Pin = 2;
const int button4Pin = 3;
const int button5Pin = 4;
const int button6Pin = 5;
const int button7Pin = 6;
const int button8Pin = 7;
const int button9Pin = 8;
const int button10Pin = 9;

// Pin numbers for relay module
const int relayPin1 = 22;
const int relayPin2 = 23;
const int relayPin3 = 24;
const int relayPin4 = 25;
const int relayPin5 = 26;
const int relayPin6 = 27;
const int relayPin7 = 28;
const int relayPin8 = 29;
const int relayPin9 = 30;
const int relayPin10 = 31;
const int relayPin11 = 32;

// Amounts for each liquid in milliliters (ml)
int liquidA = 30;
int liquidB = 40;
int liquidC = 30;
int liquidD = 30;
int liquidE = 30;
int liquidF = 20;
int liquidG = 20;
int liquidI = 30;
int liquidJ = 30;
int liquidK = 30;
int liquidL = 30;

unsigned long pa, pb, pc, pd, pe, pf, pg, pi, pj, pk, pl;

bool La = false, Lb = false, Lc = false, Ld = false, Le = false, Lf = false, Lg = false,
     Li = false, Lj = false, Lk = false, Ll = false;
bool Xa = false, Xb = false, Xc = false, Xd = false, Xe = false, Xf = false, Xg = false,
     Xi = false, Xj = false, Xk = false, Xl = false;
bool flag1 = true, flag2 = true, flag3 = true, flag4 = true, flag5 = true, flag6 = true,
     flag7 = true, flag8 = true, flag9 = true, flag10 = true;

int ON = 0;
int OFF = 1;

int C = 0, scr = 0, E = 0, B = 0, R = 0, L = 0, FN = 0;
bool latch1 = true, latch2 = true, latch3 = true, latch4 = true;

char F[11] = { 'A', 'B', 'C', 'D', 'E', 'F', 'G', 'I', 'J', 'K', 'L' };
int Q[11] = { 30, 40, 30, 30, 30, 20, 20, 30, 30, 30, 30 };

void setup() {
  lcd.begin();
  lcd.clear();
  lcd.backlight();
  lcd.print("YOYO");
  Setup_IO_Pins();
  Calculate();
  update_screen();
}
Future Improvements in Liquid Vending Machine:
- Add Buzzer feedback
- Save
Q[]values to EEPROM - Add coin acceptor or touchscreen
- Add Blynk/IoT support for remote monitoring
Applications of Liquid Vending Machine:
- Mini juice vending stations
- Automatic ingredient dispensing
- Multi-liquid dosing systems
- Chemical or pharmaceutical dosing
Conclusion:
This Liquid Vending Machine using Arduino Mega provides a cost-effective, flexible, and modular platform for dispensing customized combinations of liquids. It uses easily available components and can be tailored to a variety of use-cases like cafes, labs, or home automation. With clearly structured code and hardware, the system is reliable and expandable for future features like touchscreen, mobile app integration, or payment systems.
Need This Project?
If you need Liquid Vending Machine Project with or without Modifications or Customization then you can contact us through WhatsApp. We can deliver you this Project in the Following Ways.
Project Code:
we can provide you Project Code for Liquid Vending Machine along with Zoom Assistant, through Zoom meeting for Setup of this Project or any other Arduino Project of your need.
Fully Functional Project with Hardware/Components Shipment:
if you can not make this project yourself then you can use this option. We will assemble the Project and will ship it to your Doorstep with Safe Packaging.
Learn More about the services we offer.