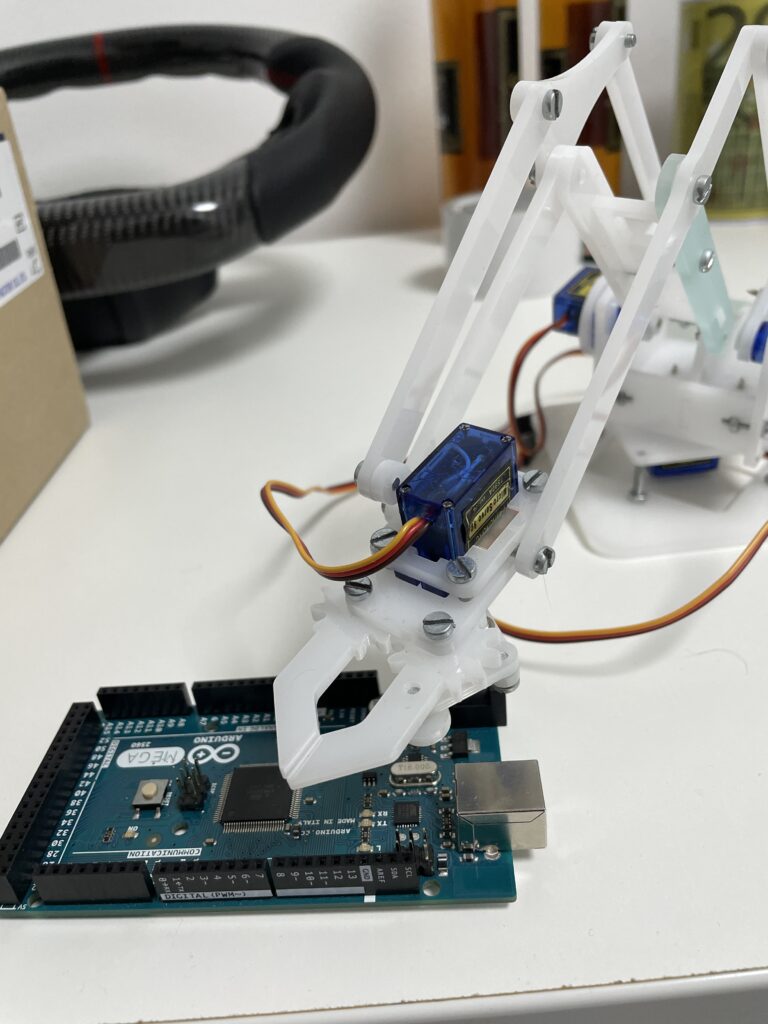
The goal of this project is to design and develop an automated robotic arm that can detect a sugar cube using an LDR (Light Dependent Resistor) sensor, pick it up smoothly using SG90 servo motors, and transfer it to a cup of coffee with precise, jerk-free motion. The robotic arm ensures accurate movement through controlled servo positioning, minimizing sudden jerks for a smooth and efficient operation.
Components used in Automatic Robotic Arm Project:
Below is a list of essential components used in this project, along with their functions:
2.1 Microcontroller & Sensors
- Arduino Board (UNO or Mega)
- Acts as the central processing unit to control servo motors and process sensor input.
- Receives the signal from the LDR sensor and executes the predefined movement sequence.
- LDR Sensor (Light Dependent Resistor)
- Detects the presence of the sugar cube based on changes in light intensity.
- Functions as a trigger to initiate the robotic arm movement.
2.2 Actuators (Servo Motors)
- 4 x SG90 Servo Motors
- Base Servo: Rotates the arm left or right.
- Shoulder Servo: Moves the arm up and down.
- Elbow Servo: Adjusts the middle section for proper reach.
- Gripper Servo: Opens and closes to grab and release the sugar cube.
2.3 Power Supply & Electronics
- External Power Supply (5V, 2A or More)
- Provides stable power to servos for smooth operation.
- Prevents Arduino from experiencing voltage fluctuations.
- Resistors (10KΩ, 1KΩ)
- Used to create a voltage divider circuit for the LDR sensor.
- Jumper Wires & Breadboard
- Connects all components.
- Acrylic/3D Printed Robotic Arm Structure
- Physical framework to hold the servos and maintain structural integrity.
Working Principle of Automatic Robotic Arm:
3.1 Detection Phase:
- The LDR sensor continuously monitors ambient light.
- When a sugar cube is placed over it, light intensity decreases.
- This triggers the Arduino to start the robotic arm movement.
3.2 Activation Phase:
- Once the sugar cube is detected, the Arduino sends signals to the servo motors.
- The robotic arm moves according to predefined positions to pick up the sugar cube.
3.3 Pick-up Motion:
- The base servo rotates to align the arm with the sugar cube.
- The shoulder and elbow servos lower the gripper near the sugar cube.
- The gripper servo closes gently to hold the cube.
3.4 Transfer Motion:
- The arm lifts smoothly to prevent sudden movements.
- The base rotates toward the coffee cup.
- The arm lowers gently to place the sugar cube into the cup.
3.5 Release & Reset:
- The gripper opens to drop the cube.
- The arm returns to its original position, ready for the next operation.
Features of Automatic Robotic Arm:
Jerk-Free Movement:
- Motion is carefully programmed using PWM (Pulse Width Modulation) to ensure smooth transitions.
- Servo speeds are adjusted with small incremental movements for fluidity.
✅ Precision & Automation:
- The arm follows a predefined set of movements to ensure accuracy.
- The entire process is automated, reducing human intervention.
✅ Stable Power Supply:
- Servos are powered externally to prevent voltage drops, ensuring smooth movement.
✅ Non-Contact Sensing:
- The LDR sensor ensures a reliable and non-contact method of detecting the sugar cube.
✅ User-Friendly Design:
- Can be operated with minimal setup.
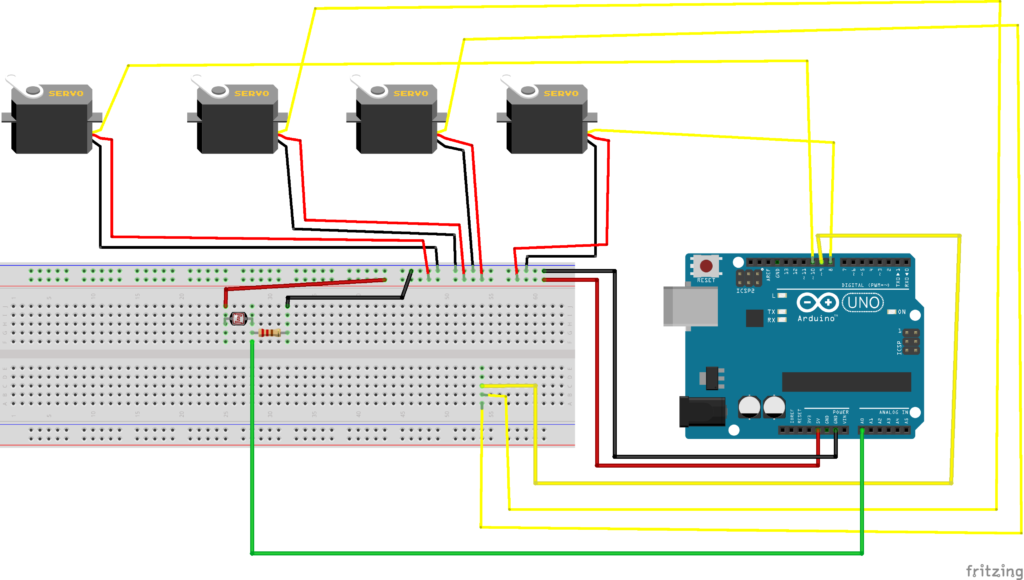
Circuit Diagram of Automatic Robotic Arm Project:
Code for Automatic Robotic Arm Project:
#include <Servo.h>

Servo servo1; //base servo
Servo servo2; //2 servos
Servo servo3; //picker servo

int ldr = A0;
int val;

int angle1 = 180;
int angle2 = 90;
int angle3 = 90;

void setup() {
  servo1.attach(8);
  servo2.attach(9);
  servo3.attach(10);

  servo3.write(angle3);
  servo2.write(angle2);
  servo1.write(angle1);

  pinMode(ldr, INPUT);
  Serial.begin(9600);

}


void loop()
{
  val = analogRead(ldr);
  Serial.println(val);
  if (val <= 500) {
//    Serial.println("condition checked");

    //base position
    for (angle1 = 180; angle1 > 70; angle1--) {
      servo1.write(angle1);
//      Serial.println("base goes to 180 70");
      delay(10);
    }
    //2 servo position
    for (angle2 = 90; angle2 < 130; angle2++) {
      servo2.write(angle2);
//      Serial.println("2 servo goes to 90 130");
      delay(10);
    }
    //picker position
    for (angle3 = 90; angle3 > 20; angle3--)
    {
      servo3.write(angle3);
//      Serial.println("picker servo goes to 90 20 ");
      delay(10);
    }
Applications Automatic Robotic Arm:
This robotic arm can be adapted for various real-world applications:
- Food & Beverage Automation:
- Automating sugar dispensing in cafes or restaurants.
- Enhancing robotic baristas for precise ingredient handling.
- Robotics & AI Learning:
- Ideal for students and hobbyists to learn about servo motor control, Arduino programming, and automation.
- Industrial Automation:
- Can be extended to handle small object sorting and packaging in manufacturing units.
- Medical & Laboratory Automation:
- Used for handling small test samples in automated laboratory environments.
- Assistive Robotics:
- Can be modified for individuals with mobility impairments to help in daily activities.
Conclusion:
This project successfully demonstrates the integration of an Arduino-controlled robotic arm to perform precise, jerk-free object transfer. Using servo motors and an LDR sensor, the arm can detect and transfer sugar cubes efficiently. The smooth and controlled movement ensures accurate object placement without sudden jerks.
By refining servo speed control, adding machine learning for object recognition, or incorporating wireless control, this robotic arm can be further enhanced for more complex automation tasks.
Would you like me to add an Arduino code sample for this project?
Need This Project?
If you need this Project with or without Modifications or Customization then you can contact us through WhatsApp. We can deliver you this Project in the Following Ways.
Project Code:
we can provide you Project Code along with Zoom Assistant, through Zoom meeting for Setup of this Project or any other Arduino Project of your need.
Fully Functional Project with Hardware/Components Shipment:
if you can not make this project yourself then you can use this option. We will assemble the Project and will ship it to your Doorstep with Safe Packaging.
Learn More about the services we offer.